Purses and bags are fun and easy to knit -- textured yarns, felting techniques, and easy patterns combine to make these attractive fashion accessories. Our free knitting patterns for purses and bags range from practical to fanciful, but they all look great on your arm. Use these patterns to embark on your next purse-knitting project.
The simple stripes felted bag isfunctionaland stylish.
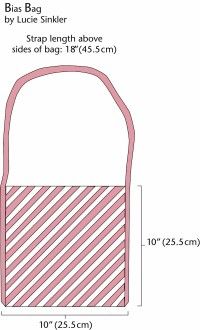
Knitting on the bias creates a diagonal design that delights the eye.
This is the bag you've been dreaming of! Two sumptuous yarns knit on the bias combine to make this classic design unforgettable.
Size
Bag: 10x10" (25.5x25.5cm)
Advertisement
Strap: 28" (71cm) long
What You'll Need
Yarn: Silk/rayon blend yarn, worsted weight, about 300 yards (274m); 100% cotton sport weight yarn (use doubled), about 230 yards (210m)
We used: Indra silk (70% silk, 30% viscos; about 300 yards [274m] per 71/2-oz juggle ball): all assorted colors -- no 2 balls are exactly alike (yarn A), 1 skein; Zitron Samoa (100% cotton; 115 yards [105m] per 50g skein): #38 (yarn B), 2 skeins
Needles: US size 8 (5mm)
Notions: Long sewing pins; tapestry needle
Gauge
16 stitches and 32 rows=4" (10cm)
Notes
This purse is knitted in garter stitch (knit every row) placed on the bias. We used 2 yarns and alternated them every 2 rows. You will start knitting in 1 corner of the body, first creating a triangle, then knit on an angle to complete a rectangle knitted on the bias.
When working with yarn B, use 2 strands held together as 1.
The strap is knitted separately and stitched in place.
Make the BagSection 1With yarn A, cast on 3 stitches.
View Enlarged ImageThe bias bag is a perfect mid-sizeshoulder bag.
Row 1: Knit.Row 2: Knit into front and back of next 2 stitches, knit 1. (5 stitches)Row 3: Knit.Row 4 (right side): With 2 strands held together as 1, join yarn B (do not cut yarn A). With yarn B, knit into front and back of first stitch, knit 2, knit into front and back of next stitch, knit 1. (7 stitches)Row 5: Knit.Row 6: With yarn A, knit into front and back of first stitch, knit 4, knit into front and back of next stitch, knit 1. (9 stitches)
Row 7: Knit.
Row 8: With yarn B, knit into front and back of first stitch, knit 6, knit into front and back of next stitch, knit 1. (11 stitches)
Row 9: Knit.
Continue in striped pattern, increasing on first and second-to-last stitches until there are 51 stitches on needle. End with wrong-side row (all knit, no increases).
Section 2
Maintaining established striped pattern, continue as follows:
Row 1 (right side): Knit into front and back of first stitch, knit 48, knit 2 together.
Row 2: Knit.
Repeat these 2 rows, changing colors every 2 rows until piece measures 21" (53.5cm) from cast-on corner. End with row 2.
Section 3
Maintaining established striped pattern, continue as follows:
Next row: Work slip slip knit decrease, knit across row until 2 stitches remain, knit 2 together.
Row 2: Knit.
Repeat these 2 rows until 3 stitches remain. Bind off loosely.
Make the Strap
With 2 strands of yarn B held together as 1, cast on 8 stitches.
Work in garter stitch (knit every row) until strap measures 48" (122cm). Bind off loosely.
Finishing
Fold body of purse in half with right sides together. The straight edge with 3 bind-off stitches and the straight edge with 3 cast-on stitches are together at the opposite end from the folded edge, forming the bag opening. Mark across fold line with pins. Unfold bag. Match center of strap cast-off edge to marked fold line on bag. Pin in place. With 1 strand of yarn B threaded on tapestry needle, sew together using backstitch. Pin strap to matching edges and sew in place. Repeat for cast-on edge of strap on other side of purse. Weave in loose ends to wrong side of purse. Turn purse to right side. Remove all pins.
Our next pattern is the perfect accessory for trips to the market -- on the next page, learn to knit our felted market bags.
For more helpful knitting tips and interesting patterns, try:
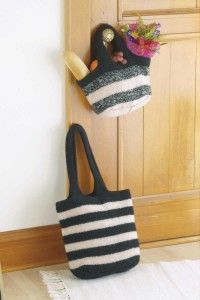
The large and small felted market bags are versatile and attractive.
A hand-knit market bag is just the thing for a trip to the neighborhood farmers' market. Both the large tote and the smaller bag make a statement with bold stripes; the smaller bag goes a step further by incorporating the fashionable "tweed" look.
Yarn: Large bag: 100% medium weight wool yarn: 600 yards (549m) color A; 400 yards (366m) color B. Small bag: 100% medium weight wool yarn: 150 yards (137m) color A and color B. Superwash wool or synthetics will not felt; do not use for felting projects.
We used: Cascade Yarns Cascade 220: #8555 black (yarn A), 3 balls for large bag, 2 balls for small bag; #8021 natural (yarn B), 2 balls for large bag, 2 balls for small bag
Needles: US size 101/2 (6.5mm) circular 24" (61cm) long
Miscellaneous: Washing machine, laundry detergent, pillowcase or lingerie bag
Notes: Instructions are written for large bag; numbers for small bag are in brackets. All pieces are worked holding 2 strands of yarn together.
Make the Handles
Holding 2 strands of color A together as 1, cast on 10 stitches. Work in stockinette stitch for 64 [30] rows. Cut yarn, leaving a 4" (10cm) tail; slip stitches onto holder. Pick up 10 stitches at cast-on edge, and work in stockinette stitch for 64 [30] rows. Cut yarn, leaving a 4" (10cm) tail; slip stitches onto another holder.
Repeat to make the second handle, except do not cut the yarn in the last step. Leave those stitches on needle. You will have 2 knitted strips with live stitches on both sides.
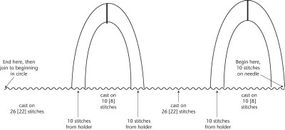
View Enlarged Image Attach the handles to the felted market bag while casting on stitches for the main bag body.
Make the Bag Body
Attach the handle: Using the second handle with 10 stitches and the working yarn (color A) attached, use the cable cast-on method to cast on 10 [8] stitches in front of the stitches on the needle. (20 [18] stitches)
Fold the knit strip in half to create the handle. Transfer 10 stitches from stitch holder onto working needle; knit across these stitches (30 [28] stitches). Cast on 26 [22] stitches using the cable cast-on method, and then knit across 10 stitches from first handle (66 [56] stitches). Cast on 10 [8] stitches in front of these stitches, knit across second set of 10 stitches from first handle, and then cast on 26 [22] stitches using the cable cast-on (112 [100] stitches). Join work into a circle, taking care not to twist stitches. Place stitch marker in front of first stitch worked to indicate beginning of round.
Rounds 1, 3, 5, and 7: Purl.
Rounds 2, 4, 6, and 8: Knit.
Round 9: Knit until 13 [11] stitches before the marker. Place second stitch marker (use another color to distinguish from first marker). The second marker will indicate beginning of round for color changes. Cut yarn, leaving 4" (10cm) tail to weave in later.
Create color sequence: For large bag, work [9 rounds color B, 9 rounds color A] 4 times (72 rounds). For small bag, holding 1 strand color A and 1 strand color B together as 1, knit 11 rounds. With 2 strands color B held together as 1, knit 11 rounds. Change to 1 strand A and 1 strand B held together, and knit 11 rounds. Using 2 strands B, knit 4 rounds.
Make the Bag Base
Knit 8 [8] stitches past second marker, then bind off 40 [34] stitches. Knit across next 16 stitches, place them on holder, bind off 40 [34] stitches, then knit across 16 stitches remaining on needle. Work 35 [27] rows in stockinette stitch. Bind off.
Place stitches from holder back on needle, and rejoin yarn. Work 36 [28] rows in stockinette stitch. Bind off.
Finishing
Thread tapestry needle with 18" (46cm) strand of yarn, and seam center of base together using mattress stitch. Rethread yarn as necessary. Starting in middle of bag base, whipstitch bound-off edges from bag body to base sides. Base piece will be slightly longer and will need to be eased to the sides (knitted fabric shrinks more lengthwise). Weave in all loose ends to wrong side of bag.
Felt the bag.
Our next pattern, the himalayan silk purse, is made with luxurious yarns for bright colors and lush textures. Keep reading for the himalayan silk purse knitting pattern.
For more helpful knitting tips and interesting patterns, try:
Somewhere between the plastic shopping bag in which you brought your yarn home and an expensive craft box or tote bag, there's a whole range of great ways to get your yarn from one place to another.
Try an oversize handbag, a backpack, or a wicker basket. Or how about shopping in the hardware store for a tool "apron" with pockets that hang over a five-gallon bucket? You can store yarn in the bucket, put needles and gadgets in the pockets, and even use the bucket as a seat when you want your knitting to be portable.
Of course, there's always the opportunity to design and knit a bag just like either of these in your favorite colors, adding pockets and embellishments to make it uniquely your own. You may want to add lining to the inside so needles don't slip out!
Advertisement
Free Himalayan Silk Purse Knitting Pattern
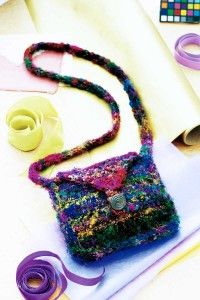
This attractive purse is a perfect companion for evening attire.
This colorful purse is knit in three pieces and sewn together on the right side of the work to create a decorative ridged edge. The strap wraps along the edges and bottom, providing depth.
Size
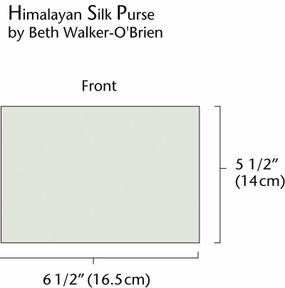
Width: 61/2" (16.5cm)
Advertisement
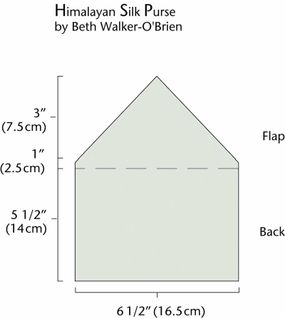
Height: 51/2" (14cm) with flap closed, not including strap
What You'll Need
Yarn: Heavy worsted weight yarn, about 80 yards (110m); worsted weight cotton waste yarn, about 1 yard (.9m)
We used: Himalaya Yarn Recycled Silk (100% silk; 80 yards [73m] per 100g skein): all assorted colors (no 2 hanks are exactly alike), 2 skeins
Needles: US size 7 (4.5mm)
Notions: Size G (4.25mm) crochet hook; 2 open-ring stitch markers; tapestry needle; stitch holder; long sewing pins; decorative button, approximately 1" (2.5cm) diameter
Gauge
16 stitches and 38 rows=4" (10cm) in Half Linen Stitch pattern
View Enlarged Image The decorative himalayan silk purse is sized to double as a clutch.
Half Linen Stitch
Note: All stitches are slipped purlwise. Slipping the first stitch in each row creates a chainlike selvage at each side of the work that will be used later when assembling the pieces.
Row 1 (wrong side): Slip 1 with yarn in front, *purl 1, slip 1 with yarn in back; repeat from * until 1 stitch remains, knit 1.
Row 2: Slip 1 with yarn in front, knit across.
Row 3: Slip 1 with yarn in front, *slip 1 with yarn in back, purl 1; repeat from * until 1 stitch remains, knit 1.
Row 4: Slip 1 with yarn in front, knit across.
View Enlarged Image When knitting this purse, you'll begin with the front section.
Make the Front
With crochet hook, needle, and main yarn, cast on 26 stitches using the crochet chain cast-on method. Work Half Linen Stitch pattern until piece measures 51/2" (14cm) ending on wrong-side row. Bind off all stitches loosely.
Make the Back
Work same as front until piece measures 51/2" (14cm) ending on wrong-side row (do not bind off). Place an open-ring stitch marker at each side edge in this last row.
Work next right-side row as follows: Slip 1 with yarn in front, slip slip knit decrease, work Half Linen Stitch pattern across row until last 3 stitches, knit 2 together, knit 1. (24 stitches remain)
Continue working in Half Linen Stitch pattern until piece measures 6.5" (16.5cm) from cast-on edge, ending with wrong-side row.
Begin Decreases
Next right-side row: Slip 1 with yarn in front, slip slip knit decrease, knit across row until 3 stitches remain, knit 2 together, knit 1. (22 stitches)
Next wrong-side row: Continue in established Half Linen Stitch pattern.
Repeat the last 2 rows until 4 stitches remain.
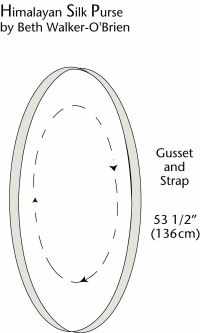
The strap and gusset are knitted as one circular piece.
Next row (wrong side): Purl 2 together, cut yarn leaving at least a 12" (30.5cm) tail (tail will be used later to crochet-chain a loop to close around button), thread tail through remaining stitch and pull tail to tighten and secure stitch. Leave stitch markers in place until assembly is completed.
Make the Gusset (Strap)
Note: The gusset is a knitted strip, 1" (2.5cm) wide, joined in a circle. It connects the front and back pieces of the purse and also serves as the purse strap.
With crochet hook, needle, and waste yarn, cast on 4 stitches using the crochet chain cast-on method.
With silk yarn and needle, work Half Linen Stitch pattern until piece measures 531/2" (136cm) ending with wrong-side row. Cut yarn leaving 12" (30.5cm) tail and thread tail on tapestry needle. Seam gusset ends together as follows:
Remove waste yarn from cast-on edge and place the 4 stitches onto other needle. Holding the 2 needles parallel in your left hand, and with wrong sides of work held together, graft the stitches together using Kitchener stitch. You have now joined the gusset into a circle about 531/2" (136cm) in circumference.
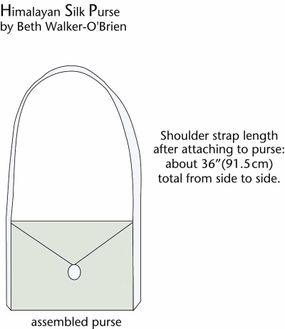
View Enlarged Image Once the front, back, and gusset pieces are done, you'll assemble the finished bag.
Assemble the Purse
Seam gusset to front piece as follows: With right sides facing, wrong side of purse front and one wrong side edge of gusset held together, pin gusset side edge along one 51/2" (14cm) side edge of front, then along the 61/2" (16.5cm) bottom edge, and then along the second 51/2" (14cm) side edge of front, leaving the remaining 61/2" (16.5cm) front top edge open. Thread tapestry needle with about a 20" (51cm) strand of main yarn. With right side of work facing and using backstitch, seam pieces together along the 3 pinned edges, joining one side edge of gusset to purse front. There should be about 36" (91.5 cm) of gusset piece remaining free and unseamed (this will later serve as the shoulder strap). Rethread tapestry needle as necessary.
Cut yarn leaving 4" (10cm) tail, weave yarn tail through stitches on wrong side of gusset. Remove all pins.
Seam gusset to back as follows: With purse back and second side edge of gusset held together with wrong sides together, pin gusset to back, aligning back (beginning at one open-ring marker) along gusset edge to match the same length of gusset already seamed to purse front (see schematic and assembled purse images). Do not pin or sew the flap to gusset. Thread tapestry needle with about 20" (51cm) main yarn. Using backstitch, seam around 3 edges of back (ending at second open-ring marker). Cut yarn leaving 4" (10cm) tail, weave yarn tail through stitches on wrong side of gusset. Remove all pins and markers.
Make the Button Loop
Using the 12" (30.5cm) tail at the top of triangular purse flap, crochet a chain long enough to fit around the button. Fasten the end of the chain to the first chain to form a loop. Fasten off yarn and using tapestry needle or crochet hook, weave loose end through several stitches on wrong side of purse flap. Sew button to front of purse, aligning with loop.
Weave in all loose ends.
If you're looking for a quick knit and a spacious, functional bag, you'll want to check out our next pattern. Go to the next page for the simple stripes felted bag pattern.
For more helpful knitting tips and interesting patterns, try:
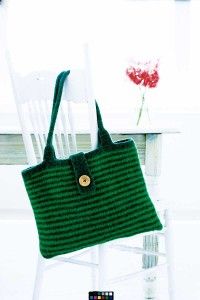
This bag might be big, but the knitting time is short and easy.
This generously sized shoulder bag knits up quickly with big needles and a double strand of yarn. Load it up, sling it over your shoulder: This bag looks great wherever you go.
Size
Before felting: about 20x18" (51x45.5cm)
Advertisement
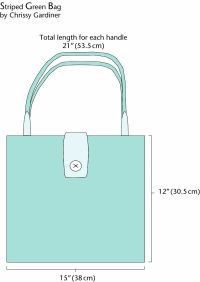
After felting: about 12x15" (30.5x38cm)
What You'll Need
Yarn: 100% wool worsted weight yarn, about 660 yards (604m) main color; 440 yards (402m) coordinating color
We used: Cascade Quatro (100% wool; 220 yards [201m] per 100g ball): #9435 (yarn A), 3 balls; Cascade 220 (100% wool; 220 yards [201m] per 100g ball): #8903 (yarn B), 2 balls
Needles: US size 13 (9mm) straight; US size 13 (9mm) double-pointed, set of 2
Notions: Tapestry needle; long sewing pins; 11/2" (4cm) round button; craft knife; sewing needle and thread to match yarn
Gauge
10 stitches and 14 rows=4" (10cm) in stockinette stitch (before felting)
Notes
Superwash wool and synthetics will not felt; do not use for felting projects.
When changing colors, drop the old color and pick up the new color from under the old one, carrying the old color loosely upward along the side. This enables you to work the stripes without cutting the yarn.
Use 2 strands of yarn held together as 1 throughout.
Make the BagHolding 2 strands of yarn A together as 1 and using straight needles, loosely cast on 60 stitches. Rows 1-5: Knit. At the end of row 5, drop yarn A (do not cut).Row 6 (right side): Join yarn B (2 strands held together as 1), knit.Row 7: Purl. Drop yarn B.Row 8: Pick up yarn A, knit.
Row 9: Purl. Drop yarn A.
Rows 10-127: Repeat rows 6-9 until there are a total of 66 stripes, not counting the initial border (rows 1-5).
Rows 128 and 129: Repeat rows 6 and 7 for a 67th stripe.
Rows 130-134: Pick up yarn A and repeat rows 1-5.
Continuing with yarn A, loosely bind off 26 stitches, knit next 7 stitches (now there are 8 stitches total on the right needle, including the stitch remaining after bind-off), beginning with next 2 stitches bind off remaining 26 stitches to end of row.
Make the Button Tab
With wrong side facing, reattach yarn A (2 strands held together as 1) to edge of 8 stitches remaining on needle.
Row 1: Knit 1, purl 6, knit 1.
Row 2: Knit.
Rows 3-28: Repeat rows 1 and 2 thirteen times more.
Row 29: Repeat row 1.
Row 30: Knit.
Loosely bind off all stitches.
Make the Handles (Make 2)
With 2 strands yarn A held together as 1 and using double-point needles, cast on 6 stitches leaving 8" (20.5cm) tail. Turn, and work in rows on 2 double-point needles as follows:
Continue with 2 double-point needles and work 4-stitch I-cord for 25" (63.5cm).
Next row: Knit in front and back of first stitch, knit 2, knit in front and back of last stitch. Turn work. (6 stitches on needle)
Knit next 8 rows.
Loosely bind off all stitches, cut yarn leaving 8" (20.5cm) tail.
Repeat steps for second handle.
Finishing
Fold body of bag in half with right sides together, bringing cast-on and bound-off edges together. Matching stripes, and using either yarn (2 strands held together) threaded on tapestry needle, whipstitch side seams together. Turn bag right side out. Pin each end of one handle to top edge of bag back, about 12 stitches in from each side seam. Pin each end of second handle to top edge of front of bag, about 12 stitches in from each side seam. Using the 8" (20.5cm) tail remaining from cast-on or bind-off threaded on tapestry needle, firmly whipstitch handles to bag body. Weave in all yarn ends to wrong side of work.
Felting
Felt bag in washing machine.
Add Button
Once bag is dry, cut buttonhole in button tab using craft knife. Using sewing needle and thread, sew button to bag body beneath buttonhole.
These fashionable and fun-to-knit bags are a great addition to any knitter's repertoire -- and they're good-looking accessories to spice up your wardrobe.
For more helpful knitting tips and interesting patterns, try: