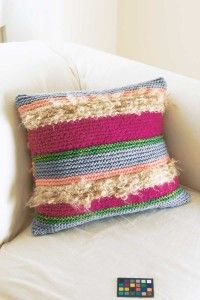
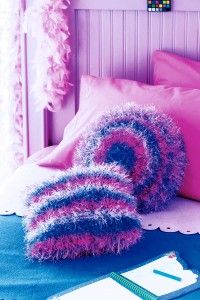
This multicolor pillow is made in two pieces, with a flap on one side that folds over to form a buttonhole closure. To add extra character, the curly, thick yarn is woven, not knit, between the stitches.
Techniques
Backstitch
Binding Off -- BO
Blocking
Cable Cast-On
Casting On -- CO
Garter Stitch
Stranding Yarn
Weaving In Yarn Tails
Size
18x18" (46x46cm) with side 1 flap folded
Gauge
12 stitches/20 rows=4" (10cm) using 2 strands worsted weight yarn in garter stitch
What You'll Need
Yarn: 800 yards [732m]/16oz [454g] worsted weight wool yarn (100% wool): 8oz (226g) color A and color C; 4 oz (102g) colors B, D, and E; 30 yards [28m]/16oz [454g] Thick Spun, a specialty handspun yarn (100% wool): 8 yards [7.4m] color C-THICK
We used: La Lana Wools Millspun Knitting Worsted (100% wool): Lavender (yarn A), 2 skeins; Madder-pale (yarn B), 1 skein; Indian Paint Brush-light (yarn C), 2 skeins; Brazilwood III (yarn D), 1 skein; Apple-Green (yarn E), 1 skein. La Lana Wools Thick Spun (100% handspun, super bulky-weight wool): Indian Paint Brush (yarn C-THICK), 8 yards
Needles: US size 10 (6mm) circular 24" (61cm) long or 14" (35.5cm) straight
Notions: Safety pin; stitch markers; tapestry needle; sewing needle and thread to match; five 11/4" (3.2cm) buttons; 16x16" (40.5x40.5cm) pillow form
Make Side 1 (Back)
Holding 2 strands of yarn A together as 1, cast on 57 stitches. Work 8 rows in garter stitch. Cut yarn, leaving 4" (10cm) tails. (Leave a 4" [10cm] yarn tail each time you change yarns, except with C-THICK; follow the instructions below for this yarn.)
Change to yarn B, and holding 2 strands together as 1, work 2 rows in garter stitch.
Begin Stranded Thick Spun Pattern (Worked Over Garter Stitch)
Row 1: (right side) With 2 strands yarn C, knit all stitches. Place a safety pin on this side to mark it as right side of work.
Row 2: (wrong side) Knit.
Row 3: (right side) With 2 strands yarn C, knit 1; with 1 strand C-THICK and leaving a 1" (2.5cm) tail on wrong side of work, *bring C-THICK yarn forward from wrong side to right side, traveling between the last stitch worked on the right needle and the first stitch on the left needle. Drop C-THICK in front and leave it there; don't cut yarn. With 2 strands yarn C, knit next 3 stitches. Pick up C-THICK and strand across the 3 stitches just worked on the right side; take yarn to wrong side of work, traveling between stitches on right and left needles. Drop C-THICK in back and leave it there. Using 2 strands yarn C, knit 1**. Repeat from *
to ** across row (ending with C-THICK on wrong side of work). Using 2 strands yarn C, knit remaining stitch.
Row 4: With 2 strands yarn C, knit.
Row 5: With 2 strands yarn C, knit.
Row 6: (wrong side) *With 2 strands yarn C, knit 1; bring 1 strand C-THICK up from row 3 and take it to right side of work, traveling between stitches on right and left needles. Drop C-THICK on right side of work and leave it there. With 2 strands yarn C, knit 1. Strand C-THICK across the right side of the 3 stitches just worked and then return C-THICK to wrong side, traveling between the right and left needles. Drop C-THICK on wrong side and leave it there**. Repeat from * to ** across row. With 2 strands yarn C, knit remaining stitch.
Row 7: Knit.
Row 8: Knit.
Row 9: (right side) Repeat row 3. Cut C-THICK, leaving 1" (2.5cm) tail to weave in later.
Row 10: (wrong side) Knit. Cut yarn C, leaving about 4" (10cm) tails to weave in later.
Begin Woven Stitch Pattern
Change to yarn D, and work as follows:
Row 1: (right side) *Knit 1, slip 1 with yarn in front**; repeat from * to ** across row to last stitch, end with knit 1.
Row 2: (wrong side) Purl.
Row 3: Knit 1, *knit 1, slip 1 with yarn in front**; repeat from * to ** across row, end with knit 2.
Row 4: Purl.
Work 3 repeats of Woven Stitch pattern (12 rows).
Change to yarn E, knit 4 rows. Change to yarn A, knit 10 rows. Change to yarn B, knit 4 rows. Change to yarn C and C-THICK, and work 10 rows in Stranded Thick Spun pattern. Change to yarn D, work 4 rows in Woven Stitch pattern. Change to yarn E, knit 4 rows. Change to yarn A, knit 8 rows.
Next row: (right side) Continuing with yarn A, purl across row to form turn line for flap. Knit 8 rows.
Next row: (wrong side) Knit across row, placing stitch markers before stitches 6, 17, 28, 39, and 50 to mark for buttonhole placements.
Buttonholes
Next row: (right side) Make a 2-stitch, 1-row buttonhole at each marker as follows: Knit up to (but not including) the first marked stitch, then bring yarn between needles to front of work, slip next stitch (the marked stitch) from left needle to right needle, take yarn between needles to back of work and drop it. *Slip next stitch from left needle onto right needle, then pass second stitch on right needle (counting from needle tip back) over first stitch and drop it off the needle (the same as binding off). Repeat from * once more (2 stitches are bound off). Return the last slipped stitch to left needle, and turn work to wrong side. With yarn in back, cable cast-on 3 stitches (1 more stitch than you bound off). Turn work back to right side. With yarn in back, slip first stitch from left needle to right needle, then pass the extra cable cast-on stitch over the slipped stitch to close buttonhole. Knit to next marked stitch, and make another buttonhole in same way. Repeat, making a buttonhole at each marked stitch, then knit to end of row.
Next row: (wrong side) Knit.
Next row: Bind off all stitches. Cut yarn, and thread 4" (10cm) yarn tail on tapestry needle. Weave across stitches on wrong side to secure. Repeat with each yarn tail except C-THICK. With sewing needle and thread, tack down C-THICK ends on wrong side of work.
Make Side 2 (Front)
Holding 2 strands of yarn A together as 1, cast on 57 stitches. Work 4 rows in garter stitch. Cut yarn, leaving 4" (10cm) tail as in side 1. Change to yarn B, and work 2 rows of garter stitch.
Side 2 Stranded Thick Spun Pattern
Row 1: (right side) With yarn C, knit across row. Place a safety pin on this side to mark it as right side of work.
Row 2: (wrong side) Knit.
Row 3: (right side) Knit 1, leaving a 1" (2.5cm) C-THICK tail on wrong side. *Bring yarn forward from wrong side between last stitch worked on right needle and first stitch on left needle. Drop C-THICK. With yarn C, knit 3 stitches. Pick up C-THICK and strand across the right side of 3 stitches just worked. Move C-THICK to wrong side of work, traveling between stitches on right and left needles, and leave it there. With yarn C, knit 1 stitch**. Repeat from * to ** across row (ending with C-THICK on wrong side of work). With yarn C, knit remaining stitch.
Row 4: Knit.
Row 5: Knit.
Row 6: (wrong side) *With 2 strands of yarn C, knit 1, bring C-THICK up from row 3 on wrong side and take it to right side of work, traveling between stitches on right and left needles. Drop C-THICK on right side. With yarn C, knit 3 stitches. Strand C-THICK across right side of 3 stitches just worked and then return it to wrong side, traveling between right and left needles. Drop C-THICK**. Repeat from * to ** across row. With yarn C, knit remaining stitch. Cut C-THICK, leaving 1" (2.5cm) tail.
Change to yarn D, and work 4 rows of Woven Stitch pattern. Change to yarn E, and work 2 rows in garter stitch. Work the following stitch patterns and colors as follows: *With yarn A, work 4 rows in garter stitch; with yarn B, work 2 rows in garter stitch; with yarn C and C-THICK, work 6 rows of Stranded Thick Spun pattern; with yarn D, work 4 rows in Woven Stitch pattern; and with yarn E, work 2 rows in garter stitch**. Repeat from * to ** 3 more times (72 rows total).
With yarn E, work 6 rows in garter stitch. Bind off all stitches. Weave in all loose ends, and tack down C-THICK tails to wrong side of work as in side 1.
Finishing the Curly Striped Pillow
Block both sides to measurements, with side 1 flap folded over to wrong side. Using threaded tapestry needle, with right sides together and wrong sides facing out, sew around both sides and bottom edge with backstitch. Leave the side 1 flap edges open. Turn work to right side and fold flap edges down over the outside of side 2 to form closure. Sew buttons to side 2 opposite buttonhole openings. Insert pillow form, and button the flap closed.
If you're looking for a whimsical design, our next pillow is for you. Go to the next page for our fluffy fun pillow pattern.
For more helpful knitting tips and interesting patterns, try:
