Free Mitten Knitting Patterns

A mom and daughter happily knitting together.
Knitting a pair of cozy mittens is a great way to warm up a chilly winter day. mixetto / Getty Images

Knitting a pair of cozy mittens is a great way to warm up a chilly winter day. Whether you choose to make a pair of mittens as a thoughtful gift or for your own enjoyment, these mittens are sure to keep the wearer toasty warm and stylish.

Even for a beginning knitter, simple step-by-step instructions make these mittens perfectly accessible. Easy-to-read patterns complement and clarify the directions, and photos provide a reference for how the final product will look.

Advertisement

These mitten patterns are very versatile. You can easily make classic mittens knit in the round and dressed up with a matching headband, or get creative by making a pair of colorful felted mittens. Either way, these mittens are sure to please!

Free Mittens and Headband Knitting Pattern

It’s simple to achieve a pulled-together winter look with these easy-to-make mittens and matching headband.

Free Fun Felted Mittens Knitting Pattern

Use your washing machine to felt these mittens to make them extra soft and comfortable. Choose a bold color or a soft hue to give the mittens extra character.

To start by trying your hand at the matching mittens and headband, see the next page.

For more helpful knitting tips and interesting patterns, try:

Advertisement

Free Mittens and Headband Knitting Pattern

Matching mittens and headband pull together a toasty winter outfit.

These mittens are cozy warm and easy to make. They are knit in the round, and the thumb is added at the end -- almost an afterthought! Knit up a quick matching headband for a gift that will make anyone smile.

Size

Mittens

Hand length, from wrist to fingertips: 7" (18cm)

Advertisement

Circumference: 7" (18cm)

Headband

Circumference: 20" (51cm)

Width: 31/2" (9cm)

What You'll Need

Yarn: Bulky weight wool yarn, about 109 yards [100m]; worsted weight curly mohair novelty yarn, about 75 yards [68.5m]

We used: Alafoss Lopi regular size (100% wool; 109 yards [100m] per 31/2oz [100g] ball): #9738 Fire Red Tweed (yarn A), 1 ball; Kiperoo Farm Loop de Lou (100% mohair; about 75 yards [68.5m] per skein): multicolor (yarn B), 1 skein

Needles: US size 101/2 (6.5mm) double-pointed, set of 5; US size 101/2 (6.5mm) circular, 16" (40cm) long

Notions: Open-ring stitch markers; 24" (61cm) scrap smooth cotton yarn in contrasting color; tapestry needle

Gauge

14 stitches and 20 rows=4" (10cm)

Use these patterns to create a cozy and stylish mitten and headband set.

Making the Mittens

Cuff

With double-point needles and 1 strand each yarn A and yarn B, cast on 24 stitches. Divide the stitches evenly between 4 needles (6 stitches on each needle). Join into a circle, taking care not to twist stitches. Place marker to denote beginning of round. Knit 5 rounds. Cut yarn B leaving 4" (10cm) tail. With yarn A, knit 17 rounds (total of 22 rounds from cast-on edge).

Thumb marker round

Knit 1, drop yarn A; fold scrap cotton yarn in half and with both strands held together as 1, knit 4 stitches, drop scrap yarn; transfer the 4 scrap yarn stitches just knit back onto the left needle, pick up yarn A, reknit the 4 stitches, and complete the round. Knit 21 (total of 22 rounds from scrap yarn thumb stitches).

Shape mitten top

Round 1: (Knit 1, knit 2 together) to end of round. (16 stitches)

Rounds 2 and 3: Knit.

Round 4: (Knit 2 together) to end of round. (8 stitches)

Cut yarn leaving 8" (20.5cm) tail. Thread tail through tapestry needle and slip remaining stitches onto needle; pull tight and push needle to inside of mitten. Weave in tail to inside of work.

Thumb

With double-point needles pick up 9 stitches from below and above the scrap yarn thumb stitches as follows:

Needle #1: Pick up 1 stitch from the side and 2 of yarn A stitches from below the scrap yarn stitches.

Needle #2: Pick up next 2 yarn A stitches from below the scrap yarn and 1 stitch from the side.

Needle #3: Pick up 3 yarn A stitches from above the scrap yarn stitches.

Remove the scrap yarn. There should be 3 stitches on each of the 3 needles (9 stitches total).

Join yarn A, with needle #1 knit 1, make 1, knit remaining 2 stitches on needle; knit 2 stitches on needle #2, make 1, knit last stitch on needle; knit 3 stitches on needle #3 (11 stitches on 3 needles). Knit 11.

Shape thumb top

(Knit 2 together) 5 times, knit 1 (6 stitches remain). Cut yarn leaving 8" (20.5cm) tail. Thread tail through tapestry needle and slip remaining stitches onto needle; pull tight and push needle to inside of mitten. Weave in tail to inside of work. Close up any gaps on either side of thumb by weaving in ends from inside of mitten.

Repeat all steps for second mitten.

Making the Headband

With circular needle and yarn A, cast on 60 stitches. Place marker. Join the stitches into round, being careful not to twist them.

Round 1: Purl.

Rounds 2 and 3: Knit.

Join yarn B (do not drop yarn A) and knit 7 rounds with 2 yarns held together as 1. Cut yarn B, leaving tail to weave in later. Knit 2 rounds. Purl 1 round. Bind off all stitches. Weave in loose ends to wrong side of work.

To learn how to make a pair of felted mittens that look fancy but are easy to knit, see the next page.

For more helpful knitting tips and interesting patterns, try:

Advertisement

Free Fun Felted Mittens Knitting Pattern

The felting process makes these fun mittens soft and comfortable.

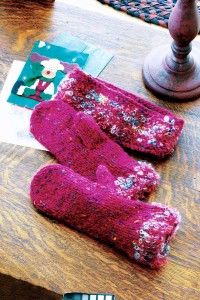
Slip your hands into these soft woolen mittens for a real winter warm-up! Perfect as a gift or to add to your own collection of winter gear, this pretty pair is first knit and then shrunk in the washing machine to achieve a felted look.

Techniques

Binding off -- BO

Advertisement

Casting on -- CO

Felting

Knitting in the round

Make 1 increase -- m1

Picking up stitches

Simple cast-on

Slipping stitches knitwise, purlwise

Working with 2 yarns as 1

Working with double-pointed needles -- dpn
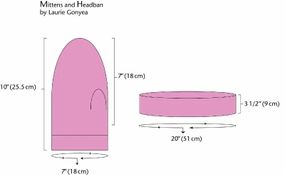
Size

Adult medium: 9" (23cm) in length, 8" (20.5cm) in circumference measured around palm (after felting)
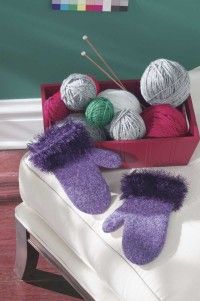
What You'll Need

Yarn: 220 yards (201m) medium weight 100% wool yarn; 50g fuzzy yarn (Superwash wool and synthetics will not felt; do not use for felting projects.)

We used: Cascade Yarns Cascade (100% wool): #220 (yarn A), 1 skein; Schachenmayr Salsa (100% polyester): #49 dark purple (yarn B), 1 ball

Needles: US size 8 (5mm) set of 5 double-pointed

Notions: Stitch markers; tapestry needle; small amount of waste yarn to use as stitch holder

Miscellaneous: Washing machine, dishwashing liquid

Gauge

18 stitches=4" (10cm)

Making the Mittens

Holding both yarns together as 1, cast on 44 stitches. Divide stitches equally onto 4 needles (11 stitches on each needle). Join stitches into a circle, taking care not to twist stitches. Place stitch marker at beginning of round. Knit in circular stockinette stitch (knit all rounds) until work measures 31/2" (9cm) from cast-on edge. Cut yarn B, leaving 5" (12.5cm) tail. Weave tail to wrong side of work, and secure.

Continue with yarn A as follows:

Round 1: [Knit 5, make 1] 8 times; knit 4. (52 stitches)

Rounds 2-11: Knit.

Begin thumb gusset

(Use the same color markers to indicate beginning and end of increases, but choose a different color than beginning-of-round marker.)

Round 12: Knit 2, place stitch marker to indicate beginning of increases, make 1, knit 2, make 1. Place stitch marker to indicate end of increases, knit to end of round. (54 stitches)

Round 13: Knit.

Round 14: Knit to first increase marker, slip marker, make 1, knit to next increase marker, make 1, slip marker, knit to end of round. (56 stitches)

Repeat rounds 13 and 14 five more times until there are 16 stitches between increase markers and 66 stitches total on needles.

Round 25: Knit.

Round 26: Knit to first marker. Thread piece of waste yarn on tapestry needle. Slip the 16 stitches between increase markers onto waste yarn; tie yarn ends together to hold stitches. With yarn A and the same needle used to begin the round, cast on 2 stitches using the simple cast-on method (these will become 2 new stitches in the next round). Knit to end of round. (52 stitches on needle, including cast-on stitches)

Continue knitting in rounds until work measures 11" (28cm) from cuff.

Shape top of mitten

Round 1: [Knit 2, knit 2 together] 13 times. (39 stitches)

Rounds 2-5: Knit.

Round 6: [Knit 1, knit 2 together] 13 times. (26 stitches)

Rounds 7-10: Knit.

Round 11: [Knit 2 together] 13 times. (13 stitches)

Round 12: Knit.

Cut yarn, leaving 5" (12.5cm) tail. Thread tapestry needle, and insert through 13 stitches on needles. Pull yarn gently to close mitten top. Turn inside out, and weave tail through several stitches to secure.

Make thumb

Insert empty knitting needle into first 8 stitches held on waste yarn. Slip remaining 8 stitches from waste yarn to second needle. Join yarn A at beginning of second needle; place marker to indicate beginning of round. With third needle, knit 8 stitches from second needle; pick up 2 stitches from knit edge above thumb opening; knit 8 stitches from first needle (18 stitches total). With beginning marker in place, rearrange stitches so each needle has 6 stitches. Use fourth needle to knit in rounds until piece measures 21/4" (5.5cm).

Shape thumb top

Round 1: [Knit 2, knit 2 together] 4 times, knit last 2 stitches together. (12 stitches)

Rounds 2-3: Knit.

Round 4: [Knit 1, knit 2 together] 4 times. (8 stitches)

Round 5: Knit.

Cut yarn, leaving 5" (12.5cm) tail. Thread tail on tapestry needle, and insert through 8 stitches on needle. Pull yarn gently to close thumb top. Turn mitten inside out, and weave tail through several stitches to secure.

Make second mitten to match.

Felting

Follow felting instructions. Try mittens on for size several times during felting process.

Knitting a pair of mittens is a quick and easy way to make a cherished gift for yourself or a loved one. Simple patterns and fun designs add interesting details that will make these mittens memorable.

For more helpful knitting tips and interesting patterns, try:

Contributing designers: Laurie Gonyea and Lucie Sinkler.

Advertisement

Advertisement

Loading...