A knitted hat or baby blanket would make a great baby shower gift. Tatyana Tomsickova Photography / Getty Images
Knitting for babies is fun and rewarding. The projects are usually small, so they go quickly, and what could be more heartwarming that giving new parents a handmade gift for their bundle of joy? Bibs and booties, ponchos and pillows -- all that and more are within your grasp, with just some basic knitting know-how.
Use these easy knitting patterns to create sweet and functional outfits and accessories for baby.
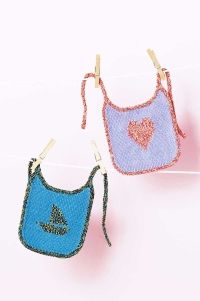
These sweet baby bibs keep your little one clean and looking good.
Baby bibs make a nice gift for a newborn. They knit up quickly and have tons of charm when customized with a sweet little heart or sailboat. Follow the chart to create the design, and this project will be smooth sailing all the way.
Size
7x7" (18x18cm)
Advertisement
What You'll Need
Yarn: 100% cotton light worsted weight or DK weight solid-color yarn, approximately 50 yards (46m) each bib (yarn A); 100% cotton light worsted weight or DK weight variegated yarn, approximately 25 yards (23m) each bib (yarn B)
Needles: US size 4 (3.5mm); US size 2 (2.75mm) circular, 24" (61cm) long
Notions: Stitch holder; tapestry needle
Gauge
26 stitches and 36 rows=4" (10cm) in stockinette stitch
Notes
The yarn is worked on small needles in order to produce a closely knit fabric so spills won't soak through easily.
When changing colors, drop the old color and bring the new color up from under the old color, twisting them together to avoid gaps. For the boat pattern you will need 2 balls yarn A and 1 ball yarn B. For the heart you will need 3 balls yarn A and 2 balls yarn B. Because these areas are quite small, you may choose to cut long lengths of yarn instead of winding smaller balls or bobbins.
Make the BibUsing yarn A and size 4 (3.5mm) needles cast on 31 stitches.Row 1 and all odd-number rows (wrong side): Purl all stitches.Row 2: Knit 1, make 1, knit 29, make 1, knit 1. (33 stitches)Row 4: Knit 1, make 1, knit 31, make 1, knit 1. (35 stitches)Row 6: Knit 1, make 1, knit 33, make 1, knit 1. (37 stitches)Row 8: Knit 1, make 1, knit 35, make 1, knit 1. (39 stitches)Row 10: Knit 1, make 1, knit 37, make 1, knit 1. (41 stitches)Work in stockinette stitch (knit on right side, purl on wrong side) for 7 rows more, ending with row 17.
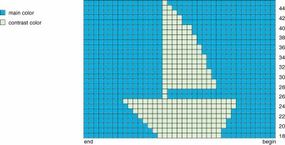
Use this chart to make the sailboat motif on your bib.
Next row: Begin working motif (heart or sailboat) following the chart and using the intarsia method.
After finishing charted design, work 10 rows in stockinette stitch with yarn A.
Use this chart to make the heart motif on your bib.
Shape Neckline
Row 1 (right side): Knit 12, bind off 17, knit to end of row (12 stitches on each side of bind-off). Place first set of 12 stitches on stitch holder.
Rows 2, 4, 6, 8, 10, and 12: Purl.
Row 3: Bind off 2 stitches, knit 10.
Row 5: Bind off 1 stitch, knit to end of row. (9 stitches)
Row 7: Bind off 1 stitch, with 1 stitch already on right needle from bind-off, knit 5 more, knit 2 together. (7 stitches)
Row 9: Bind off 1 stitch, with 1 stitch already on right needle, knit 3 more, knit 2 together. (5 stitches)
Row 11: Bind off 1 stitch, with 1 stitch already on right needle, knit 1 more, knit 2 stitches together. (3 stitches)
Row 13: Slip 2 stitches as if to knit them together, knit 1, pass the 2 slipped stitches over the knitted one. Cut yarn, pull tail through last stitch and fasten off.
Rejoin yarn to 12 stitches on holder and knit other side, reversing shaping.
Edging and Ties
With right side facing, pick up 43 stitches along the neckline edge of bib using yarn B and size 2 (2.75mm) circular needles. Knit 3 rows. Bind off all stitches.
With circular needle and using knitted cast-on method and yarn B, cast on 50 stitches. With same needle and yarn and right side facing, pick up 140 stitches evenly along left edge, bottom, and right edge of bib. Cast on another 50 stitches on the end. Knit 3 rows.
Bind off all stitches. Weave in all ends to wrong side of work.
Every child needs a cute and cuddly companion. Keep reading for our baby's buddy inchworm pillow pattern.
For more helpful knitting tips and interesting patterns, try:
This cute cushion gently cradles a sleepy child's head. It makes a thoughtful gift that you can create in a day. Knitted up in a soft, washable cottony yarn, it's both snuggly and easy to clean.
Size
Length (after stuffing): about 29" (73.5cm)
Advertisement
What You'll Need
Yarn: Worsted weight yarn, approximately 127 yards (116m); scrap yarn in assorted colors for eyes, nose, I-cord striping
Needles: US size 7 (4.5mm); US size 6 (4mm) double-pointed, set of 2
Notions: Stitch holder; long sewing pins; tapestry needle; polyester fiberfill
Gauge
16 stitches and 23 rows=4" (10cm)
Make the Pillow (Make 2)
Cast on 16 stitches.
Row 1 (right side): Knit 1, knit into front and back of next stitch, knit across to last 2 stitches, knit into front and back loop, knit 1. (18 stitches)
Row 2 (wrong side): Purl 1, make 1 purlwise, purl across to last stitch, make 1 purlwise, purl 1. (20 stitches)
Rows 3, 5, 7, and 9: Repeat row 1.
Rows 4, 6, 8, and 10: Repeat row 2.
Row 11 (right side): Repeat row 1. (38 stitches)
Row 12: Purl.
Row 13: Knit 1, knit into front and back loop, knit to last 2 stitches, knit into front and back loop, knit 1. (40 stitches)
Rows 14-17: Repeat rows 12 and 13 twice more. (44 stitches)
Row 18: Purl.
Row 19: Knit.
Rows 20-23: Repeat rows 12 and 13 twice more. (48 stitches)
Row 24: Purl.
Row 25: Knit 1, knit into front and back of next stitch, knit 20, knit 2 together, turn work. Continue to work on these 24 stitches only. Place remaining 24 stitches on stitch holder.
Row 26: Bind off 2 stitches, purl to end. (22 stitches on needle)
Row 27: Knit to last 2 stitches, knit 2 together. (21 stitches)
Row 28: Purl.
Row 29: Knit.
Row 30: Bind off 1 stitch, purl to end. (20 stitches)
Row 31: Knit to last 2 stitches, knit 2 together. (19 stitches)
Rows 32-40: Starting with a purl row, work 9 rows in stockinette stitch, ending with a wrong-side row.
Row 41: Knit 2 together, knit to last 2 stitches, knit into front and back loops of next stitch, knit 1. (19 stitches)
Row 42: Purl.
Row 43: Knit to last 2 stitches, knit into front and back loops of next stitch, knit 1. (20 stitches)
Row 44: Purl.
Row 45: Knit 2 together, knit to last stitch, knit into front and back loops of last stitch. (20 stitches)
Row 46: Purl.
Row 47: Knit to last stitch, knit into front and back loops of last stitch. (21 stitches)
Row 48: Purl.
Row 49: Knit 2 together, knit to end. (20 stitches)
Rows 50 and 51: Repeat rows 48 and 49 once. (19 stitches)
Row 52: Purl.
Row 53: Knit 2 together, knit to last 2 stitches, knit 2 together. (17 stitches)
Rows 54-61: Repeat rows 52-53 four times. (9 stitches)
Row 62: Bind off 1 stitch, purl to last 2 stitches, purl 2 together. (7 stitches)
Row 63: Knit 2 together, knit to last 2 stitches, knit 2 together. (5 stitches)
Bind off remaining stitches. Cut yarn.
Pick up 24 stitches from stitch holder, and work the pattern from row 25, reattaching yarn and reversing all shaping. Note: Beginning the second section with a knit (right-side) row, the shaping that involved binding off stitches on the wrong side (rows 26, 30, 62) in the first section will now change to purl 2 together for each bind-off stitch called for in the pattern as you will not be able to bind off at the end of a purl row without cutting the yarn. For example, row 62 will now begin and end with purl 2 together.
Finishing
Press both pieces using plenty of steam to gently block into shape, smoothing edges to form even curves. Do not stretch the knitting. Pin together with wrong sides facing, matching all edges. With yarn A threaded on tapestry needle, use mattress stitch to sew the pieces together around the edges, leaving an opening at the head or tail for the filling. Stuff the pillow as evenly as possible; do not overstuff. Stitch opening shut, tie yarn tail into knot, and weave in ends to inside of pillow.
Adding Features
Note: Stitch the details into the face using photo as your guide. Knot the tails firmly, pulling loose ends deep into the pillow.
Make the stripe: With yarn C, cast 3 stitches onto 1 double-point needle and make a simple I-cord about 1 yard (91.5m) long. To ensure cord is long enough, wrap it around the pillow in a spiral from head to tail. Unwrap. Bind off I-cord and cut yarn. Pin one end of cord to the underside of the pillow, about 3" (7.5cm) from the tail end. Rewrap cord around worm, ending on the underside about 3" (7.5cm) from head end, and pin it into place. Hide end of cord underneath spiral. Using yarn C threaded onto tapestry needle, stitch cord into place along entire length to secure it to the pillow, adding a backstitch every few stitches. Hide all stitches underneath the cord, with yarn tails knotted firmly and pulled deep into the body of the pillow.
Make the antennae: Cut 6 pieces of yarn A each about 8" (20.5cm) in length. Thread 3 pieces onto tapestry needle and draw yarn halfway through a stitch where the first antenna will be. Remove needle, leaving yarn pulled halfway through stitches. With about 4" (10cm) on both sides, braid the yarn. Finish by knotting strands together firmly. Trim yarn tails to desired length. Repeat with the remaining 3 pieces of yarn for the other antenna.
Make the eyes: Thread 24" (61cm) yarn B onto tapestry needle, pull ends together and tie in overhand knot to create a 12" (30.5cm) double strand. Pull yarn through a stitch about 1" (2.5cm) below first antenna, and thread needle between strands at knot. Pull yarn gently to anchor, and push knot behind stitches. Make eye using a satin stitch, going across 3 knit rows. Make 3 or 4 stitches next to each other, creating an oval for the eye. Run needle up through the back of the stitches made, and push the needle deep into the stuffing of the head and across to where you will make the other eye. Repeat instructions to make second eye. After you've run the needle up through the back of the stitches just made, cut yarn at needle. Knot ends, rethread needle with yarn ends, and pull yarn and knot through stitches to hide inside body. Remove needle.
Make the nose: Make a 11/2" pom-pom. Thread tapestry needle with yarn tails, draw through 3 stitches at the position desired, and pull the nose into place. Draw the needle through the pillow a few times more to firmly anchor nose to face; knot yarn securely. Hide knot behind nose. If you don't want to make a pom-pom for the nose, stitch a nose following the steps for making the eyes.
Our next pattern is quick, easy, and cozy -- keep reading for our hooded jacket and booties pattern.
For more helpful knitting tips and interesting patterns, try:
Choose a cotton/acrylic blend of yarn that combines the pillowy soft texture of cotton with the shape retention of acrylic.
Advertisement
Easy Baby Hooded Jacket and Booties Knitting Pattern
This soft and cozy set makes a great gift.
Super-fast to make, and soft as a baby's bottom! Make several, and keep them on hand for baby showers. Bright, joyful colors mean that this modern layette works for both boys and girls.
Note: Instructions are given for smallest size; all other sizes are listed in brackets. When only 1 number is given, it applies to all sizes.
Make the Jacket
Back
Cast on 33 [37, 41] stitches. Work 2 rows of knit 1, purl 1 ribbing. Change to stockinette stitch, and continue until piece measures 63/4" [7", 71/2"] (17cm [18cm, 19cm]). End with purl row.
Armhole Shaping
Next row: (right side) Bind off 3 stitches at beginning of row, then knit to end of row. (30 [34, 38] stitches)
Next row: (wrong side) Bind off first 3 stitches purlwise, purl to end of row. (27 [31, 35] stitches )
Continue in stockinette stitch until back measures 11" [111/2", 121/2"] (28cm [29cm, 31.5cm]). Bind off all stitches.
Left Front
Cast on 17 [19, 21]stitches. Work 2 rows of knit 1, purl 1 ribbing. Change to stockinette stitch; continue until piece measures 63/4" [7", 71/2"] (17cm [18cm, 19cm]), ending with purl row.
Armhole Shaping
Next row: (right side) Bind off 3 stitches, knit to end of row. (14 [16, 18] stitches)
Continue in stockinette stitch for 21/4" [21/2", 3"] (5.5cm [6.5cm, 7.5cm]), ending with a knit row.
Neck Shaping
Next row: (wrong side) Bind off 3 stitches purlwise at beginning of row, then purl to end. (11 [13, 15] stitches)
Next row: (right side) Knit.
Next row: (wrong side) Bind off 2 stitches purlwise, purl to end of row. (9 [11, 13] stitches)
Next row: (right side) Knit.
Next row: (wrong side) Bind off 1 stitch, purl to end of row. (8 [10, 12] stitches)
Continue in stockinette stitch until front measures same as back -- 11" [111/2", 121/2"] (28cm [29cm, 31.5cm]). Bind off all stitches.
Right Front
Make as left front, reversing shaping as follows.
Cast on 17 [19, 21] stitches. Work 2 rows knit 1, purl 1 ribbing. Change to stockinette stitch for 63/4" [7", 71/2"] (17cm [18cm, 19cm]). End with knit row.
Armhole Shaping
Next row: (wrong side) Bind off 3 stitches, purl to end of row. (14 [16, 18] stitches)
Continue in stockinette stitch for 21/4" [21/2", 3"] (5.5cm [6.5cm, 7.5cm]). End with purl row.
Neck Shaping
Next row: (right side) Bind off 3 stitches, knit to end of row. (11 [13, 15] stitches)
Next row: (wrong side) Purl.
Next row: (right side) Bind off 2 stitches, knit to end of row. (9 [11, 13] stitches)
Next row: (wrong side) Purl.
Next row: Bind off 1 stitch, knit to end of row. (8 [10, 12] stitches)
Continue in stockinette stitch until front measures same as back -- 11" [111/2", 121/2"] (28cm [29cm, 31.5cm]). Bind off all stitches.
Sleeve
Cast on 20 stitches. Work 2 rows knit 1, purl 1 ribbing.
Sleeve Shaping
Next row: Knit 1, make 1, knit 18, make 1, knit 1. (22 stitches)
Continue in stockinette stitch, increasing same way every sixth row until there are 32 [34, 36] stitches on needle. Work even in stockinette stitch without further increases until sleeve measures 7" [71/2", 8"] (18cm [19cm, 20.5cm]). End with purl row. Bind off.
Repeat all steps for second sleeve.
Hood
Cast on 5 stitches.
Row 1: Knit.
Row 2: Purl. At the end of the row, cast on 2 stitches using either cable cast-on or simple cast-on method.
Row 3: Knit. (7 stitches)
Row 4: Purl. Cast on 2 stitches.
Row 5: Knit. (9 stitches)
Row 6: Purl. Cast on 3 stitches.
Row 7: Knit. (12 stitches)
Row 8: Purl. Cast on 4 stitches.
Row 9: Knit. (16 stitches)
Rows 10-20 (even rows only): Purl.
Row 11: Knit 1, make 1, knit 15. (17 stitches)
Row 13: Knit 1, make 1, knit 16. (18 stitches)
Row 15: Knit 1, make 1, knit 17. (19 stitches)
Row 17: Knit 1, make 1, knit 18. (20 stitches)
Row 19: Knit 1, make 1, knit 19. (21 stitches)
Work even without further increases until hood measures 81/2" (21.5cm) from cast-on edge. End with right-side row. Don't bind off. Place marker to indicate end of first half.
Second side of hood: Work even for 5" (12.5cm) from stitch marker. On next wrong-side row, begin with row 20 and work back to row 1. Mirror shaping by decreasing on rows where increases were made, and bind off stitches on the rows where stitches were cast on. When row 1 is finished, work should measure 81/2" (21.5cm) from stitch marker. Bind off remaining 5 stitches.
Finishing
Sew fronts to back piece at shoulders using mattress stitch with yarn threaded on tapestry needle. Fold hood in half, and sew seam from center neck to tip of hood. Pin hood to neck opening, matching front and hood edges. Sew hood in place from right side with mattress stitch. Pin sleeve tops to armholes, and stitch in place using backstitch. Sew side seams and sleeves with mattress stitch. Baste zipper in position, placing edges of knitted pieces next to teeth. With sewing thread, sew zipper in place using backstitch along the edge of knitted fronts. Whipstitch edges of zipper tape in place from wrong side. Remove all pins. Weave yarn ends on wrong side of jacket.
Make the Booties
Cast on 16 stitches.
Row 1: (right side) Purl.
Row 2: (wrong side) Knit 1, *make 1, knit 1**; repeat from * to ** to end of row. (31 stitches)
Row 12: Knit 9, bind off 7, knit to end of row (18 stitches). Place first set of 9 stitches on holder.
Row 13: Knit. (9 stitches)
Row 14: Purl.
Rows 15-23: Continue in reverse stockinette (purl on right side, knit on wrong side, repeat rows 13-14). Bind off on row 24. Cut yarn. Transfer stitches from holder back onto needle. With wrong side of bootie facing, rejoin yarn at the end of bind-off stitches. Repeat rows 13-24. Fold bootie piece in half. With threaded tapestry needle, sew instep together (the 7 bound-off stitches in the center). Sew cast-on edges (underfoot) together with whipstitch. With right side facing, sew back seam together with mattress stitch up to the reverse stockinette stitch, then turn bootie to wrong side to finish seam. Weave ends to wrong side, and secure. Turn bootie to right side, and fold cuff back.
Repeat all steps for second bootie.
A cozy towel is a must to keep baby dry and warm after bathtime. On the next page, find our hooded towel knitting pattern.
For more helpful knitting tips and interesting patterns, try:
Is your yarn fuzzy, furry, or flimsy? Does it have more than one color in it? If it does, it's best to choose a pattern with simple stitches to let the complexity of the yarn shine through. In general, the simpler the yarn, the more complicated, lacy, or textured pattern you can use; the more complex the yarn, the simpler the pattern.
Advertisement
Easy Baby Hooded Towel Knitting Pattern
This cozy, absorbent towel is functional and fun.
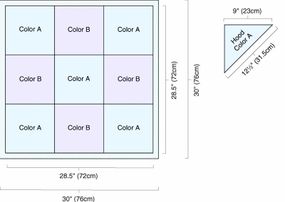
Made with soft and absorbent cotton yarn, this hooded bath towel is not only useful, but also unique. Three vertical panels are sewn together to form one large square, and a separate triangular piece is added in one corner to form a hood.
Size
Approximately 30x30" (76x76cm), including crochet edge
Advertisement
What You'll Need
Yarn: Cotton worsted weight yarn, approximately 472 yards (424m) color A, 236 yards (212m) color B, and about 200 yards (183m) color C
163/4 stitches and 22 rows=4" (10cm) in stockinette stitch
Note: When joining and ending each color leave a 4" (10cm) tail to weave in later.
The finished towel makes a checkerboard pattern.
Make the Towel
Panel 1
With color A, cast on 40 stitches.
Row 1 (right side): Knit.
Row 2: Purl.
Work even in stockinette stitch (knit on right side, purl on wrong side) until piece measures 91/2" (24cm). Cut yarn. Join color B, continue in stockinette stitch for an additional 91/2" (24cm). Cut yarn. Join color A, continue in stockinette stitch for an additional 91/2" (24cm), ending with wrong-side row. Bind off loosely. Weave in loose ends.
Panel 2
With color B, cast on 40 stitches.
Row 1 (right side): Knit.
Row 2: Purl.
Work even in stockinette stitch until piece measures 91/2" (24cm). Cut yarn. Join color A, continue in stockinette stitch for an additional 91/2" (24cm). Cut yarn. Join color B, continue in stockinette stitch for an additional 91/2" (24cm), ending with wrong-side row. Bind off loosely. Weave in loose ends.
Panel 3
Work as for panel 1.
Make the Hood
Using color A, cast on 54 stitches.
Rows 1-3: Knit.
Row 4 (wrong side): Purl.
Row 5 (right side): Work slip slip knit decrease using first 2 stitches, knit to last 2 stitches, knit 2 together. (52 stitches)
Row 6: Purl.
Continue in stockinette stitch, repeating row 5 every other row (right-side rows only) for a total of 17 times. (18 stitches remain)
Next 8 rows: Work decreases every row until 4 stitches remain, working as follows:
Right-side rows: Repeat row 5.
Wrong-side rows: Purl 2 together, purl to last 2 stitches, work slip slip purl decrease.
Bind off loosely. Weave in loose ends.
Finishing
Pin panels together with right sides up and panel 2 in center. Carefully align color block squares when pinning. With yarn A threaded on tapestry needle, sew panels in place using mattress stitch. Rethread needle as necessary, leaving 4" (10cm) tails to weave in later. Steam lightly.
With color C threaded on tapestry needle, add decorative whipstitch around squares, rethreading needle as necessary. Cut yarn after each horizontal and vertical seam leaving 4" (10cm) tail to weave in later.
Pin hood to 1 corner of towel with wrong sides together, easing hood edges in order to fit the towel corner. With color C, work 2 rows single crochet around towel edges, working 3 single crochet stitches in each corner stitch to neatly round the corners. Weave in ends to wrong side of work.
Want to make a pretty little dress for a pretty little girl? Go to the next page for our lacy dress knitting pattern.
For more helpful knitting tips and interesting patterns, try:
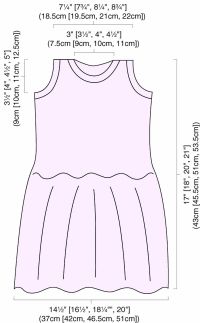
Easy Baby and Kids' Lacy Tank Dress Knitting Pattern
This little dress is easy to knit and looks great.
This is the sweetest little dress, with a lacy skirt and cute tank-style top. Its simple and delicate shape will look gorgeous on your favorite princess.
Work even in stockinette stitch (knit on right side, purl on wrong side) until piece measures 4" [4", 41/2", 41/2"] (10cm [10cm, 11.5cm, 11.5cm]) from beginning of stockinette stitch, ending with a wrong-side row.
Shape Armhole
Note: In the following rows of armhole shaping, binding off of armhole edge stitches is worked on right-side and wrong-side rows. Decreases are worked on right-side rows only.
Continue in stockinette stitch, binding off 4 stitches at beginning of each armhole edge 0 [0, 1, 1] time(s). (58 [65, 64, 71] stitches)
Bind off 3 stitches at beginning of each armhole edge 1 [2, 1, 2] time(s). (52 [53, 58, 59] stitches)
Bind off 2 stitches at beginning of each armhole edge 1 [1, 2, 2] time(s). (48 [49, 50, 51] stitches)
Next right-side row: Knit 1, work slip slip knit decrease, knit across row to last 3 stitches, knit 2 together, knit 1. (46 [47, 48, 49] stitches)
Next wrong-side row: Purl.
Repeat last 2 rows 3 [2, 1, 0] time(s) more. (40 [43, 46 49] stitches)
Work even in stockinette stitch until piece measures 61/2" [7", 71/2", 8"] (16.5cm [18cm, 19cm, 20.5cm]) from beginning of stockinette stitch, ending with a wrong-side row.
Next row (right side): Knit 13 [14, 15, 16] stitches, bind off next 14 [15, 16, 17] stitches, knit to end. (13 [14, 15, 16] stitches on each side of neck edge)
Shape left side of neck bind-off (this will be the right side of neck as worn)
Note: In the following left-side neckline shaping rows, binding off of neckline stitches occurs on right-side rows only beginning at neck edge. On wrong-side rows all stitches are purled. Decreases are made on right-side rows at the neck edge.
Continue in stockinette stitch.
Next row and all wrong-side rows: Purl.
Right-side rows: Bind off 3 stitches at neck edge 0 [0, 1, 1] time(s). (13 [14, 12, 13] stitches)
Right-side rows: Bind off 2 stitches at neck edge 1 [2, 1, 2] time(s) more. (11 [10, 10, 9] stitches)
Next row (right side): Knit 1, work slip slip knit decrease, work to end of row. (10 [9, 9, 8] stitches)
Next row: Purl.
Repeat last 2 rows 2 [1, 1, 0] time(s) more. (8 stitches)
Work even until piece measures 17" [18", 20", 21"] (43cm [45.5cm, 51cm, 53.5cm]) from cast-on edge. Place 8 remaining shoulder stitches on holder.
Shape second side of neck (this will be the left side of neck as worn)
Note: In the following neckline shaping rows, binding off of stitches occurs on wrong-side rows only beginning at neck edge. On right-side rows all stitches are knit. Decreases are made on right-side rows at the neck edge.
With wrong side facing, join new yarn and continue in stockinette stitch binding off 3 stitches at neck edge 0 [0, 1, 1] time(s), purl to end of row. (13 [12, 12, 13] stitches)
Next row and all right-side rows: Knit.
Wrong-side rows: Bind off 2 stitches at neck edge 1 [2, 1, 2] time(s). (11 [10, 10, 9] stitches)
Next row (right side): Knit to last 3 stitches, knit 2 together, knit 1. (10 [9, 9, 8] stitches)
Next row (wrong side): Purl.
Repeat last 2 rows 2 [1, 1, 0] time(s) more. (8 stitches)
Work even until piece measures 17" [18", 20", 21"] (43cm [45.5cm, 51cm, 53.5cm]) from cast-on edge. Place 8 shoulder stitches on holder.
Front
Follow instructions for back through armhole shaping until piece measures 51/2" [6", 61/2", 7"] (14cm [15cm, 16.5cm, 18cm]) from beginning of stockinette stitch, ending with a wrong-side row. (40 [43, 46, 49] stitches)
Next row (right side): Knit 16 [17, 18, 19] stitches, bind off 8 [9, 10, 11] stitches, knit to end of row. (16 [17, 18, 19] stitches each side of neck)
Shape second side of neck (this will be the left side of neck as worn)
Next row and all wrong-side rows: Purl.
Right-side rows: Bind off 3 stitches at neck edge 1 [1, 2, 2] time(s). (13 [14, 12, 13] stitches)
Right-side rows: Bind off 2 stitches at neck edge 1 [2, 1, 2] time(s). (11 [10, 10, 9] stitches)
Next right-side row: Knit 1, work slip slip knit decrease, knit to end of row. (10 [9, 9, 8] stitches)
Next row (wrong-side): Purl.
Repeat last 2 rows 2 [1, 1, 0] time(s) more. (8 stitches)
Work even until piece measures 17" [18", 20", 21"] (43cm [45.5cm, 51cm, 53.5cm]) from cast-on edge. Place 8 shoulder stitches on holder.
Shape Left Side of Neck (As Worn)
Continue in stockinette stitch, with wrong side of work facing, join new yarn, bind off 3 stitches at neck edge 1 [1, 2, 2] time(s), purl to end of row. (13 [14, 12, 13] stitches)
All right-side rows: Knit.
Wrong-side rows: Bind off 2 stitches at neck edge 1 [2, 1, 2] time(s), purl to end of row. (10 [9, 9, 8] stitches)
Next right-side row: Knit to last 3 stitches, knit 2 together, knit 1. (10 [9, 9, 8] stitches)
Next wrong-side row: Purl.
Repeat these 2 rows 2 [1, 1, 0] time(s) more. (8 stitches)
Work even until piece measures 17" [18", 20", 21"] (43cm [45.5cm, 51cm, 53.5cm]). Place 8 shoulder stitches on holder.
Finishing
With wrong sides facing (right sides together), seam left shoulder stitches of front and back together using 3-needle bind-off technique.
Work Left Armhole Band
With size 5 (3.75mm) needle and right side facing, pick up 64 [68, 76, 88] stitches around armhole edge starting at bottom of armhole of back piece.
Knit 4 rows. Bind off loosely.
Work Neckband
With size 5 (3.75mm) needle and right side facing, pick up 78 [84, 90, 96] stitches around neck edge starting at right shoulder of front piece.
Knit 4 rows. Bind off loosely.
With wrong sides facing (right sides together), seam right shoulder stitches of front and back together using 3-needle bind-off technique. Seam neckband edges together at right shoulder.
Work Right Armhole Band
With size 5 (3.75mm) needle and right side facing, pick up same number of stitches as left armhole band, starting at bottom of armhole of front piece.
Knit 4 rows. Bind off loosely. With yarn threaded on tapestry needle sew side seams using mattress stitch. Weave in loose ends to wrong side of dress.
Keep your little princess warm (and fashionable) with our next easy pattern -- keep reading for the pretty poncho knitting pattern.
For more helpful knitting tips and interesting patterns, try:
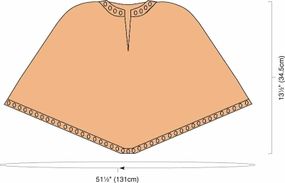
This stylish poncho is easy to knit -- and it's easy on the eyes.
This multicolor poncho is worked in one piece, starting at the bottom edge. Fringe is added at the end to make it even more fabulous. It's a little girl's dream!
Size
Fits 18-24 months
Length (including fringe): 16" (40.5cm)
Advertisement
What You'll Need
Yarn: Bulky weight multicolor yarn, about 286 yards (262m) yarn A; worsted weight solid-color yarn, about 200 yards (183m) yarn B
We used: Plymouth Encore Colorspin chunky (75% acrylic, 25% wool; 143 yards [131m] per 100g skein): #7124 (yarn A), 2 skeins; Plymouth Encore worsted (75% acrylic, 25% wool; 200 yards [183m] per 100g skein): #1382 (yarn B), 1 skein
Needles: US size 10 (6mm) circular, 24" (61cm) long
Repeat rounds 6-8 decreasing 4 stitches every third round in established places until there is a total of 124 stitches and piece measures about 9" (23cm) from cast-on edge.
Split For the Neck Opening
Begin working back and forth in rows as follows:
Row 1 (right side): Knit 1, work slip slip knit decrease, knit to 2 stitches before next marker, knit 2 together, slip marker, knit 2, work slip slip knit decrease, knit to 2 stitches before next marker, knit 2 together, knit 1. Turn work. (120 stitches)
Row 2: Purl.
Repeat rows 1 and 2 until 92 stitches remain and neck opening is about 3" (7.5cm) long. End with row 1.
Shape Shoulders
Before turning work to begin row 2, place a stitch marker after stitch 23 (counting stitches from beginning of row) and another marker after stitch 69.
Note: To mark decreases for shoulder shaping, use a different color stitch marker than previously used.
Row 2: Purl, slipping all markers in place.
Next row (right side): Knit 1, work slip slip knit decrease, knit to 2 stitches before new marker, decrease 2 stitches using the vertical double decrease method as follows: Slip 2 stitches as if to knit them together, remove marker, knit 1, pass the 2 slipped stitches over the knit stitch, place marker, knit to 2 stitches before marker in the center of back, knit 2 together, knit 2, work slip slip knit decrease, knit to 2 stitches before second shoulder marker, decrease 2 stitches same as first shoulder, place marker, knit to 2 stitches before next marker, knit 2 together, knit 1. (84 stitches)
Next row: Purl.
Repeat these last 2 rows until 52 stitches remain, ending with knit (right-side) row.
Neck Edging
Row 1: (wrong side): Knit.
Row 2: Knit 1, (knit 2 together, yarn over) to last 3 stitches, knit 2 together, knit 1.
Row 3: Knit.
Bind off loosely. Weave in loose ends to wrong side of work.
Finishing
Make the Fringe
For each fringe, cut one 10" (25.5cm) strand yarn A and two 10" (25.5cm) strands yarn B. (90 bunches, or 270 strands, total)
Place poncho flat on table. Insert the crochet hook from back to front into a hole in the bottom edging. Working with 1 strand yarn A and 2 strands yarn B at a time, fold them in half and hold cut ends together to create a loop. Place folded loop on hook and pull it halfway through the knitted piece. With hook still in place, pull cut ends of fringe through the loop to make knot. Pull fringe ends to tighten. Repeat making fringe around poncho.
Make the I-Cord
With yarn B cast on 3 stitches and knit I-cord about 28" (71cm) long. Thread I-cord through the holes in the neck edging.
Make the Tassels
Wrap yarn A around 5 fingers about 10 times, cut yarn. Cut a 6" (15cm) strand of yarn A, thread through the wrapped yarn, and tie both ends of the 6" (15cm) strand into a double knot. Thread both ends onto tapestry needle and stitch securely to end of I-cord; weave ends into center of I-cord to hide. Cut another 6" (15cm) strand of yarn A and wrap around yarn bunch about 1/2" (1.3cm) down from tassel top. Tie both ends of this strand into a double knot and allow remaining 2 ends to hang with the tassel strands. Cut through bottom loops of yarn bunch; trim ends to even length. Repeat for second tassel.
Knitting for babies is both fun and rewarding. Use these easy baby knitting patterns to dress up your little one in style.
For more helpful knitting tips and interesting patterns, try:
Contributing designers: Lucie Sinkler, Helen Ralph, Kathy Perry, Beth Walker-O'Brien
Advertisement
Baby Knitting Patterns FAQ
What is the easiest thing to knit for a baby?
Baby bibs are one of the easiest things to knit for a baby. You can knit them quickly and customize them using whatever colors you desire. All you'll need is about 50 yards of yarn and 3.5 mm knitting needles.
What is the most common knitting stitch?
The most common stitch for knitting baby patterns is the stockinette stitch. You can use it in knitting bibs, pillows, hooded jackets and blankets.
How do you make a simple baby poncho?
To make a simple baby poncho, you'll need around 286 yards of yarn and a 24 inch 6 mm needle. Before knitting, you need to cast 180 stitches all around to form the shape. From there, you start knitting from left to right until you meet the first stitch.
Cite This!
Please copy/paste the following text to properly cite this HowStuffWorks.com article: