How to Make Beaded Hair Barrettes

This shooting star barrette is sure to be a favorite.

You can learn how to make beaded hair barrettes like the ones at the mall -- but better! All it takes are some simple art supplies, an assortment of beads, and a few basic tools.

Whether you prefer big, sparkling hair barrettes or small, dainty ones, you'll find the perfect project here to help you create whatever suits your fancy!

Advertisement

Start browsing through the pages below to find out how to make everything from the glamorous to the groovy.

Daisy Chain Barrette

In this section, kids will master the art of making a daisy chain. Knowing the basics of the daisy chain will help you create many other bobby pin creations. Go to this page to find out more.

Flight of Fancy Barrette

This fancy barrette sparkles and glows in greens and golds. Kids can learn to make this beaded barrette in seven easy steps. Continue to this page to learn more.

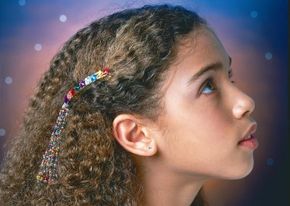
Shooting Star Barrette

Get ready to liftoff! Learn how to create this starry barrette made of beads, sequins, and jewels. Go to this page to get started.

Beaded Barrette

There's nothing plain-Jane about this festive beaded barrette. In this section, learn how to create layers upon layers of beads for a dramatic, and somewhat animated, effect.

Ruffle Ribbon with Side Rolls

In this section, learn how to make this intricate beaded creation and the hairstyle to match!

Stacked Bow with Four-Strand Round Braids

This project will show you how to to mix textures and patterns for an interesting composition. You'll need a few special materials for this one. Go to this page to find out how to get started.

Best-Yet Barrette

Hot pink and bright blue makes for an eye-catching color combination. In just a few easy steps, you'll learn how to weave bright beads and embroidery floss together to create the best barrette yet! Ready? Set? Go!

Friends Forever Barrette

Best friends can pair up to make this neat little FRIENDS barrette made of pretty purple and orange beads. You can fix each other's hair too! Continue to this page to whip up your do and this bead creation, too!

Groovy Jeweled Hair Clip

Girls everywhere will love this groovy jeweled hair clip! Create this gem in just a few easy steps, along with a special hairstyle to match. Continue to this page to learn more.

Spangle Dangle Barrettes

Poofs and ponytails will make this dangling barrette stand out in a crowd. Continue to this section to learn how to create this cute combination.

Sparkle Effects Barrette

In this section, kids will use an assortment of crystal beads to create a dramatic effect. The hip hairstyle adds a special "something" to this sparkling creation.

Glamor Hair Snaps

Nature and vibrant colors -- what a nice combination! Go to this page to learn how to create gorgeous dragonfly hair snaps.

Glamorous Gathered Barrette

With some lace and pony beads, kids can create a glamorous gathered barrette -- perfect for those dressy occasions. Continue to this page to find out how to make this popular hair accessory.

If you're ready to get started, just select your favorite beaded barrette project to begin. Or, you can continue to the next page to begin creating your collection of beaded hair barrettes with the first project on the list -- a daisy chain barrette.

For more fun crafts and activities for kids, see:

Advertisement
Daisy Chain Barrette

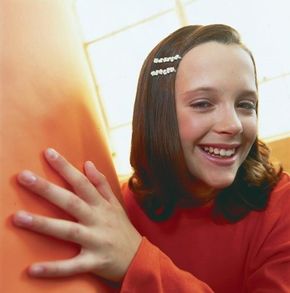
Daisy Chain Barrette

All aboard the Daisy Chain! Once you learn the basics of this daisy chain barrette project, you'll be chugging right along, making lots of beaded bobby pins! Keep reading to find out how to make this beaded hair barrette.

What You'll Need:

Advertisement

24 inches of clear or white beading thread

72 white seed beads

12 yellow seed beads

10 green seed beads

2 flat bobby pins, 1-3/4 inches long

Scissors

Needle

Glue gun or craft glue

Step 1: Cut a 12-inch piece of beading thread. Thread 1 end with a needle, and knot the other end so the beads won't fall off.

Step 2: To make a daisy, string 6 white seed beads into the center of the thread. Pass the needle back through the first bead, making a circle. Thread on a yellow bead, and place it in the center of the seed bead circle. Pass the needle back through the third white seed bead, and pull gently.

Step 3: Add 1 green seed bead, then make 5 more daisies by repeating step 2. (Be sure to thread on 1 green seed bead before you start another flower.) Knot the end of your thread, and trim the end.

Step 4: Glue the Daisy Chain on a bobby pin; let dry. Repeat steps for the matching bobby pin.

Try this!

You can make a checkered bobby pin out of the same materials used in the Daisy Chain. Instead of white, yellow, and green seed beads, all you'll need is black and white -- or whatever two colors you like!

Step 1: Follow step 1 for the Daisy Chain.

Step 2: To make a checkerboard pattern, string 1 white seed bead, 1 black, 1 white, and 1 black onto the beading thread. Pass the needle back through the first 2 beads and then through the second 2 again.

Step 3: Add another white and black seed bead, then pass the needle back through the second row of beads. Add 2 more beads, and pass the needle back through the third row of beads, and so on.

Step 4: Continue stringing beads until there are enough to cover the bobby pin. Glue the checkered chain on a bobby pin; let dry. For a patriotic bobby pin, alternate rows of red, white, and blue.

Ready for something fancy? Then continue to the next page to learn how to make a flight of fancy barrette.

For more fun crafts and activities for kids, see:

Advertisement
Flight of Fancy Barrette

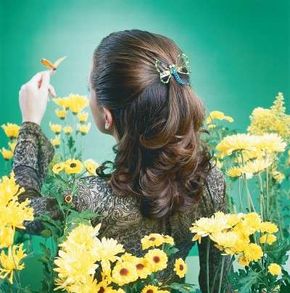
Not only does this fancy barrette sparkle -- it glows!

This flight of the fancy barrette is a delicate dragonfly creation that glows in greens and golds -- a bejeweling combination that would look perfect perched in your hair!

Follow the steps below to learn how to make this beautiful beaded hair barrette.

Advertisement

What You'll Need:

36 inches of medium-gauge, gold-tone wire

2 gold sand beads, 6mm each

Spoonful of seed bead/E bead/ bugle bead mix in shades of green and gold

26 matte blue-green E beads

2-inch bow-clip barrette

Wire cutters

Needle-nose pliers

Cement glue

Step 1: Begin by threading beads onto the wire in this order: 1 sand bead, 1 seed bead, 1 blue-green E bead, 1 seed bead, 1 sand bead, and 3 blue-green E beads. Pull these beads to the center of the wire. Take the opposite end of the wire, and slip it through the last 3 beads (beads 8, 7, and 6, in that order). The 2 wire ends should cross inside this group of beads with a wire end extending from each side.

Step 2: Following the diagram on page 33, thread seed beads, E beads, and bugle beads in the order shown for the upper wing (beads 9-43 on the diagram), slipping back through the first large bead of the wing (bead 9) to complete the loop. Repeat for the other upper wing (beads 44-78 on the diagram), slipping back through bead 44 to complete.

Step 3: Weave the 2 wires through 3 more blue-green E beads (beads 79-81). String the 3 beads on the left wire first, then slip the right wire through the same beads from right to left. Again, the wires will cross inside the beads.

Step 4: Next, string on the first 4 beads for the lower wing (beads 82-85), then pass the wire through the 2 larger beads of the upper wing (beads 40 and 39) to stiffen and lock the wings to each other. Finish stringing on the rest of the beads for the lower wing (beads 86-108), slipping back through bead 82 to complete the loop. Repeat for the other lower wing (beads 109-135). Pass the wire through beads 75 and 74 to lock the wings together, then through bead 109 on the way back.

Step 5: Weave the 2 wires through 3 new blue-green E beads (beads 136-138) as you did in step 3. Continue this bead-weaving technique to finish the dragonfly body, using 7 rows of 2 E beads (beads 139-152) and 2 rows of 1 E bead (153 and 154).

Step 6: Firmly pinching the 2 wire ends in 1 hand, twist the wires to form a finely twisted wire tail. When the twist is about 1/2 inch long, clip off the excess wire. Using needle-nose pliers, curl the 1/2-inch tail into a flat coil at the end of the dragonfly so it won't catch your clothing or hair.

Step 7: To attach the dragonfly to a barrette, gently bend the wings to fit the curve of a clean, dry metal clip. Apply a generous coat of cement glue to the back of the dragonfly along the horizontal line of where the upper and lower wings meet and cross the body. Wait 3 minutes, then press the dragonfly firmly against the center of the barrette. Hold for about 2 minutes, and set aside to dry.

In the next section, take your beadmaking skills to new heights. Continue reading to learn how to make a shooting star barrette!

For more fun crafts and activities for kids, see:

Advertisement
Shooting Star Barrette

This shooting star barrette will look like it's sailing through the sky!

Get your head in the clouds with this stylin' shooting star barrette. The steps below will show you how to make this beaded hair barrette in dazzling colors that will give a liftoff to any hairstyle!

What You'll Need:

Advertisement

10 feet of beading thread

1 bow clip barrette

450 to 500 seed beads in various colors

75 to 100 small sequin stars in an assortment of colors

5 to 10 E beads in various colors

5 to 10 star jewels in different colors

Ruler

Scissors

Needle

Tacky glue

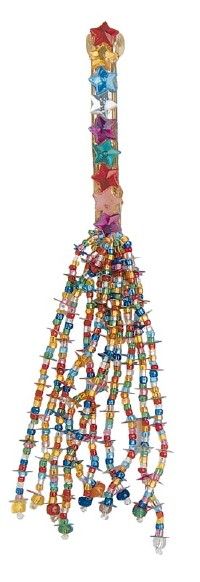
Step 1: To make the barrette danglers, measure 5 lengths of beading thread, 2 feet each.

Step 2: Insert 1 end of the thread through the round hole at the hinged end of the barrette. Pull it through the hole until it meets up with the other end of the thread; make a knot at the center. You should now have 2 pieces of thread hanging from the barrette that are the same length. Repeat this step with the other 4 lengths of thread.

Step 3: Insert 1 length of thread through a needle, and begin stringing on seed beads and sequin stars: 5 beads, 1 star, 5 beads, 1 star, etc.

Step 4: When you have made your dangler the length you want, add 1 E bead and a seed bead. Tie a knot, and then run the needle over the last seed bead, up through the E bead, and through about 1 inch of beads before cutting the thread.

Step 5: Repeat steps 3 and 4 for the other 9 strands of thread.

Step 6: To decorate the barrette, spread glue across the top of the barrette. Carefully place star jewels in the glue. Let dry completely before wearing.

Continue to the next page to learn how to make a wacky, wild beaded barrette!

For more fun crafts and activities for kids, see:

Advertisement
Beaded Barrette

You've never seen anything like this before. This beaded barrette is art in motion -- it rattles and shines, it's bold and brassy, loud and jazzy, and it's sure to become one of the faves in your hair's wardrobe. Continue reading to find out how to make this beaded hair barrette in five steps.

What You'll Need:

Advertisement

2-1/4" safety pins, one gold and one silver

1-3/8" safety pins, five gold and five silver

1-1/4" safety pins, 40 gold and 40 silver

Spaghetti beads, 40 gold and 40 silver

2-3/4" barrette

If you use fever beads, the safety pins will become more a part of the design. Create different patterns by changing the size, color, shape, or order of the beads. There's no limit to what you can do. Plastic beads will give you a flurry of color. This pair of barrettes would look great at the base of two pigtails or at the top of two braids.

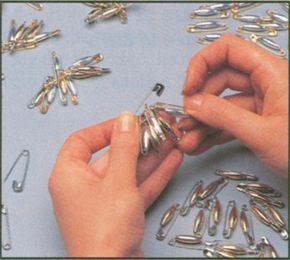
Step 1: Put the 40 silver beads onto the 40 gold 1-1/4" safety pins. Put the 40 gold beads onto the 40 silver 1-1/4" safety pins.

Step 2: Put four of the beaded safety pins onto each of the 1-3/8" safety pins. Alternate the color of the beaded pins-gold, silver, gold, silver.

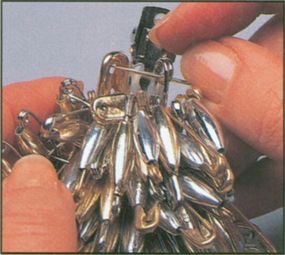
Step 3: Glue the 2-1/4" safety pins to the barrette as shown. They should lie head-to-foot, and they should be angled outward a bit. Once you've set the safety pin on the barrette, put on more glue to secure it.

Step 4: Attach the 1-3/8" safety pins to the 2-1/4" safety pins as shown. Put the first one through the holes at the ends of the 2-1/4" safety pins. Alternate the color and the direction of the 1-3/8" safety pins.

Step 5: Continue attaching the 1-3/8" safety pins in this way across the barrette. Put the last one through the holes in the ends of the 2-1/4" safety pins.

Have you ever heard of a ruffle ribbon with side rolls? Now you have! Continue to the next page to learn how to ruffle and roll.

For more fun crafts and activities for kids, see:

Advertisement
Ruffle Ribbon with Side Rolls

This beaded barrette creation is perfect for special occasions.

Want to learn how to make beaded hair barrettes to wear during those special holidays? Try this ruffle ribbon with side rolls! The ruffle ribbon is set off beautifully by a beaded pattern.

The ribbon can stand on its own, but adding something can give it a formal look to coordinate with a special outfit. The side rolls hairdo is just the icing on the cake.

Advertisement

What You'll Need:

1 yard ribbon, 2-1/2" wide

16" craft wire

44 pearl beads

20 plated beads

2-3/4" barrette

Note: The stitch size is an important part of getting the ribbon to gather properly. On thick ribbons, they should be 1/2" apart; on thinner, more delicate material, they should be 1/4" apart.

Tip: Fold the ribbon in half before you sew to put a faint crease in it; follow the crease as you sew to keep the stitches in a straight line.

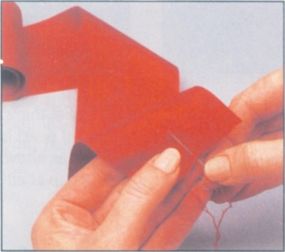
Step 1: Secure the thread at one end of the ribbon in the center using a double stitch. The thread should be doubled and knotted at the end.

Step 2: Neatly sew a running stitch down the center of the ribbon to the other end. The stitches should be approximately 1/2" apart.

Step 3: Hold the ribbon in one hand and the thread ends in the other. Carefully pull the thread in one direction and push the ribbon in the other to create the ruffle. When the ruffle is the desired length, tie or sew the thread ends securely in place. Trim any excess thread.

Step 4: Bend the craft wire in half and twist the wire together a few times at the end with the bend.

Step 5: Thread half the beads on one side of the wire and half the beads on the other side of the wire in an alternating pattern as shown -- two pearl beads followed by one plated bead.

Step 6: Twist the wire at every other group of pearl beads to create a pattern as shown. Do not twist the last group at either end of the wire.

Step 7: Place the beaded wire lengthwise across the top of the ruffle. Bring the ends of the wire around the back of the ruffle and twist them together securely. Trim any excess wire.

Step 8: Glue the barrette to the back of the ruffle.

How to Create Side Rolls:

Step 1: Pick up a section of hair from the hairline near the temple and hold it in your right hand palm up. Twist the hair by turning your hand palm down.

Step 2: Transfer the twisted section of hair to your left hand and hold it securely. Pick up a new section of hair in your right hand as shown. Add this to the hair in your left hand and give the whole thing a twist.

Step 3: Continue back along the hairline, adding new sections of hair and twisting, until you reach the nape of the neck. Pin the hair securely with a hairpin.

Step 4: Repeat on the other side of the head. Join the two twisted sections at the nape with a covered band. Insert the ponytail styler behind the band, loop end up.

Step 5: Pull the ponytail up through the loop.

Step 6: Gently holding the ponytail, pull the ponytail styler down so that the ponytail is pulled through behind the covered band. Hair flips over and drops down.

Continue to the next page to learn how to create a stacked bow with four-strand round braids.

For more fun crafts and activities for kids, see:

Advertisement
Stacked Bow with Four-Strand Round Braids

This stacked bow will add a touch to any outfit.

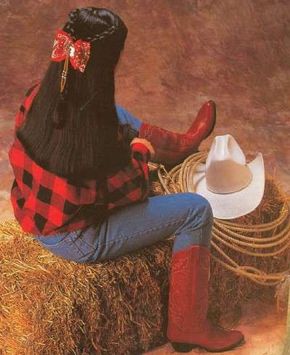
This stacked bow with four-strand braids barrette provides just the right accent to your Western wear. The red bandanna stands out sharply against dark hair; if you're a blonde or a redhead, you might want to try a different color -- maybe light blue.

Continue reading to learn how to make this beaded hair barrette.

Advertisement

What You'll Need:

Bandanna

Craft wire

10" leather strip

1-1/2" concha

Two wooden beads

Four plated beads

2-3/4" barrette

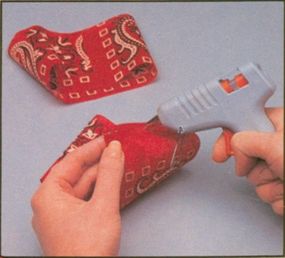
Step 1: Cut two strips of material from the bandanna, one 12" x 3 -1/2" and the other 9" x 3-1/2".

Step 2: Glue together the ends of each strip of material to form them into two loops.

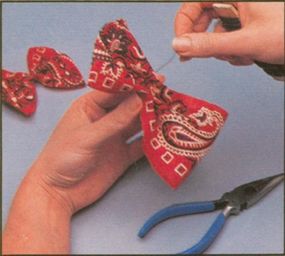
Step 3: Pinch together the center of each loop to form a bow. Wrap craft wire around the center of each bow to secure it.

Step 4: Place the small bow on top of the large bow and wire them together at the center. Fluff out the loops of the bows as needed.

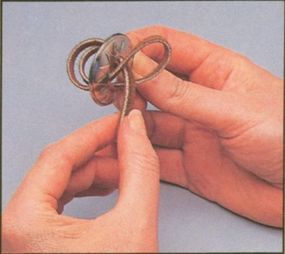
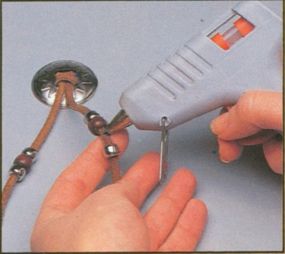
Step 5: Fold the leather strip in half. Insert the looped center through one of the holes on the concha and back through the other hole. Put the loose ends of the strip through the loop and pull to tighten.

Step 6: Put the beads onto the leather strip as shown, securing them with glue.

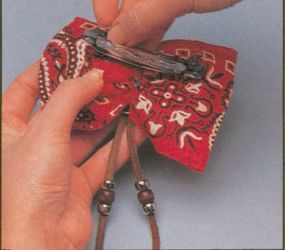
Step 7: Glue the concha onto the smaller bow.

Step 8: Glue the barrette onto the larger bow.

How to Create Four-Strand Round Braids

Step 1: Gather up the hair on one side of the head from the front hairline to the ear. Divide it into four equal strands. Cross the inside left strand over the inside right strand.

Step 2: With your right hand, reach behind the two inside strands and grasp the outside left strand. Bring the outside left strand behind the two inside strands ...

Step 3: ... and back over the inside right strand. In essence, this makes the outside left strand and the inside left strand switch places.

Step 4: With your left hand, reach behind the two inside strands and grasp the outside right strand. Bring the outside right strand behind the two inside strands and back over the inside left strand. In essence, this makes the outside right strand and the inside right strand switch places.

Step 5: Continue braiding in this way, bringing the outside strand behind the two inside strands and then back over one of them, until the braid is long enough to reach the crown. Fasten the braid at the crown with hairpins.

Step 6: Repeat this procedure on the other side of the head. Secure the two braids together at the crown.

Step 7: Divide the hair that's left over from the braided sections into four strands. Braid this hair using the same technique. Secure the braid with a coated band.

The best is yet to come! Continue to the next section to find out how to make a best-yet barrette.

For more fun crafts and activities for kids, see:

Advertisement
Best-Yet Barrette

Kids will love these hot pink beaded creations.

This best-yet barrette will brighten your day -- rain, sleet or snow! Learn how to make this beaded hair barrette in just four easy steps. Read on to get started.

What You'll Need:

Advertisement

Small (2 x 1/4-inch) barrette

Hot pink and blue embroidery floss

6 or 7 rocaille beads (4mm) in colors to match floss

Scissors

Craft glue

Step 1: Cut an 18-inch piece of each color of embroidery floss.

Step 2: Open the clip. Smooth a layer of glue on the top and inside top of the barrette. Press about a 1/4-inch tail of floss into the glue at the inside of the barrette, and begin wrapping. As you wrap, alternate the colors and be sure the floss lies flat.

Step 3: As you wrap, thread the beads onto the floss so they are evenly spaced. (NOTE: If you stiffen the ends of the floss with glue and let them dry, the beads will be easier to thread on.) Alternate the color of beads.

Step 4: Finish wrapping along the length of the barrette, trim the excess floss, and secure the ends of the floss to the underside of the barrette with glue. (To make the purple and silver barrette, follow the same instructions to cover the barrette using purple floss. Then wrap the silver floss evenly over the purple floss.)

Sometimes the occasion calls for smooth and glamorous hair, just like a movie starlet! And what better way to ornament this style then with these beaded, flossed, baubled barrettes.

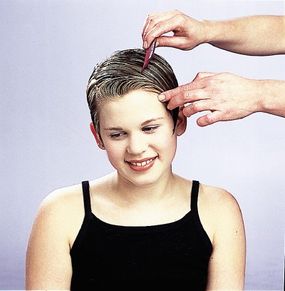
Step 1: Start with damp hair. Use a liquid texturizing lotion, which will give a medium hold, or a medium-hold gel. Distribute the gel through your hair with your fingers. Then comb through the hair.

Step 2: On the side you part your hair, take the end of the comb to make a large zigzag part. Bring the comb down, up, down, then up as you work back to the crown of your head. You are not trying to make a perfect zigzag part -- give your style character with an uneven part.

Step 3: Comb your hair away from both sides of the part.

Step 4: Blow-dry your hair with a large round brush to give your hair volume and body. Always keep the brush moving as you dry your hair. Dry hair in sections, beginning with one sections underneath and working up to the top of your head. Hold the hair out from your head before rolling it to give you the most volume.

Step 5: You can also run the brush and the hair dryer over the top surface of your hair to smooth the hair. Follow the brush with the air flow from the blow dryer out to the ends.

Step 6: Place the barrette to add a decorative touch to this style. Place another barrette beside the first for even more flair!

In the next section, best gal pals can create these beaded beauties -- together! Continue to the next page to learn how to create friends forever barrettes.

For more fun crafts and activities for kids, see:

Advertisement
Friends Forever Barrette

Let the beads dangle to the side when you wear this dainty barrette.

This friends forever barrette is shown off to good advantage against the smooth and sleek lines of this style.

This barrette is so easy, you'll want to make one for you and one for your best friend! Just follow the steps below to learn how to make this hair barrette.

Advertisement

What You'll Need:

Large, silver bobby-pin barrette

Nylon line

Alphabet beads (to spell out "FRIENDS," your name, and your best friend's name)

15-20 purple beads

2 small orange heart beads

15­­-20 orange beads

2 small purple heart beads

Scissors

Craft glue

Step 1: Cut a 10-inch piece of nylon line. Tie 1 end of the line to an end of the barrette. String the alphabet beads spelling FRIENDS onto the line. Run a line of glue on the outside of the barrette, set the beads in the glue, and tie the other end of the line to the other end of the barrette. FRIENDS will lay across the top of the barrette. Let glue dry completely. Trim tails.

Step 2: Cut a 10-inch length of line. Tie the middle of the line to the back curve of the barrette.

Step 3: On 1 tail, string 5 purple beads, the last letter of your name, a purple bead, the second to the last letter of your name, a purple bead...until you have completed your name. Thread on 5 purple beads, an orange heart, a purple bead, an orange heart, and a purple bead. Tie a knot after the last bead, and dab the knot and the last bead with glue.

Step 4: Repeat step 3 using the orange beads and your friend's name. Trim the ends of the line.

Mom can help you create this friends forever hairdo!

Let's get started on that slick hairdo!

Step 1: Start with damp, towel-dried hair. Work a defining cream through your hair.

Step 2: Use a pomade to make the hair look slick while giving it shine.

Step 3: Smooth the pomade over your hair's surface.

Step 4: Mold your hair into the shape that you want your style to be. To get the fullness that we got at the front, comb the hair in the opposite direction of your natural part. The pomade will hold the hair in place. If you like, dry your hair using a diffuser attachment on your blow-dryer. This will prevent the molded shape from getting blown around.

Step 5: Place the barrette where you want it. We placed it so it holds the bangs and sides back, while providing decoration to this very sculptural style.

Ready to get down and get groovy? On the next page, learn how to make a jeweled hair clip that your friends will surely envy!

For more fun crafts and activities for kids, see:

Advertisement
Groovy Jeweled Hair Clip

This jeweled clip and hairdo is sure to make you stand out in a crowd.

This groovy jeweled hair clip is the focal point in this glossy, smooth style. Groovy, baby!

Simply follow the steps below to learn how to make this beaded hair barrette, and the hairdo too!

Advertisement

What You'll Need:

Hair snap clip

30 translucent small pony beads

1 yard nylon line

Scissors

Step 1: Thread the beads onto the line. You will have to hold 1 end of the line while you string on the beads. When the beads are all strung, hold the ends together and place them around the snap clip. You may need to add or subtract a bead to fit your clip.

Step 2: Once you have the correct number of beads, tie the ends of the line together so you have a long tail and a 5-inch tail. Open the snap clip. Thread the shorter tail through the hole in the tip of the clip, and tie the beads to the clip.

Step 3: Place the bead circle on the top of the clip, fitting it to the shape of the clip. Using the long tail of line, wrap around the beads and the top of the clip. Wrap the line around every other bead.

Step 4: At the back end of the clip, wrap around every bead to hold them in place. Continue wrapping around the top of the clip. When you've gone completely around the barrette, tie the 2 ends of the nylon line together. Trim the tails. Adjust the beads around the clip.

Now that your jeweled barrette is complete, it's time to create that smooth hairstyle.

Step 1: If your hair is naturally curly or wavy, use a smoothing gel for this style. When you blow-dry your hair, the gel will make it easier to get your hair straight.

Step 2: Massage the smoothing gel through your hair.

Step 3: Dry the hair with a large round brush and your hair dryer. To get the hair as straight as possible, work from the bottom layers upward, section by section.

Step 4: To make the top as smooth as possible, stretch and smooth the hair along the top by following the heat of the blow-dryer after the brush. Keep the brush moving.

Step 5: When your hair is dry, use a pomade, sometimes called wax, to add shine and keep the hair smooth. Use the pomade sparingly.

Step 6: Work a small amount of pomade between your palms, and smooth it over the top surface of your hair.

Step 7: Gather the hair from the top front area of your head, and direct it back and away from your front hairline. Place the gem clip barrette to secure the hair.

Step 8: Take a section of hair behind the barrette, and lightly back comb the hair to give it some fullness. Gently fan the back-combed hair over the back of your head. Then gently smooth over the top of the hair. Spray with a bit of hair spray to hold.

Ready for more? Great! Continue to the next page to learn how to make a few sassy spangle dangle barrettes.

For more fun crafts and activities for kids, see:

Advertisement
Spangle Dangle Barrettes

This dangling barrette literally dances with every move you make!

This spangle dangle barrette is fantastic -- but add poofs of ponytails and it's spectacular!

Just follow the steps below to make this beaded hair barrette and you'll instantly add motion and color to your hairstyle. This style rocks!

What You'll Need:

Bobby pin

1/8-inch polyester ribbon in light pink, dark pink, and light blue

8mm faceted beads in clear, blue, and pink

Transparent spaghetti beads in pink and clear

Clear tape

Scissors

Ruler

Craft glue

Step 1: Using clear tape, secure the bottom (flat) side of the bobby pin to the edge of a secure flat surface, such as a table or desk.

Step 2: Cut the ribbon into 12-inch lengths: 1 light blue, 2 dark pink, 2 light pink.

Step 3: Double each piece of ribbon, fold it over the top (wavy) part of the bobby pin, and attach it to the bobby pin with a lark's head knot. Stiffen the ribbon ends with glue so that threading on the beads will be easier.

Step 4: To rows 1 and 5, thread on 1 clear spaghetti bead, make a knot, 1 blue faceted bead, make a knot, 1 pink faceted bead, make a knot.

Step 5: To rows 2 and 4, begin with a knot. Add 1 clear faceted bead, make a knot, 1 clear spaghetti bead, make a knot, 1 purple faceted bead, make a knot.

Step 6: On the middle row, begin with 1 blue faceted bead, add 1 clear spaghetti bead, 1 clear faceted bead, 1 blue faceted bead, 1 clear spaghetti bead, and 1 clear faceted bead. Make a knot.

Step 7: Trim the ends of the ribbon so the bottom of the ribbon dangle has a V shape. (Be sure to remove all the glued ribbon ends when you trim them.)

Mom can help you create this cute hairdo in a snap!

Follow these steps to create a spangle dangle barrette hairdo:

Step 1: Use a medium-hold gel in your hair, and blow it dry.

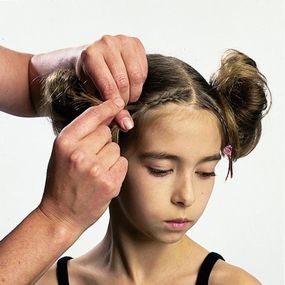
Step 2: Part the hair down the middle, from the front of your head to the nape of your neck. Leave a small piece of fringe on either side of the part.

Step 3: Make the hair poof by gathering your hair in a coated band.

Step 4: Twist the ponytail holder once, and pull the hair halfway through the band. You will have a loop of hair.

Step 5: Fan out and shape this loop of hair. Use a bit of hair spray if you want extra hold.

Step 6: Braid each of the side fringes left out of the ponytails. Use an under-braiding technique. Separate the hair into 3 strands, and bring the left strand under the center strand.

Step 7: Then bring the right strand under the center strand. Use this pattern throughout. If you are picking up hair along the scalp, join a little of the scalp hair to the outside strands before crossing them under the center strand.

Step 8: To add a bead, thread the bead onto a length of ribbon. Place an end of the ribbon along the braided end of hair. (Note: Have the ribbon and bead ready before you begin braiding.) Form a loop around the braid above the bead, and thread the end of the ribbon through the loop. Pull the loop tight. Repeat twice.

Step 9: Use the same technique in step 8 below the bead. Knot the ribbon below the bead to secure the bead and braid.

Step 10: Add the ribbon dangle wherever it will show best!

This next barrette will have a positive effect on you and everyone around you! Continue to the next page to learn how to create a true sparkle effects barrette.

For more fun crafts and activities for kids, see:

Sparkle Effects Barrette

This cool hairstyle and sparkling barrette are a perfect combination.

This pin-curl sparkle effects barrette will accentuate the lively nature of this textured hairstyle -- revel in all the fun!

With the simple steps below, learn how to make this beaded hair barrette -- then get ready for glitter, glitz, and color galore!

What You'll Need:

Double-pronged hair clip

Waxed paper

Blue glitter glue pen

Round, clear plastic lace

4mm crystal beads: 2 purple, 1 each of green, blue, red, yellow

Fold-over crimper

Scissors

Measuring tape

Wire cutters

Needle-nosed pliers

Step 1: Place a small piece of waxed paper between the top and bottom prongs of the hair clip. Paint the top of the clip with the blue glitter pen. Let paint dry completely.

Step 2: Measure and cut an 11-inch length of the plastic lace. Fold the middle of the lace around the spring of the hair clip. Thread a purple, a green, a blue, a red, a yellow, and a purple bead on both strands of the plastic lace. The beads should fit snugly on the lace.

Step 3: Evenly space the beads along the length of the lace.

Step 4: Most fold-over crimpers have a loop; if yours does, have an adult help you cut the loop off with the wire cutters. Put both laces into the fold-over crimper, and use the needle-nosed pliers to fold the crimper shut, leaving the tails free at the end.

How to make a sparkle effects hairstyle:

Step 1: Use a defining cream for its styling properties. It provides a medium hold with great flexibility.

Step 2: Work the defining cream through your wet hair.

Step 3: Power dry your hair, and use your fingers to give it body. Blow-dry your hair in every direction. Keep the blow dryer moving quickly over the hair as you move your fingers back and forth.

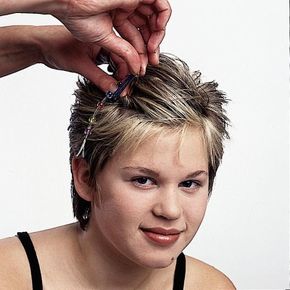
Step 4: Twist a small section of hair going back from the front hairline, and place the hair ornament. You may place the clip forward, backward, sideways -- however you want. Be creative! Place bits of hair around the hairline to frame the face. You can also give the hair a spritz of spray for hold if you wish.

Now that your barrette collection is well-stocked with glitz and glitter, it's time to stock up on glamorous creations. In the next section learn how to make glamor hair snaps!

For more fun crafts and activities for kids, see:

Glamor Hair Snaps

You'll look like a movie star when you wear this dreamy hair snap.

Girls will go buggy over these glamor snaps and style! Once you learn how to make these beaded hair barrettes, you'll see just how glamorous nature can be! Go ahead -- snap to it!

What You'll Need to Make a Dragonfly:

8 inches of light gauge wire

25 light yellow seed beads

2 dark blue seed beads

40 light purple seed beads

1 small clothes snap

Wire cutters

Jewelry glue

Beaded Dragonfly

Step 1: Slide 2 yellow seed beads to the middle of the wire.

Step 2: Take 1 end of the wire and insert it into the opposite end of the 2 yellow seed beads. Pull the wire tight so there is an even length of wire on both sides of the beads.

Step 3: On 1 wire, slide on 1 dark blue seed bead, 2 yellow beads, and 1 dark blue bead. Put the other wire into the beads from the other side, and pull the wire tight against the first 2 beads. Flip the beads so the row with the blue beads is on the top row.

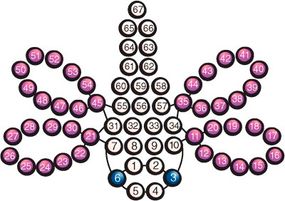
Step 4: On 1 wire, slide on 4 yellow seed beads (beads 7-10 on the diagram). Put the other wire into the beads from the opposite side, and pull the wire tightly.

Step 5: Slide 10 light purple seed beads onto a wire. Put the end of the same wire back through the first light purple bead (bead 11 on the diagram). Pull tight to form a wing. Repeat step 6 for the other side.

Step 6: Add another row of 4 yellow beads (beads 31-34 on the diagram).

Step 7: Repeat step 5, once on each side, to form the bottom wings.

Step 8: Twist the remaining wire around itself. Fold the wire to the back.

Step 9: Glue 1 side of the snap to the back of the dragonfly. Let the glue dry completely before wearing.

How to create a gorgeous glamor hair snaps hairstyle:

Step 1: If you have curly or wavy hair, use a diffuser to emphasize the texture. (If you have straight hair, use a curling iron to curl the hanging tendrils.) Work on the hair from the bottom to the top, picking up irregularly parted-out sections of hair. Twist the sections loosely. Leave some tendrils flowing loosely around the edges.

Step 2: Move the twist down, letting it twist into a coiled shape. Every twist will form and twist differently. Use your finger to support and move the twist around as you shape it.

Step 3: Pin the twisted shape into place, leaving a bit of the ends free.

Step 4: Spread the loose tendrils decoratively around the twists and pin with hair pins. You can shorten tendrils by winding them around the twisted shapes and anchoring them with hair pins.

Step 5: Place the beaded hair snaps around your front hairline to frame your face.

Gather your materials and tools, and get ready for more glamor. In the next and final section of this article, learn how to make a glamorous gathered barrette.

For more fun crafts and activities for kids, see:

Glamorous Gathered Barrette

Glamorous Gathered Barrette

This glamorous gathered barrette uses wrapped laces and beads to create a unique gathered look. Learning how to make this beaded hair barrette can be easy if you follow the simple steps below. Don't forget to ask mom to help you with your creation!

What You'll Need:

2 lanyard laces (for each barrette)

1-1/3 yards purple, 25 inches white laces

6-inch aluminum bracelet blank, 1/2-inch wide

Craft snips or tin snips (adult use)

Metal fingernail file

Ruler

Scissors

Masking tape

8 pony beads 6x9 mm: 4 white, 4 pink

Metal barrette, 2-1/2 inches long

Low- and high-temperature glue gun and glue (adult help needed)

Step 1: Ask an adult to use the craft snips to cut the bracelet blank in half crosswise, making two 3x1/2-inch pieces. Set 1 piece aside (for the second barrette). Smooth the edges and corners of the bracelet blank piece with a fingernail file.

Step 2: Cut five 5-inch pieces of white lace.

Step 3: Center bracelet blank on top of laces.

Step 4: Insert an end of the purple lace under the laces at 1 end of the bracelet blank. Glue the lace end to hold.

Step 5: Thread the purple lace through a white pony bead. Wrap the purple lace around the back of the bracelet blank, and thread the lace through the bead again. Repeat 2 more times, keeping the laces flat and wrapping the lace side by side.

Step 6: Repeat step 5, wrapping and threading the lace through each bead 4 times while alternating pink and white beads.

Step 7: Insert the end of the purple lace under the white laces at the bracelet blank end.

Step 8: Pull the purple lace tight. Glue to hold. Trim the end.

Step 9: With adult help, use the glue gun set on high, and apply the glue along the top of the barrette. Center the wrapped blank on the barrette.

With the tips in this article, you're sure to find the beaded hair barrette of your dreams.

For more fun crafts and activities for kids, see:

ABOUT THE CRAFT DESIGNERSThe following crafts were designed by Janis Bullis and Mary Beth Janssen-Fleischman:Beaded Barrette Ruffle Ribbon with Side Rolls Stacked Bow with Four-Strand Round Braids

Advertisement
Loading...