Knitting Instructions

Your journey into the world of knitting begins with needles and some yarn.

You can use the simple knit and purl stitches to make many wonderful things. But don't stop there! If you keep challenging yourself to try new patterns and learn new techniques, knitting will continue to be an exciting adventure.

This article offers a plethora of information that will help you create more complicated knit patterns. From making increases and decreases to mastering cables, the techniques outlined here will take you to the next level of knitting. You'll find:

  • Determining and Knitting Gauge
  • Take the time to find your knitting gauge before starting a project with help from the tips on this page.
  • Knitting in the Round
    Learn how to knit without seams using either circular needles or double-pointed needles here.
  • Knitting Increases
    Check out this page for tips on the variety of ways to make knitting increases, including yarn overs and the make one method.
  • Knitting Decreases
    From knitting two stitches together to the slip slip knit method, the decreases you'll learn in this section are sure to help you in your knitting endeavors.
  • Special Knitting Stitches
    On this page, you'll learn about special knitting stitches that show up often in patterns, such as a slip stitch, duplicate stitch, and simple I-cord.
  • Knitting Cables
    Knitting cables is a more advanced technique, but thanks to the tips in this section, you'll be creating beautiful cabled designs in no time!
  • Joining New Yarn
    Find out the best way to join new yarn to your project -- whether the same color or a different one -- with the tips featured here.
  • Knitting Buttonholes
    Check out this section for helpful tips on making buttonholes in sweaters and other knitted projects.
  • Fixing Knitting Mistakes
    Learn how to correct those inevitable knitting mistakes, such as as dropped stitches, on this page.
  • Basic Crochet Stitches
    Find out why knowing various crochet stitches can benefit your knitting in this section.
  • Finishing: Picking Up Stitches
    Get the basics on picking up stitches on various types of knitted edges here.
  • Finishing: Seams and Weaving Yarn Tails
    Learn tips on sewing seams and weaving yarn tails to ensure your knitted piece is both beautiful and sturdy.
  • Washing and Blocking Knitting
    Take note of the tips on this page to wash and block your knitted projects with care.
  • Felted Knitting
    Learn how to take a knitted piece and turn it into a unique, durable felted item in this section.
  • Standard Knitting Abbreviations
    Find a long list of the most common knitting abbreviations and their meanings on this page.

We'll start by learning the importance of determining gauge on the next page.

Advertisement

Determining and Knitting Gauge

The word gauge (or tension) refers to how many stitches (or rows) there are in an inch of knitting using a specific yarn and needle size. The resulting numbers are used to determine how many stitches and rows it will take to achieve a desired size. Remember, the needle size listed in the pattern is the size the designer used to obtain the listed gauge. Two knitters using the same materials may end up with different gauges. A difference of only half a stitch per inch could make a discrepancy of several inches in the size of the finished project. Take time to make a gauge swatch before starting your project -- you'll be glad you did. It may be necessary to make several attempts before you achieve the correct gauge.

How to Knit a Gauge Swatch

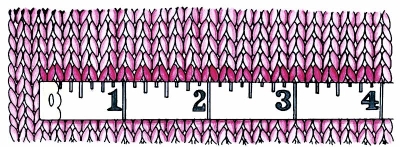
Use the main needle size listed in the pattern. Cast on about 6 inches worth of stitches, using the stitch gauge given in the pattern to determine the number to cast on. Work the main pattern until the swatch measures 4 inches in length; bind off all stitches. Lay the swatch on a flat, hard surface. Measure, then count 4 inches worth of stitches across the swatch (fig. 13a).

Determining gauge
Gauge Swatch: Figure 13a

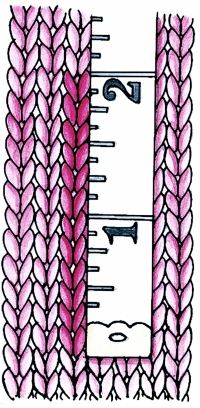
Divide this number by 4 to get the number of stitches per inch. Repeat the process a few times in different areas to confirm the count. To measure the rows, center a measuring tape or ruler lengthwise on the swatch, and count the number of rows over 2 inches (fig. 13b), or 4 inches if the pattern is very large vertically. Divide the total by 2 (or 4, if using that number) to determine the number of rows per inch. Note: Knit stitches are wider than they are tall. However, in stitch patterns such as stockinette stitch, you'll normally have more rows per inch than stitches per inch.

Determining gauge
Gauge Swatch: Figure 13b

Compare your gauge with the pattern gauge. If your gauge swatch has more stitches per inch than the pattern gauge, this means your stitches are smaller than the pattern gauge, and you'll need to try larger size needles until your swatch stitches are the same size as the required gauge. If your swatch has fewer stitches per inch than the pattern gauge, your stitches are larger than the pattern gauge, and you'll need to try smaller size needles to obtain the pattern gauge. Be exact in your measurements, and knit as many swatches as you need to, changing needle sizes until you find the size that allows you to obtain the correct gauge.

Find out how quick and easy knitting in the round can be with the helpful tips on the next page.

Advertisement

Knitting in the Round

To avoid sewing seams, you can work in rounds using circular needles or double-pointed needles.

Circular Needles

To work in rounds, cast your stitches on one end of the needle the same as you would on a straight needle. Check to make sure that the cast-on lays flat and smooth and is not twisted. Add a stitch marker to the end of the needle to mark the beginning of the round (fig. 14a), and work the first round according to your pattern instructions.

Knitting with Circular Needles: Figure 14a

Double-Pointed Needles

Evenly distribute your cast-on over three or four needles, keeping one needle out to knit with. Make sure the cast-on lays flat and smooth and no stitches are twisted. If you'd like, add a stitch marker to the first needle to mark the beginning of the round. (It's easy for a stitch marker to fall off the double-pointed needle, however, so be careful.) The needles either form a triangle (if you cast on to three needles) (fig. 14b) or a square (if you cast on to four needles). With the empty needle, knit all stitches on the first needle. When that needle is empty, use it to knit the stitches on the next needle. Continue to knit the stitches from each double-point onto an empty needle, working the stitches as instructed in the pattern.

Knitting with Double-Pointed Needles: Figure 14b

In the next section, you'll learn how to add stitches to your work.

Advertisement

Knitting Increases

Increases (inc) are used to shape your knitting and to create lace patterns. There are many ways to make an increase; we've listed a few standard methods below. Many pattern instructions specify which type of increase to use; others do not.

It's important to learn how each increase affects the appearance of your work so you can use the appropriate method. Make small knit swatches and practice each increase method listed here. Label them, and keep them for future reference. Avoid making increases and decreases in the edge stitches because they affect the ability to make a smooth seam when finishing. Make increases or decreases at least one stitch in from the edge stitches.

Yarn Over (yo)

A yarn over is the basis of most lace patterns and is very simple to make. In fact, many new knitters make yarn overs completely by accident (but in those cases it's called a hole, not lace). When moving the yarn from the front or the back of your work, you would normally be very careful to put the yarn between the needles and not over it (which would create an extra loop on the needle). To make a yarn over when knitting, bring the yarn to the front of the work and then knit the following stitches as instructed (fig. 16a). On the next row, work into the front loop of this strand (yarn over) as you would any other stitch, transferring it from the left needle after it is knitted.

Yarn Over: Figure 16a

Knit 1 in the Front and Back Loops (k1f&b)/Bar Increase

This is one of the most visible increases in stockinette stitch -- it leaves a little bump that looks like a purl stitch. Use it decoratively, or use it when the purl bump is part of a stitch pattern. The bar increase is one of the easiest to make and is usually a favorite with knitters.

Knit 1 in the Front and Back Loops: Figure 16b

To make it, knit the front loop, but don't remove the stitch from the left needle (fig. 16b). Knit into the back loop of the same stitch (fig.16c).

Knit 1 in the Front and Back Loops: Figure 16c

Make One (m1)

These increases are made simply by knitting into the horizontal strand between stitches on the right and left needles. One method creates a left-leaning increase, meaning that the front strand of the increase slants to the left. The other method leans to the right. This is called paired increases.

To make a left-leaning increase:

Step 1: Insert the left needle from front to back under the strand (fig. 16d).

Left-leaning Increase: Figure 16d

Step 2: With the right needle, knit into the back of the strand (fig. 16e).

Left-leaning Increase: Figure 16e

Step 3: Slip the strand off the left needle. You now have 1 new stitch (an increase) on the right needle. Note how the front strand of this new stitch leans toward the left (fig. 16f).

Left-leaning Increase: Figure 16f

To make a right-leaning increase:

Step 1: Insert the left needle from back to front under the strand (fig. 16g).

Right-leaning Increase: Figure 16g

Step 2: Knit into the front of the strand (fig. 16h).

Right-leaning Increase: Figure 16h

Step 3: Slip the strand off the left needle. You now have 1 new stitch (an increase) on the right needle. Note how the front strand leans toward the right (fig. 16i).

Right-leaning Increase: Figure 16i

Let's move onto knitting decreases on the next page.

Advertisement

Knitting Decreases

Use decreases (dec) for shaping the necklines of sweaters, making lace patterns, and many more things. Some decreases have a definite slant either left or right; pattern instructions sometimes specify which type you should use. Left- and right-slant decreases are referred to as paired decreases.

Knit Two Together (k2tog)

The knit two together decrease is made by working into two stitches at the same time. With yarn behind your work, skip the first stitch on the left needle and insert the right needle knitwise into the second stitch and the first stitch at the same time. Knit the two stitches as if they were one stitch (fig. 17a), and remove the stitches from the left needle. This decrease leans to the right on the knit side of the work.

Knit Two Together: Figure 17a

Purl Two Together (p2tog)

As the name suggests, this decrease is the purl-side method of the knit two together increase. With yarn in front of the work, insert the right needle through the loops of the next two stitches on the left needle as if to purl (fig. 17b); purl the two stitches as if they were one stitch, and remove the stitches from the left needle. This decrease leans to the right when viewed from the knit side.

Purl Two Together: Figure 17b

Slip Slip Knit (ssk)

Slip slip knit is a one-stitch decrease that leans to the left and is usually paired with knit two together on knit rows.

Work this decrease as follows: Slip two stitches knitwise, one at a time, from the left needle onto the right needle; insert the left needle tip from left to right into the front loops of both slipped stitches (fig. 17c) with yarn in back. Knit both stitches together from this position.

Slip Slip Knot: Figure 17c

Learn techniques for some of the other common stitches you'll find in knitting patterns, such as slip stitch, on the next page.

Advertisement

Special Knitting Stitches

While working a knitting pattern, you may come across some special stitches that don't fall into the category of increases or decreases. Following are tips on some of the most common.

Slip Stitch (sl st)

Sometimes instructions tell you to slip a stitch. This means you'll move a stitch to the right needle without knitting or purling. The instructions may indicate whether to slip it as if to knit or purl. To slip as if to knit (fig. 15a), keep the yarn behind your work and insert the right needle into the next stitch on the left needle as if to knit it. However, instead of wrapping the yarn around the needle, simply slide the stitch off the left needle and onto the right.

Slip Stitch - Slip as if to knit: Figure 15a

To slip as if to purl with yarn in back (fig. 15b), with the knit side facing you, insert the right needle tip into the next stitch on the left needle as if to purl, and slide the stitch onto the right needle.

Slip Stitch - To slip as if to purl with yarn in back: Figure 15b

To slip as if to purl with yarn in front (fig. 15c), with purl side facing you, slip the stitch as if to purl. When a stitch is slipped using either of these methods, the strand will not show on the knit side of the work. However, some stitch patterns reverse the normal process, so always follow instructions carefully.

Slip Stitch - To slip as if to purl with yarn in front: Figure 15c

Why does it make a difference how stitches are slipped? When stitches are slipped as if to purl, they are transferred onto the right needle untwisted, which means the front stitch loop remains in front of the needle. When slipped as if to knit, they are transferred in a twisted position. In other words, the back loop of the stitch is now in front. Some pattern stitches require this; others don't.

A rule of thumb about slipping stitches: Always slip as if to purl unless the pattern instructions specify otherwise. An exception to this rule is that you'll always slip as if to knit when the stitch is part of a decrease method. A stitch that's part of a decrease is transferred to the right needle as if to knit, in the twisted position, because it will later become untwisted when the decrease is complete.

Duplicate Stitch

Duplicate stitch is used to create small motifs, make small additions to intarsia (working large patches of color), mend socks, and cover knitting errors. It produces a stiff fabric, as stitches are duplicated on top of the knit fabric below. The technique is worked horizontally, vertically, and diagonally.

For horizontal stitches:

Step 1: Thread a tapestry needle with the same yarn type as the knit fabric beneath. Work with strands about 18" (46cm) long to avoid having the yarn plies untwist and fibers shed as the needle is drawn through the knit fabric many times. Rethread the tapestry needle as necessary.

Step 2: Begin the first duplicate stitch in the lower right corner of the motif or pattern. (You'll work from right to left.) Secure the yarn on the wrong side of the fabric, and bring the needle through to the front of the fabric at the base of the first stitch.

Step 3: Insert the needle into the right-hand side of the top of the same stitch, carry the needle and yarn across the back of the work, and bring them to the front on the left side of the same stitch (fig. 29a). Reinsert the needle into the base of the first stitch.

Horizontal Duplicate Stitch: Figure 29a

Step 4: Bring the needle up through the base of the stitch to the left of the stitch just duplicated. Repeat step 3.

To work the next horizontal row, insert the needle into the base of the last horizontal stitch worked, and then bring needle and yarn out to the front through the center of that stitch. Turn the work (the motif will be upside down), and work horizontal stitches across the second row of motif stitches, working the same as the previous row. Continue working horizontal stitches from right to left on each row. Weave the yarn tails through the backs of stitches to secure.

For vertical stitches:

Begin at the lowest point and work upward. Work the same way as for horizontal duplicate stitch, but bring the needle out to the front through the center of the stitch above the one just worked rather than the stitch to the left (fig. 29b).

Vertical Duplicate Stitch: Figure 29b

For diagonal stitches:

These are made using a combination of horizontal and vertical methods. Work one stitch horizontally, and instead of finishing by moving to the next stitch on the left in the same row, bring the needle out at the base of the next stitch on the left, one row above.

How to Make a Simple I-Cord

You can make an I-cord to use as a drawstring, strap, or tie using double-pointed needles or a short circular needle.

Step 1: Cast on 3 or 4 stitches onto one double-pointed needle. Slide the stitches to the other end of the needle. The working yarn is at the "wrong" end of the needle (fig. 22a).

Simple I-Cord: Figure 22a

Step 2: With the yarn stranded across the back of the stitches, pull it up to the front at the needle tip and knit the stitches (fig. 22b).

Simple I-Cord: Figure 22b

Step 3: Repeat step 2 until the cord is the desired length. Unless instructed otherwise, finish the last row as slip 1, knit 2 together, pass the slipped stitch over. Cut the yarn, and thread the end through the last stitch.

Knitting cables looks difficult, but once you get the basics down, you'll be amazed at the beautiful creations you can make. Learn about cables on the next page.

Advertisement

Knitting Cables

You have probably admired heavily textured Aran sweaters but thought such complicated patterns were beyond your skill level. Although an Aran design is not a good choice for your first project, it is something you'll be able to accomplish after honing your skills. One of the main features of an Aran design is the cable.

Cables are usually made on a background of reverse stockinette stitch because the bumpy background enhances the smooth cable twists. A cable is basically stitches crossed over each other on the right side of the work; they twist to the right or the left depending on whether you cross to the front or the back of the work. You will need a cable needle. You can use stitch markers to set off the stitches to be cabled, or you can just read your stitches (know the difference between the reverse stockinette background and the stockinette stitches of the cable) to see where to work the cable. Cables are worked over varying numbers of stitches, usually in stockinette stitch. One of the most common cables is based on four stitches.

Back Cross Cable, or Cable 4 Back (C4b)

The four-stitch back cable slants, or crosses, to the right. To make the cable, work to the beginning of the stockinette cable stitches, slip the next two stitches onto the cable needle, and hold it in the back of your work. Knit the next two stitches on the left needle (fig.18a), and then knit the two stitches from the cable needle (C4b made).

Back Cross Cable: Figure 18a

Front Cross Cable, or Cable 4 Front (C4f)

The four-stitch front cable slants to the left and is made in exactly the same way as the back cable, except that the cable needle is held to the front. Work to the beginning of the stockinette cable stitches, slip the next two stitches onto the cable needle, and hold it in the front of your work. Knit the next two stitches on the left needle (fig. 18b). Knit the two stitches from the cable needle (C4f made).

Front Cross Cable: Figure 18b

Knowing how to join new yarn to your work will come in handy for many knitting projects. Learn how on the next page.

Advertisement

Joining New Yarn

When you near the end of a ball of yarn, try to change to the new yarn at the row edge. This will prevent uneven stitches in the middle of your work and make weaving in the yarn tails much easier, because you can hide them in the seams.

Step 1: Using an overhand knot (to be removed when finishing the item), tie the old and new yarns together close to the needle, leaving a 4- to 6-inch (10-15cm) tail on both yarns.

Step 2: Drop the old yarn, and begin knitting with the new one. Once you are more experienced and feel more comfortable with controlling the yarns, you may choose to omit knotting the yarns together and simply drop the old yarn and start knitting with the new, tightening and securing the yarn tails later.

Another option is to hold the old and new yarn together and knit with both for a few stitches. Then drop the old yarn and continue with the new. This method attaches the yarn securely and decreases the number of ends to weave in later, but it can leave a noticeable lump, so don't use it in a prominent place.

Changing Colors

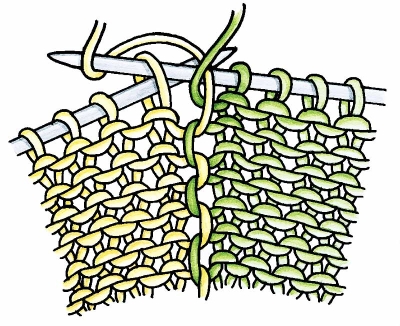
When changing colors somewhere other than the end of a row, drop the old color on the wrong side, pick up the new color from underneath the old, and continue knitting with the new color (fig. 21). This prevents a hole from appearing between colors.

Changing Colors: Figure 21

Stranding Colors

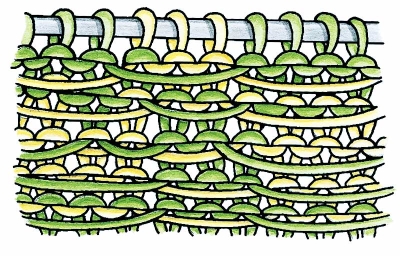
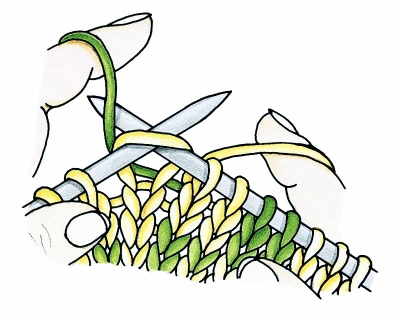
Sometimes called Fair Isle, Scandinavian, or Norwegian knitting, stranding is a technique that allows you to use two colors of yarn on the same row, carrying the yarn not in use across the back of the work (fig. 19a). Fair Isle knitting traditionally uses no more than two colors per row. Scandinavian stranded knitting often uses more than two colors per row. Choose patterns that avoid overly long strands (anything more than an inch worth of stitches). Otherwise, you'll need to weave in the yarn not in use to prevent snags when wearing the finished product. To weave in, strand the yarn not in use over the working yarn before making the next stitch.

Stranding Colors: Figure 19a

It is possible to knit with the yarn held in one hand, either American-English or Continental style, but you can knit much faster and control the tension (uniformity) of the stitches if you learn to knit with a yarn held in each hand (fig. 19b). Not only can you make beautiful sweaters with this technique, but you can really impress your friends when they see you knitting with both hands!

Stranding Colors: Figure 19b

Knowing how to knit buttonholes is an important technique for sweater patterns. Learn more in the next section.

Advertisement

Knitting Buttonholes

There are many ways to make buttonholes. Three of the most common are the horizontal, the vertical, and the yarn over. The pattern instructions indicate which buttonhole to use, and the materials section lists the number and size of the buttons needed. It's best to buy the buttons before you work the buttonholes so you know exactly what size to make them.

Buttonholes in knitting will stretch slightly with wear, so it's a good idea to make the buttonhole slightly smaller than the button. Don't buy buttons with pointed, rough, or sharp edges; they can snag fibers and wear through the yarn very quickly.

Horizontal Buttonhole

The horizontal buttonhole is sometimes called the two-row buttonhole because it takes two rows to complete it.

Step 1: On the right side of your knitting, work the specified number of stitches to the beginning of the buttonhole. Then bind off the required number of stitches and continue in pattern across the row. (Remember that it takes two stitches to bind off the first stitch.) Count your stitches at the end of the row, subtracting the number you were told to bind off.

Step 2: On the wrong side, work across the row to the bound-off stitches. Cast on the specified number using the simple cast-on or the cable cast-on. Continue in pattern across the row. Count your stitches to make sure you're back to the original stitch count.

Horizontal Buttonhole: Figure 23

Vertical Buttonhole

Both sides of this buttonhole are worked at the same time, using separate balls of yarn. If you don't have a spare ball of yarn, wind a small ball before beginning the buttonhole.

Step 1: Working on the wrong-side row and using the working yarn, work across the body of the garment to the desired place for the buttonhole. Drop the working yarn and pick up the new yarn ball. Join the new yarn ball and, beginning with the next stitch, work to the end of the row. The stitch count remains the same.

Step 2: Still using the new yarn, work across to the buttonhole. Drop the new yarn and pick up the working yarn. Using the working yarn, work to the other end of the row. Repeat steps 1 and 2 until the buttonhole is desired length.

Last row: With working yarn, work to the buttonhole and continue to the end of the row. Cut the new yarn, and weave in the loose ends. Continue in pattern, using the working yarn.

Yarn Over Buttonhole

This buttonhole is easy to make and is useful for garments, such as baby clothing, that need a small buttonhole. It's also self-enlarging, creating larger buttonholes when thicker yarns are used. It is worked over two stitches as follows: Work to where you want the buttonhole, then work yarn over (yo), knit two together (k2tog). The stitch count remains the same on this row.

Even the most experienced knitters make mistakes. Learn how to fix knitting mistakes on the next page.

Advertisement

Fixing Knitting Mistakes

One thing to know about mistakes in knitting is that we all make them. Fortunately, knitting is easily corrected, and you'll learn from any missteps. Once you learn to correct them, you'll be happily on your way again.

Dropped Stitches

Count your stitches often as you work, especially after casting on and after making increases or decreases. This habit will help you catch many mistakes. If your stitch count is less than it should be, it may be because a stitch has dropped from your needle.

Use a crochet hook to correct a dropped stitch, whether it has dropped one row or several rows (a running stitch).

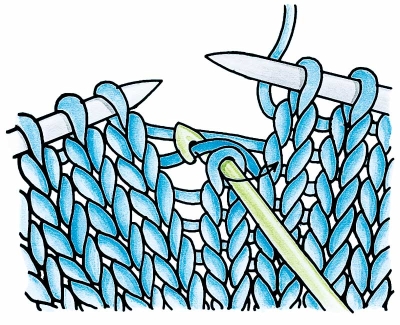
Step 1: Hold the knit side of the work toward you. Count the horizontal strands between the two needles to determine how many rows the stitch has slipped. It's important to begin with the very first strand closest to the dropped stitch. With the loose horizontal strands behind the loop of the dropped stitch, insert a crochet hook into the loop from front to back. Catch the first horizontal strand and pull it through the stitch (fig. 20a). Repeat the step with each horizontal strand until the dropped stitch is back at the current row.

Dropped Stitches: Figure 20a

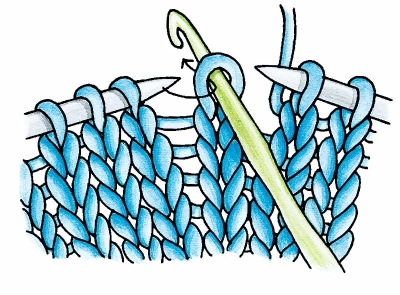
Step 2: Place the stitch on the left needle untwisted, with the right loop of the stitch in front of the needle (fig. 20b).

Dropped Stitches: Figure 20b

Continue in pattern.

Learn basic crochet stitches on the next page to add decorative edges and more to your knitting.

Advertisement

Basic Crochet Stitches

Knowing how to work a few basic crochet stitches is very useful in knitting. Chain stitch (ch), single crochet (sc), and double crochet (dc) are frequently used by knitters to create decorative edges, to cast on or bind off, and to make buttonholes, buttons, accessory cords, embellishments, and more.

Hook sizes are coordinated with knitting needle sizes, but the system for labeling size is different. Crochet hooks are numbered in several different ways. The smallest sizes are steel hooks, which use numbers. The higher the number, the smaller the hook size. Larger hooks are labeled with letters and numbers, A/0 through P/16. Some brands also include metric sizes. Many knitters use a hook one or two sizes smaller than their needle size to prevent the crochet from becoming ruffled or wavy instead of lying flat and smooth against the knit fabric. Practice on your gauge swatch to determine which size hook works best on your project.

Crochet Chain (ch)

The chain stitch forms the foundation row in crochet. It is quick and easy to make.

Step 1: Begin with a slipknot. Insert the crochet hook into the center of the slipknot from right to left, catching the working yarn. Pull up a loop, and place it on the crochet hook. Pull both the yarn tail and the working yarn to snug up the slipknot loop around the shank of the crochet hook.

Step 2: Holding the hook in your right hand and the working yarn in your left hand, bring the yarn over the hook from back to front, and pull it through the loop on the crochet hook (fig. 30a).

Crochet Chain: Figure 30a

Step 3: Repeat step 2 until the chain is the desired length (fig. 30b). When the last chain is made, cut the working yarn, leaving a tail to weave in later.

Crochet Chain: Figure 30b

Step 4: Thread the tail through the last chain on the hook, and pull to tighten and secure.

Single Crochet (sc)

Single crochet can be used as a quick and easy finishing edge on your knitted pieces. It is attached either directly to knit stitches, along a bound-off edge, or as a border for other crochet stitches. It makes a firm finish and helps the edges to lay flat.

Step 1: Insert the hook under a bound-off stitch (or wherever directed in the instructions). Bring the working yarn over the hook and pull through a loop, yarn over again, and pull it through the loop on the hook (fig. 31a).

Single Crochet: Figure 31a

Step 2: Insert the hook under the next bound-off stitch (fig. 31b), yarn over, and pull up a loop (two loops on hook).

Single Crochet: Figure 31b

Yarn over again, and pull the yarn back through both loops on the hook, leaving one loop on the hook (fig. 31c).

Single Crochet: Figure 31c

Step 3: Repeat step 2 until the required number of stitches is completed. Finish according to pattern instructions.

Double Crochet (dc)

This stitch is worked into a chain, single crochet, or directly into the knitting, as shown here.

Step 1: Insert the hook into the knitting one stitch in from the edge, yarn over and draw up a loop. Yarn over again, and pull it through the loop on the hook. Yarn over, insert the hook into the next base stitch (fig. 32a), and draw up a loop (three loops on hook).

Double Crochet: Figure 32a

Yarn over and pull it through the first two loops (fig. 32b), yarn over and pull it through the last two loops (fig. 32c).

Double Crochet: Figure 32b

Double Crochet: Figure 32c

The double crochet is complete; one loop is on the hook (fig. 32d).

Double Crochet: Figure 32d

Step 2: Yarn over, insert the hook in the next stitch, yarn over, and pull up a loop (three loops on hook). Yarn over and pull it through two loops, yarn over and pull it through the remaining two loops. The second double crochet is complete, with one loop left on the hook.

Repeat step 2 for pattern. To end the last stitch, after completing step 2, cut the yarn and pull it through the last loop on the hook.

On the next page, we'll start to learn about the finishing steps involved with a knitting project.

Finishing: Picking Up Stitches

Pick up stitches using a knitting needle or crochet hook and yarn. For a neater edge, use needles or a hook one or two sizes smaller than the working needle. After the pickup is finished, change to the needle size indicated in the instructions. The right side of the work is facing, unless instructed otherwise.

If the number of stitches to pick up aren't included in the instructions, measure the area of pickup, and multiply that number by the stitch gauge of the border pattern to be applied. Divide the area of pickup into quarter sections, or smaller spaces if necessary, and mark with pins or thread. This will help you maintain the same number of stitches in each. Example: Pick up and knit 100 stitches. Divide the area into fourths, and pick up 25 stitches in each quarter section. If the border uses a different color than the pickup area, pick up the stitches in the main color, then change to the new color on the next row.

Picking Up Stitches Along a Bound-off Edge

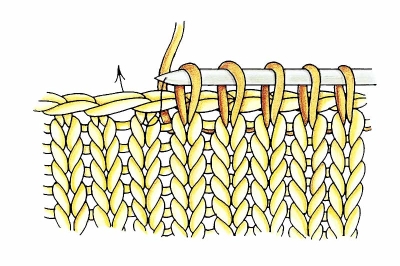
With the right side of the garment facing you, insert the tip of the right-hand needle into the first full stitch beneath the bind-off row (fig. 24a), wrap the yarn around the needle, and pull it through the stitch, creating a new stitch on the needle. Repeat in each stitch until the required number of stitches are on the needle.

Along a Bound-off Edge: Figure 24a

Picking Up Stitches Along a Side Edge

With right side facing, unless instructed otherwise, join the working yarn at the lower edge if not already attached. Insert the right needle into the fabric through the first full stitch of the first row and wrap the yarn around the needle knitwise. Pull through a loop, creating a new stitch on the right needle (fig. 24b).

Along a Side Edge: Figure 24b

Repeat the process, spacing the pickup stitches along the side edge as necessary, but always working into a full stitch. What's important is to not leave any holes or uneven spaces in the work. It's sometimes better to pick up more stitches than indicated, and then decrease the extra stitches evenly across the first row. You may want to practice stitch pickup along the side edges of your gauge swatch before picking up stitches on the actual garment.

Picking Up Stitches Along a Curved Edge

Curved edges are usually a combination of edges...horizontal, diagonal, and vertical. To pick up stitches along an edge that was formed by making decreases, such as along the neck shaping of a sweater, insert the needle into the stitch below the edge stitch (fig. 24c) -- not between the stitches -- to prevent holes from occurring when the pickup is finished.

Along a Curved Edge: Figure 24c

The next step in finishing your work is to sew seams and weave in yarn tails. Learn how on the next page.

Finishing: Seams and Weaving Yarn Tails

While it may be tempting to hurry through the finishing so you can finally see the completed project, it's important not to rush through sewing the seams and weaving yarn tails if you want the end result to look polished and professional. Block each piece before assembling, and allow the pieces to dry. This helps the edges remain flat as you work.

Shoulder Seams (bound-off edges)

Step 1: Lay both pieces flat, with right sides facing up. Thread a yarn needle, and, beginning at the right-side edge of the piece closest to you (the lower piece), insert the needle from back to front through the center of the first stitch. Pull the yarn through, leaving a yarn tail to weave in later.

Step 2: Insert the needle from right to left under the two vertical legs of the first stitch on the piece farther from you (fig. 25a), then insert the needle from right to left under the next two vertical legs on the near piece, beginning in the same hole as the first stitch was made. Pull the yarn gently to adjust the stitch and close the stitches together.

Shoulder Seams: Figure 25a

Step 3: Continue to alternate sides, inserting the needle from right to left under two strands and beginning in the same hole as the last stitch was made. Pull the yarn every few stitches to adjust it and close the seam. At the end of the seam, weave in the yarn tail.

Mattress Stitch

Mattress stitch is a great stitch to know when it comes to sewing vertical seams, including side and sleeve seams.

Step 1: Thread a yarn needle with matching color yarn, leaving a four-inch tail to weave in later. With both pieces flat and right sides facing up, insert the needle under the horizontal strand between the first and second stitches of the first row on one piece and the corresponding strand on the second piece. Gently pull the yarn to tighten.

Step 2: Insert the needle under the horizontal strand on the next row of one piece, and then insert the needle under the strand on the same row of the other piece.

Step 3: Continue to work under the horizontal strands, alternating pieces, until you have six to eight rows worked (fig. 25b), and then pull the yarn gently to close the seam.

Mattress Stitch: Figure 25b

Step 4: Continue weaving together to the end of the seam. Weave yarn tails into the seam stitches, and secure.

Backstitch

Backstitch is an easy way to make a firm seam.

Step 1: Thread a tapestry needle with matching yarn. With right sides together, work along the wrong sides about one stitch in from the edges. Work two running stitches on top of each other to secure the lower edges (fig. 26a).

Backstitch: Figure 26a

Step 2: With the needle and yarn behind the work, insert the needle through both layers of fabric about two stitches to the left of the running stitch and pull the yarn to the front of the work.

Step 3: Insert the needle from front to back one stitch back to the right, working through both layers.

Step 4: Moving forward to the left about two stitches, bring the needle to the front of the work, about one stitch ahead of the original stitch. Repeat the process until you reach the end of the seam, working one stitch backward (to the right) on the front side of the work and two stitches forward (to the left) on the back side of the work.

Step 5: Finish the seam by working two or three running stitches on top of each other, stitching over the bound-off edges. Weave in yarn tails.

Three-Needle Bind-off

This bind-off finishes off two edges, binding off the stitches and closing the seam at the same time. Normally used to close shoulders, it can also be used to close side seams when working a garment from side to side. You can also pick up stitches along two side edges and then use the three-needle bind-off to close those seams. To make a flat, neat seam on the right side, follow these instructions.

Step 1: With the right sides of the work together, and with the needle tips aligned and facing to the right (fig. 27a), hold both needles in your left hand.

Three-Needle Bind-off: Figure 27a

Step 2: Insert the empty right-hand needle into the first stitch on each of the two needles in the left hand, and knit the two stitches together (fig. 27b). Slip them off the needle as you would a knit stitch. You now have one stitch on the right needle.

Three-Needle Bind-off: Figure 27b

Step 3: Knit the next pair of stitches the same way. You now have two stitches on the right needle.

Step 4: Pull the first stitch on the right-hand needle over the second stitch (the one closest to the tip), just as you would in a normal bind-off (fig. 27c).

Three-Needle Bind-off: Figure 27c

Step 5: Repeat steps 3 and 4 until all stitches have been bound off. Cut the yarn and pull the end through the last loop; weave in the end to secure.

Kitchener Stitch (or Grafting)

This technique joins live stitches together in an elastic, invisible seam. The method can also be used over bound-off stitches to make a strong, stable seam.

With an equal number of stitches on two needles, and right sides facing up, hold the needles parallel to each other with points facing right. Thread a blunt tapestry needle with two to three times the length of the area to be joined. For live stitches, work as follows:

Step 1: Insert threaded needle into the first stitch on the front needle purlwise (as if to purl); leave stitch on needle.

Step 2: Insert needle into the first stitch on the back needle knitwise (as if to knit); leave stitch on needle.

Step 3: Insert needle into the same first stitch on the front needle knitwise (fig. 28a); slip stitch off needle.

Kitchener Stitch: Figure 28a

Insert needle into the next front stitch purlwise; leave stitch on needle (fig. 28b).

Kitchener Stitch: Figure 28b

Step 4: Insert needle into the same stitch on the back needle purlwise (fig. 28c); slip stitch off needle.

Kitchener Stitch: Figure 28c

Insert needle into the next back stitch knitwise; leave stitch on needle (fig. 28d).

Kitchener Stitch: Figure 28d

Repeat steps 3 and 4 until all stitches are worked.

Tip: To make the technique easier as you work, remember this...Front needle: purlwise leave on, knitwise take off. Back needle: knitwise leave on, purlwise take off.

Weaving in Yarn Tails

Carefully weaving in the yarn ends makes your knitting look neat and keeps it from pulling loose and unraveling over time.

Thread a tapestry needle with the yarn tail. Working on the wrong side of the knitting, weave the needle in and out of the back of the stitches for a few inches in one direction, and then turn and work in the opposite direction for an inch or two. Pull the yarn gently to tighten, and cut it close to the work. Stretch the knitting slightly so that the tail disappears into the last stitch.

Learn all about washing and blocking your knitted piece in the next section.
Washing and Blocking Knitting

Always save at least one label from your yarn when you make an item that needs to be washed often. Keep it where you can easily find it when it's time to wash the piece. Some yarns can be safely washed in the washing machine and dried in the dryer, but others would be destroyed by such treatment. If you have any doubt, play it safe -- hand-wash it.

Fill a sink with lukewarm water (never hot!), and add a small amount of mild soap made especially for delicate knits. Put the garment in the sink, and allow it to soak. Do not agitate or handle roughly, or felting could begin. Drain the sink, and gently press down on the garment to squeeze some of the water out. Never wring or twist a wet item; always support the weight so the item doesn't stretch. Fill the sink with cool rinse water; allow the item to soak, drain the water, and again gently press out the excess water. Repeat until the soap is removed.

Have a blocking board (a thick, padded board on which to pin damp garments so they can dry to the correct size) ready, or spread a layer of thick towels on a flat surface such as a table or a bed. (Never hang a knitted garment.) Lift the garment from the sink with both hands without stretching it, and spread it out on the prepared surface. Use a tape measure to shape it to the correct measurements. Pin in place using rustproof T-pins, and let dry.

Some yarns, including wool, can be blocked by using steam, but always check the yarn label first. Lay the garment on a blocking board, and pin it to the correct measurements. Keep the steam spray several inches above the garment -- never put it directly on to the garment.

Sometimes you wash a knitted piece in order to felt it. Learn about felting on the next page.

Felted Knitting

Felting (or fulling) is the process of using hot water, agitation, and suds to change (or shrink) a knitted piece into a felted fabric that will not unravel, even when cut. Felting creates a very durable fabric that is practical as well as beautiful.

When making an item to be felted, use extra-large needles and make it several sizes larger than normal. This creates space between the stitches and rows and allows the fibers to shrink while maintaining a smooth fabric surface.

Animal fibers are best for felting. You can use wool, mohair, camel, and alpaca, among others. Superwash wool yarns have been treated to resist shrinking -- they will not felt. Synthetic yarns do not felt, either.

To felt, set the washing machine on the hot water cycle and low water level. Add a small amount of dishwashing liquid; too many suds hampers the felting process. Add towels, tennis balls, or washable sneakers to the machine to balance the load and aid the felting process. Allow the machine to agitate for five minutes, then stop it to check the amount of felting. Continue to check every five minutes or so until the stitches completely disappear and the item is the desired size. The amount of felting time varies depending upon yarn, washing machine, and hardness of water.

Once the desired felting stage is obtained, remove the item from the washing machine, drain the soapy water, and fill it with cold rinse water. Soak the item in rinse water for several minutes to remove all soapiness. Set the machine directly on spin cycle to eliminate excess water from the felted item, or wrap it in a large towel and squeeze to take out the rinse water. Remove the felted item from the machine immediately after spinning to avoid wrinkling the fabric. Stretch, pull, and pat it into shape, and allow it to air-dry on a flat surface.

In the last section, you'll find a handy chart for deciphering all those knitting abbreviations.

Standard Knitting Abbreviations

Use this key as a reference for new and unfamiliar abbreviations found in knitting patterns.

[ ]
Work instructions within brackets as many times as directed
( ) Work instructions within parentheses in the place directed
* Repeat instructions following the asterisk as directed
* to ** Repeat instructions between the * and ** as directed
alt alternate
approx approximate
beg beginning/begin
bet between
BO bind off
CO cast on
cont continue
dec decrease/decreases/decreasing
dpn double-pointed needles
foll follow/follows/following
g st garter stitch
inc increase/increases/increasing
k or K knit
k1,p1 knit 1, purl 1
k2tog knit 2 together
kwise knitwise
LH
left-hand
m1
make 1 stitch
m1 p-st make 1 purl stitch
p or P purl
p2tog purl 2 stitches together
pm place marker
prev previous
psso pass slipped stitch over
pwise purlwise
rem remain/remaining
rep repeat(s)
rev St st reverse stockinette stitch
RH
right-hand
rnd(s) round(s)
RS right side
sk skip
skp slip, knit, pass slipped stitch over-1 stitch decreased
sk2p slip 1, knit 2 together, pass slipped stitch over the knit 2 together -- 2 stitches decreased
sl slip
sl1k slip 1 knitwise
sl1p slip 1 purlwise
sl st slip stitch
ssk
slip, slip, knit these 2 stitches together -- a decrease
sssk slip, slip, slip, knit these 3 stitches together -- a 2-stitch decrease
st(s) stitch(es)
St st stockinette stitch
tbl through back loop
tog together
WS wrong side
wyib with yarn in back
wyif with yarn in front
yfwd yarn forward
yo yarn over
yon yarn over needle


You've learned the basics of knitting -- but there's always room to improve. Keep working on the techniques detailed in this article and your projects will soon have a professional look.

    Advertisement

    Loading...