How to Make Kids' Necklaces

Wearable crafts are a fun activity to do with kids. These kids' crafts are a great way to spend a day. Necklaces are especially fun because they provide a fun way to make your own fashion statement.

Making your own necklaces isn't that difficult. Whether you are making your star-inspired necklace or a military dog tag, these necklaces are simple and easy.

Advertisement

Check out the links below to make your own necklaces.

Found Object Necklace

Make necklaces out of found objects.

Star Necklace

Brighten any room with this star-inspired necklace.

Ice Cream Cone Necklace

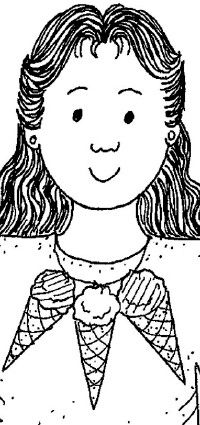
Everyone will scream when you wear this ice cream cone necklace.

American Medals

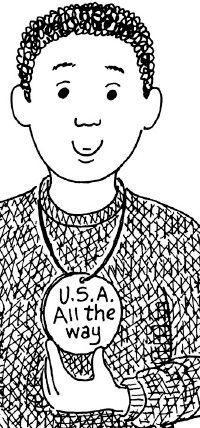
Celebrate your patriotism with this American medal necklace.

A Flower Necklace

Create a necklace from natural materials.

Photo Tag Necklace

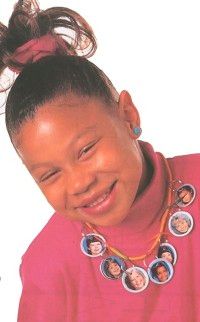
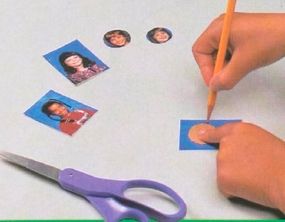
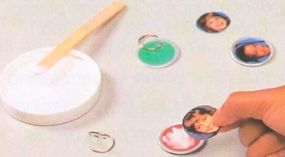
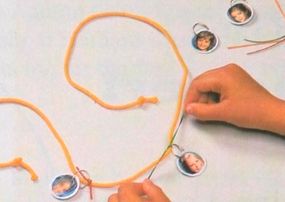
Keep your friends close by wearing their likeness around your neck.

Military Dog Tags

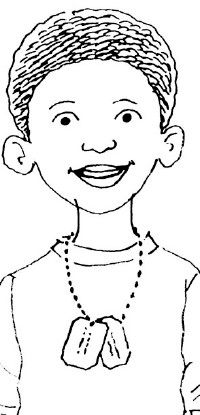
Make a necklace just like soldiers wear.

Aloha Hawaiian Lei

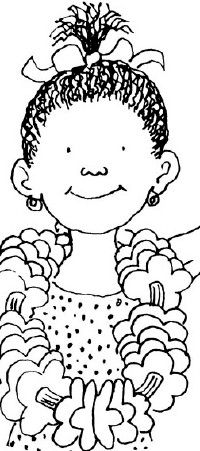
Enjoy island flavor with this Hawaiian-inspired necklace.

Check out the next page to find out how to make a necklace from items that you find.

For more fun activities and jewelry crafts, check out:

Advertisement

Found Object Necklace

Make necklaces from found objects.

When artists find something at a garage sale or lying around the house and use it in sculpture or jewelry, they call it a "found" object. You can make wearable crafts like a found object necklace, too. You can search for a vintage doodad for your one-of-a-kind object d'art.

How to Make the Found Object Necklace

What You'll Need:

  • Newspapers
  • An unusual, distinctive thing to hang from a necklace (such as an old key, earring, natural stone, game piece, etc.)
  • Poster paint and paintbrush or brightly colored nail polish (optional)
  • 36-inch-long black satin cord
  • Scissors

Spread out newspapers, and paint your object if you wish. Make sure you have good ventilation if you are using nail polish. Let the object dry for a day.

Advertisement

Fold the satin cord in half to find the center. Wrap the folded center loop around the object and pull the loose ends through the loop. Or tie the object in the center if necessary.

Knot the ends of the cord around your neck (be sure the cord is long enough to slip over your head). Then go knock 'em out with your unique sense of style!

Find out how to make a necklace to award for a special deed on the next page.

For more fun activities and jewelry crafts, check out:

Advertisement

Star Necklace

Make star-inspired necklaces.

Show someone they're appreciated or reward them for a special deed by making wearable crafts such as this star necklace. A fun kids' craft, this necklace is easy to make.

How to Make a Star Necklace

What You'll Need:

  • Flour
  • Salt
  • Cream of tartar
  • Water
  • Cooking oil
  • Measuring cups and spoons
  • Saucepan
  • Mixing spoon
  • Waxed paper
  • Rolling pin
  • Cookie cutters
  • Pencil or straw
  • Wire cooling rack
  • Poster paints
  • Paintbrush
  • Glitter markers
  • Ribbons

Have an adult help you make the clay. To mix up a small batch of play clay, stir together 2 cups of flour, 1/2 cup of salt, and 2 tablespoons of cream of tartar in a saucepan. Then add 1 cup of water and 2 tablespoons of cooking oil.

Advertisement

Put the pan over medium heat, and cook for 3 to 5 minutes. Stir the mixture constantly until it looks like mashed potatoes.

Dump the clay out on a sheet of waxed paper, but wait until the clay is cool enough to touch. Roll out the play clay to a layer about 1/4 inch thick.

Cut out stars (or other appropriate shapes) with cookie cutters.

With a pencil or straw, make a hole in the top, but not too close to the edge. The size of the hole depends on the thickness of the ribbon you're using.

Let the cutouts air dry for 24 hours on a wire rack. Paint them with poster paints, and let dry.

With the glitter markers, write on the names of the people who are receiving your awards and add any other messages. Thread ribbons through the holes and present your awards!

On the next page, learn how to turn ice cream cones into necklaces.

For more fun activities and jewelry crafts, check out:

Advertisement

Ice Cream Cone Necklace

Ice cream cones make a fun necklace.

Here's an ice cream cone you can wear! With this wearable craft activity, you'll learn how to fashion your own ice cream cone necklace -- a sweet treat indeed!

How to Make the Ice Cream Cone Necklace

What You'll Need:

  • Box of sugar cones
  • Clear varnish
  • Disposable paintbrush
  • Waxed paper
  • Shoe box with lid
  • Scissors
  • 2-inch craft foam balls
  • Glue
  • Staples
  • Modeling paste
  • Butter knife
  • Paints
  • Paintbrushes
  • Embroidery thread

Paint sugar cones with varnish inside and out -- have an adult help you, and do this in a well-ventilated area. Lay the cones on waxed paper to dry overnight.

Advertisement

Cut 1-inch holes in the lid of a shoe box, and put the lid back onto the shoe box. This is the stand.

The next day, run glue around the rims of the cones, and carefully press a foam ball onto each one.

Put a tiny bit of glue onto the ends of staples and push one into the top of each ball. Make sure you leave a little room for the embroidery thread cord to pass easily underneath the staple.

Put the cones into the stand until they are dry. Use a butter knife to swirl modeling paste over each foam ball. Make sure not to cover the staples. The modeling paste will make the balls look more like real ice cream. Put the cones back into the stand to dry.

Paint the ice cream in the colors of your favorite flavors. When the paint is dry, thread embroidery thread through the staples to finish your ice cream necklace. These cones are guaranteed to make everybody scream for ice cream!

Check out the next page to learn how to make patriotic medals.

For more fun activities and jewelry crafts, check out:

Advertisement

American Medals

Make your own American Medal.

Citizenship Day is a time to celebrate new citizens of the United States. It is also a day to remind us of our rights and privileges that have been guaranteed by the United States Constitution. With American Medals, you can present a new citizen with one of these homemade medals, or simply wear the medal yourself and celebrate your pride in being an American.

How to Make American Medals

What You'll Need:

  • Plaster of Paris
  • Water
  • Empty plastic tub
  • Disposable plastic cups
  • Pencil
  • Markers or paints
  • Clear nail polish
  • Cord

Present your favorite American with a patriotic medal.

Advertisement

Mix plaster of Paris and water in an empty plastic tub until it is thick and smooth. Pour 1/2 inch of the mix into a small plastic cup.

Quickly poke a pencil at one edge to make a hole to thread the necklace cord through. When the plaster has dried, peel away the plastic cup.

Paint your medal on both sides, and let it dry. You can now draw or paint patriotic messages such as "I Am an American," "U.S.A. All the Way!," or "Life, Liberty, and Happiness."

Protect your medal with a coat of clear nail polish after the paint has dried.

Thread enough cord through the hole to make a loop large enough for your head to pass through. You are now ready to wear or give away your medal with pride.

On the next page, you'll learn how to make a necklace from flowers.

For more fun activities and jewelry crafts, check out:

Advertisement

A Flower Necklace

Flowers make a colorful necklace.

In Hawaii, people make flower necklaces called leis. With this wearable craft, you can make a dazzling flower necklace, too.

How to Make a Flower Necklace

What You'll Need:

  • Flowers with stems (such as daisies)

To make a necklace, first you'll need to pick a lot of wild flowers that have long stems, such as daisies. (Be careful if you use dandelions, because the same yellow color that rubs off on your hands or chin can get messy.)

Advertisement

Here's how to chain them together:

Cross two stems at right angles. Loop the vertical stem around the horizontal one so it ends up alongside the horizontal stem.

Next lay a third stem at right angles to the two horizontal stems. Loop it around both horizontal stems. Keep adding stems this way until your lei is as long as you want it. Tie the last stem to the first flower to make a circle. Aloha!

Check out the next page to find out how to make a photo tag necklace.

For more fun activities and jewelry crafts, check out:

Advertisement

Photo Tag Necklace

Carry your friends with you.

Take your friends with you wherever you go! With this photo tag necklace, you can make a necklace using your friends' images. Make the arrow pin out of cardboard and key tags for a cool option!

How to Make a Photo Tag Necklace

What You'll Need:

  • Small piece of cardboard
  • Photos of friends
  • Key tags (available at hardware stores)
  • 1 yard yellow cotton cording
  • 1/4 yard each of red, orange, and green satin ribbon, 1/16 inch wide
  • Tracing paper
  • Pencil
  • Scissors
  • Tacky glue
  • Paper punch
  • Ruler

Trace the circle pattern onto cardboard and cut out. Center circle over your photo and trace with a sharp pencil. Cut out photo circle. (Tip: To cut a smooth circle, hold the scissors still while you turn the photo. Practice on scrap paper.) Cut out as many photos as you need.

Advertisement

Trace your friends' pictures.

Remove the ring from a key tag and apply glue to one side of the tag. Lay the photo over the tag, making sure the hole in the tag is at the top. Repeat with all photos. Let glue dry. Using the hole in the tag as a guide, punch a hole through the photo with the paper punch. Replace the ring. Prepare all photo tags.

Apply glue to photo tags.

Tie a knot at each end of yellow cording. Cut the satin ribbon into

4-inch lengths. Slip a piece of ribbon through the ring on the tag and tie the ring to the center of the yellow cord with a double knot. Trim ends of ribbon. Repeat for all photo tags, using all the ribbon colors.

Slip ribbons through the tag.

On the next page, find out how to make a military dog tag necklace like American soldiers wear.

For more fun activities and jewelry crafts, check out:

Advertisement

Military Dog Tags

Make your own

These dog tags aren't for dogs! They're ID tags like the metal ones American soldiers wear. In this craft activity, you can make your own military dog tags just like the real ones. Cool!

How to Make Military Dog Tags

Adult Help Needed

Advertisement

What You'll Need:

  • Pencil or pen
  • Aluminum pie pan
  • Ruler
  • Work gloves
  • Heavy-duty scissors
  • Needle-nose pliers
  • Paper clip
  • Hole punch
  • 18 inches of ball chain

You must have an adult help you with this project. Use a pencil or pen point to mark two 1-1/2x2-1/4-inch rectangles on the flat portion of the pie tin.

Wearing work gloves, cut out the tags with scissors. Trim the corners of the tags diagonally to make a pair of octagons.

Have an adult use the pliers to bend back the edges of the tags about 1/8 inch. Fold corners first, then tops and bottoms, and then the sides.

Again wearing your work gloves, place each tag right-side up on a hard surface and use the ruler to gently smooth the edges of the tags by rubbing the ruler along all the folded-down edges. (Have the adult check to make sure there are no sharp edges remaining.)

Now it's time to emboss your initials on the tags with the end of a paper clip. Place the tags on a soft surface, such as a stack of newspaper, and use just enough pressure to raise the letters without poking through the aluminum. Punch a hole in each tag 1/4 inch from the top.

String your tags, back sides together, onto the ball chain. Wear your tags with pride!

Check out the next page to find out how to make a colorful Hawaiian lei.

For more fun activities and jewelry crafts, check out:

Advertisement

Aloha Hawaiian Lei

Use pasta to make a Hawaiian lei.

Make your own version of the colorful lei Hawaiians give visitors as a way of saying "aloha" or "welcome." Theirs are made of beautiful flowers, but these Aloha Hawaiian Leis will last longer. In this wearable craft activity, try making your own lei.

Aloha Hawaiian Lei

What You'll Need:

  • Uncooked ziti pasta
  • Tempera paints
  • Paintbrush
  • Waxed paper
  • Colored crepe paper
  • Scissors
  • String
  • Large sewing needle

Color 16 pieces of uncooked ziti using tempera paints. Let them dry on waxed paper.

Advertisement

Cut out bunches of flower shapes from colored crepe paper. Loosely tie a knot in one end of a 3-foot piece of string.

Thread the other end through the eye of a large sewing needle. Sew through the centers of a dozen or so flowers.

String on a piece of painted ziti. Continue sewing on flowers and pasta, stopping 3 inches from the end of the string.

Undo the beginning knot, and tie the string ends together with a knot (be sure the lei is long enough to fit over your head). Aloha!

For more fun activities and jewelry crafts, check out:

ABOUT THE CRAFT DESIGNERS

Ice Cream Cone Necklace by Lisa Lerner and Kersten Hamilton

American Medals by Lisa Lerner and Kersten Hamilton

Advertisement

Advertisement

Loading...