How to Make Beaded Necklaces

You'll be the hit of the party when you wear a beaded necklace you make yourself.

Beaded necklaces are among the most versatile of all jewelry -- you can wear them to a fancy dress ball, at school, or when you're just hanging out with friends.

This article will teach you how to make many different types of necklaces. Make them all, and then wear whichever suits your mood.

Advertisement

Check out the links below for instructions on making beaded necklaces:

Native Necklace

Honor the original inhabitants of America with these beautiful necklaces.

Deep Aurora Necklace

Glow like the Northern Lights with this necklace inspired by the Aurora Borealis.

Got My Heart on a String Necklace

Give a gift from the heart when you make this necklace for a friend.

Lifesaver Necklace

This necklace may not save your life, but it will sure jazz up your outfit.

Loopy Necklace

Brighten the mood with this fun and light-hearted beaded necklace.

Peaches and Dreams Necklace

You're sure to draw lots of attention with this fanciful bead necklace.

Something Special Necklace

This blue crystal necklace is the perfect accessory for a sunny day.

Star Power Necklace

Do you feel like a star? You will when you wear this dazzling beaded necklace.

Triple Take Necklace

Impress your friends with a cool three-tiered beaded necklace.

What a Gem! Necklace

Use your favorite gems for this colorful necklace.

Radical Rickrack Necklace

A beaded necklace that's so easy to make, you'll want one for every day of the year.

Beads and Baubles Necklace

Ordinary household items are all you need to make this awesome beaded necklace.

Witch's Necklace

Your Halloween costume isn't complete until you put on this beaded necklace.

Rolled Bead Necklace

Colorful beads and colorful paper combine to make a beautiful hand-made necklace that makes for a wonderful gift.

Go to the next page to learn how to make your first beaded necklace.

For more fun activities and bead crafts, check out:

Advertisement

Native Necklace

Make a traditional native necklace in honor of the original North Americans.

What You'll Need:

  • Ravel-free burlap scraps
  • Scissors
  • Embroidery thread and needle
  • Thin wire
  • Beads
  • Ribbon

Step 1: Cut four different geometric shapes out of burlap. Sew around the edges so they don't unravel.

Advertisement

Step 2: Embroider the shapes with cross-stitches in geometric patterns. Use a different bright-colored thread for each pattern.

Step 3: Attach the burlap shapes with wire so that they hang down in a long line.

Step 4: Cut a piece of wide ribbon into fringe and sew on the bottom of the last shape. Sew a thin ribbon to each side of the top shape and tie in a knot; make sure the loop is long enough to pass over your head.

Step 5: Add more beads to hang down from the shapes with short pieces of wire if you like. Experiment with different shapes, and make necklaces for all your friends to wear.

Keep reading to learn how to make a necklace that will really light up the night.

For more fun activities and bead crafts, check out:

Advertisement

Deep Aurora Necklace

You'll glow like the Northern Lights when you

Aurora Borealis is the scientific term for the Northern Lights, a spectacular curtain of lights that glow from electrically charged particles in the earth's atmosphere. You, too, will be glowing when you wear this awesome Deep Aurora necklace.

What You'll Need:

  • 15 inches of necklace memory wire (depends on neck size)
  • Spoonful of seed bead/bugle bead mix in lavender, violet, and gold
  • 4 gold faceted beads, 4mm each
  • 4 aurora borealis hearts, 10mm each
  • 4 gold rosebud beads, 6mm each
  • 4 aurora borealis spacer beads
  • 7 aurora borealis drops, 6x11mm each

Tools:

  • Wire cutters
  • Needle-nose pliers

Step 1: Cut a piece of necklace memory wire long enough to coil around your neck about 1-1/2 times. Using needle-nose pliers, make a loop at one end of the wire. You may need an adult to help you with this step.

Advertisement

Step 2: String a few beads from the seed bead/bugle bead mix onto the wire. Then add on a gold faceted bead, one Aurora Borealis heart, a seed bead or small bugle bead, a gold rosebud bead, one Aurora Borealis spacer bead, and two Aurora Borealis drops.

Step 3: Now string on seed beads and bugle beads until you are about 1/2-inch from the center of the necklace. Add on one gold faceted bead, one heart bead, a seed bead or small bugle bead, a rosebud bead, and one spacer bead.

Step 4: Next, thread on three Aurora Borealis drops, each separated by a seed bead, for the center of your necklace. Then reverse your bead pattern by stringing on a spacer bead, one rosebud bead, a seed bead or small bugle bead, one heart bead, and a gold faceted bead.

Step 5: Thread on a mix of seed beads and bugle beads until you're about two inches from the end of the wire.

Step 6: Repeat step 2, but reverse the bead pattern by starting with two Aurora Borealis drops. Finish the necklace by making a loop at the end of the wire with the needle-nose pliers.

Keep reading to learn how to make another cool beaded necklace.

For more fun activities and bead crafts, check out:

Advertisement

Got My Heart on a String Necklace

Put your heart on a string with this beaded necklace.

This sophisticated got my heart on a string necklace will win heartfelt praise from your friends.

What You'll Need:

  • 20 inches nylon line
  • 2 cut-hematite round beads, 2mm
  • 1 hematite heart bead
  • 3 crimp beads
  • 1 clasp and jump ring

Tools:

  • Needle-nose pliers
  • Scissors

Step 1: String one round hematite bead on the nylon line and slide it to the center of the strand.

Advertisement

Step 2: Bring both ends of the nylon line together and string on the heart bead, the remaining round hematite bead, and one crimp bead.

Step 3: Slide this grouping of beads down until they touch the bottom round bead. The bottom round bead will turn on its side. Crimp down.

Your necklace will look like this when it is finished.

Step 4: Finish one end of the nylon line with a crimp bead and clasp, and finish the other end with a crimp bead and jump ring. To do this, slide a crimp bead and then a clasp onto the end of the nylon line. Thread the nylon line back through the crimp bead, and pull it tight so the crimp bead is close to the clasp.

Step 5: Using needle-nose pliers or crimping pliers, flatten the crimp bead so it stays in place. Using a sharp pair of scissors, trim the excess line as close to the crimp bead as possible, but only on the short end. Obviously, you need to leave the long end in order to string the beads. Before you crimp down, make sure that both sides of the necklace are the same length. Repeat on the other end with a jump ring.

Next you'll learn about a beaded necklace that's a real lifesaver.

For more fun activities and bead crafts, check out:

Advertisement

Lifesaver Necklace

This lifesaver necklace may not save your life, but it sure looks like a tasty treat.

This lifesaver necklace is almost good enough to eat.

What You'll Need:

  • 20 inches nylon line
  • 10 blue seed beads, 1mm
  • 10 clear seed beads, 1mm
  • 1 blue "lifesaver" bead
  • 1 iridescent star bead
  • 3 crimp beads
  • 1 clasp and jump ring

Tools:

  • Needle-nose pliers
  • Scissors

Step 1: String all 20 seed beads on the nylon line, alternating blue and clear. Slide them to the center of the strand.Step 2: Add the "lifesaver" bead and slide it to the middle of the seed beads. Bring the ends of the nylon line together, forming a loop of seed beads around the lifesaver.Step 3: String the star bead onto both strands of nylon line at once, and slide it all the way down until it touches the seed beads.Step 4: String a crimp bead onto both strands at once, and crimp it snugly against the star bead. Make sure both sides of the necklace are the same length before crimping down.Step 5: Finish one end of the nylon line with a clasp and crimp bead, and finish the other end with a jump ring and crimp bead. To do this, slide a crimp bead and then a clasp onto the end of the nylon line. Thread the nylon line back through the crimp bead, and pull it tight so the crimp bead is close to the clasp.

Advertisement

Step 6: Using needle-nose pliers or crimping pliers, flatten the crimp bead so it stays in place. Using a sharp pair of scissors, trim the excess line as close to the crimp bead as possible, but only on the short end. Obviously, you need to leave the long end in order to string the beads. Before you crimp down, make sure that both sides of the necklace are the same length. Repeat on the other end with a jump ring.

On the next page is a necklace that is sure to bring a smile to your face.

For more fun activities and bead crafts, check out:

Advertisement

Loopy Necklace

Add a whimsical touch with this loopy necklace.

Round and round this loopy necklace goes...where it stops, nobody knows!

What You'll Need:

  • 2 strands nylon line, 25 inches each
  • 2 crimp beads
  • 1 clasp and jump ring
  • 30 to 40 color-lined beads, size 6, assorted colors

Tools:

  • Needle-nose pliers
  • Scissors

Step 1: Holding both strands of nylon line together at one end, attach them to the clasp with a crimp bead. To do this, slide a crimp bead and then a clasp onto the end of the nylon line. Thread the nylon line back through the crimp bead, and pull it tight so the crimp bead is close to the clasp.

Advertisement

Step 2: Using needle-nose pliers or crimping pliers, flatten the crimp bead so it stays in place. Using a sharp pair of scissors, trim the excess line as close to the crimp bead as possible, but only on the short end. Obviously, you need to leave the long end in order to string the beads. Before you crimp down, make sure that both sides of the necklace are the same length.

Step 3: Thread the right strand of nylon line through a color-lined bead from right to left, then thread the left strand through the same bead from left to right. Pull gently, leaving a small section of nylon line between bead and crimp.

Step 4: Add another bead in the same manner: Thread the right strand through the bead from right to left, then thread the left strand through from left to right. Pull gently until the nylon line forms a small loop between beads. You determine the size loop you prefer. Just be consistent as you add beads.

Step 5: Repeat step 3 until the necklace reaches the desired length. Keep in mind that the nylon line will stretch somewhat as it is worn.

Step 6: Bring the strands back together, and finish the necklace with a crimp bead and jump ring.

Click next for more cool beaded necklaces.

For more fun activities and bead crafts, check out:

Advertisement

Peaches and Dreams Necklace

Try making this necklace -- it's a peach.

The design of this peaches and dreams necklace is the ultimate in fun and fancy. Be dreamy, and get noticed.

What You'll Need:

  • 4 strands nylon line, 20 inches each
  • 4 crimp beads
  • 1 clasp and jump ring
  • 46 pale pink pearlized beads, 2mm
  • 10 pale pink pearlized beads, 4mm
  • 1 head pin
  • 3-1/4 inches silvertone chain (links must be large enough for clasp)

Tools:

  • Needle-nose pliers
  • Scissors
  • Transparent tape or masking tape
  • Wire cutter
  • Round-nose pliers

Step 1: Holding all four strands of nylon line together at one end, string two crimp beads and the clasp onto all four strands.Step 2: Thread two of the strands back through one of the crimp beads, and thread the other two strands back through the other crimp bead. Pull the strands tightly so that the crimp beads are pushed snugly against the clasp and each other. Crimp down. Trim the excess line.Step 3: Tape the clasp to a table or other flat work surface to hold it in place.Step 4: String a 2mm bead onto the two middle strands.Step 5: Next, string a 2mm bead onto the left two strands by threading the right strand of nylon line through the hole from right to left, then threading the left strand through the same bead from left to right. Pull gently, leaving a small loop of nylon line.Step 6: String a 2mm bead onto the two right strands in the same manner: Thread the right strand of nylon line through the hole from right to left, then thread the left strand through the same bead from left to right. Pull gently, leaving a small loop of nylon line.

Advertisement

Step 7: String a 4mm bead onto the two middle strands.

Step 8: Repeat steps 5 through 7 for the rest of the beads, stopping when you have one 4mm bead and three 2mm beads left. Note: As you pull the nylon line, make sure you are creating loops of equal size and that the beads are evenly spaced.

Step 9: Tape the ends of the nylon line to hold the beads in place for the moment, and set the necklace aside until step 12.

Step 10: Make the remaining 4mm bead into a charm. To do this, insert a head pin into the hole of the bead. The head of the pin prevents the bead from falling off. Using a wire cutter and with an adult's help, cut the head pin to about 1/4-inch above the bead. Then, bend the pin sharply away from you.

Step 11: Using a round-nose pliers, grab the end of the pin and bend it toward you, around the pliers, to make a loop with the remaining head pin length. Before you close the loop, however, put it on the end of the silvertone chain, then squeeze it shut. The charm is now attached to the end of the chain.

Step 12: Use needle-nose pliers to attach the jump ring to the other end of the chain.

Step 13: Remove the tape from the end of the necklace, and repeat steps 5 through 7 one more time, using the last 2mm bead instead of a 4mm bead in step 7.

Step 14: Bring all four strands of nylon line back together. String two crimp beads and the jump ring onto all four strands.

Step 15: Thread two of the strands back through one of the crimp beads, and thread the other two strands back through the other crimp bead. Pull the strands tightly so that the crimp beads are pushed snugly against the jump ring and each other. Crimp down. Trim the excess line.

Next is a beaded necklace made out of cool blue crystal.

For more fun activities and bead crafts, check out:

Advertisement

Something Special Necklace

Chase the blues away with this blue crystal necklace.

You'll look beautiful wearing this something special necklace. You'll dazzle everybody in bright crystal blue.

What You'll Need:

  • 3 light blue crystals, 6mm
  • 3 head pins
  • 22 inches nylon line
  • 1 clasp and jump ring
  • 34 crimp beads
  • 19 light blue crystals, 4mm

Tools:

  • Needle-nose pliers
  • Scissors
  • Wire cutter
  • Round-nose pliers

Step 1: Make each of the 6mm crystals into a charm. To do this, insert a head pin into the hole of the bead. The head of the pin prevents the bead from falling off. Using a wire cutter and with an adult's help, cut the head pin to about 1/4 inch above the bead. Then, bend the pin sharply away from you.

Advertisement

Step 2: Using a round-nose pliers, grab the end of the pin and bend it toward you, around the pliers, to make a loop with the remaining head pin length. Set aside until step 7.

Step 3: Attach the clasp to one end of the nylon line with a crimp bead. To do this, slide a crimp bead and then a clasp onto the end of the nylon line. Thread the nylon line back through the crimp bead, and pull it tight so the crimp bead is close to the clasp.

Step 4: Using needle-nose pliers or crimping pliers, flatten the crimp bead so it stays in place. Using a sharp pair of scissors, trim the excess line as close to the crimp bead as possible, but only on the short end. Obviously, you need to leave the long end in order to string the beads.

Step 5: String on another crimp bead, and crimp in place about one inch from the clasp.

Step 6: Next, string on a 4mm crystal and another crimp bead. Crimp in place snugly against the crystal.

Step 7: Repeat steps 5 and 6, leaving 1/2 inch between bead groupings, until seven crystals are in place.

Step 8: String another 4mm crystal onto the nylon line, then thread the looped head pin of one of the 6mm crystal charms onto the nylon line.

Step 9: Thread the line back up through the 4mm crystal and pull it through until the 4mm crystal is 1/2 inch from the last crimp bead. Leave a 1/2-inch loop of nylon line where the 6mm crystal hangs.

Step 10: String on a crimp bead, and crimp in place 1/2 inch from the previous 4mm crystal, then string on another 4mm crystal and crimp bead. Crimp snugly in place, just as you did in step 6.

Step 11: Repeat steps 8 through 10 twice so there are three loops with 6mm crystals.

Step 12: Next, repeat steps 5 and 6 until the remaining crystals are in place.

Step 13: To finish, follow the instructions above for attaching the clasp to attach the jump ring and crimp bead to the end of the line.

When you wear the necklace on the next page you're sure to feel like a star.

For more fun activities and bead crafts, check out:

Advertisement

Star Power Necklace

Be the shining star when you wear this necklace.

This star power necklace will hang brightly around your neck, announcing your shining qualities to everyone you meet.

What You'll Need:

  • 1 small jump ring
  • 1 clear star bead
  • 24 inches nylon line
  • 5 plastic crystal rondelle beads, 6mm
  • 16 silver-lined seed beads, 2mm
  • 6 crimp beads
  • 1 clasp and jump ring

Tools:

  • Needle-nose pliers
  • Scissors

Step 1: Using needle-nose pliers, attach the jump ring to the star bead.

Advertisement

Step 2: String the nylon line through the jump ring, pulling it through until the star is positioned at the center of the strand.

Step 3: Bring the ends of the nylon line together and string one crystal rondelle bead and one seed bead onto both strands at once.

Step 4: Separate the strands, and string three seed beads on each side.

Step 5: String another seed bead on one of the strands, then thread the other strand through the same seed bead, going the opposite direction. This bead will turn on its side.

Step 6: On each strand, string one crimp bead, ­measure up two inches from the horizontal seed bead, and crimp in place.

Step 7: Next, string one seed bead, one crystal rondelle bead, and one seed bead on each strand. Note that there is no need for a crimp bead above the three-bead group -- gravity will keep the beads in place when the necklace is worn.

Step 8: Repeat steps 6 and 7, this time measuring up three inches from the last seed bead before flattening the crimp beads in place.

Step 9: Finish one end of nylon line with a crimp bead and clasp, and finish the other end with a crimp bead and jump ring. To do this, slide a crimp bead and then a clasp onto the end of the nylon line. Thread the nylon line back through the crimp bead, and pull it tight so the crimp bead is close to the clasp.

Step 10: Using needle-nose pliers or crimping pliers, flatten the crimp bead so it stays in place. Using a sharp pair of scissors, trim the excess line as close to the crimp bead as possible, but only on the short end. Obviously, you need to leave the long end in order to string the beads. Before you crimp down, make sure that both sides of the necklace are the same length.

Your friends won't be the only ones impressed when you wear the necklace you'll learn about next.

For more fun activities and bead crafts, check out:

Advertisement

Triple Take Necklace

Your friends will love this three-tiered necklace.

Your friends will do more than a double take when you wear this triple take necklace.

What You'll Need:

  • 50-1/2 inches nylon line
  • 27 crimp beads
  • 1 clasp and jump ring
  • 4 round transparent yellow beads, 4mm
  • 5 round transparent lavender beads, 4mm
  • 4 round transparent blue beads, 4mm

Tools:

  • Scissors
  • Needle-nose pliers

Step 1: Cut three strands of nylon line in the following lengths: 16 inches; 16-1/2 inches; and 18 inches.Step 2: Holding all three strands together at one end, follow the instructions on page 5 to attach them to the clasp with a crimp bead.Step 3: Using the shortest strand, string on a crimp bead and crimp down 5-3/8 inches from the clasp.Step 4: String on a yellow bead and a crimp bead. Crimp down snugly against the bead.Step 5: String on another crimp bead and crimp down 3/4 inch from the previous crimp bead, then add the next yellow bead and another crimp bead. Crimp down.Step 6: String on another yellow bead and crimp bead, pushing them snugly against the second yellow bead before crimping down.

Advertisement

Step 7: String on another crimp bead, and crimp down 3/4 inch from the previous crimp bead, then add the last yellow bead and another crimp bead. Crimp down.

Step 8: Move on to the middle strand of nylon line. String on a crimp bead, and crimp down 5-1/2 inches from the clasp.

Step 9: String on a lavender bead and a crimp bead. Crimp down snugly against the bead.

Step 10: String on a crimp bead, and crimp down 1/2 inch from the previous crimp bead, then add the next lavender bead and crimp bead. Crimp down.

Step 11: Repeat step 10 until all five lavender beads have been added to the middle strand.

Step 12: Move on to the longest strand of nylon line. String on a crimp bead, and crimp down 5-7/8 inches from the clasp.

Step 13: String on a blue bead and a crimp bead. Crimp down snugly against the bead.

Step 14: String on a crimp bead, and crimp down 3/4 inch from the previous crimp bead, then add the next blue bead and crimp bead. Crimp down.

Step 15: Repeat step 14 until all four blue beads have been added to the last strand.

Step 16: To finish, bring all three strands back together, and add the last crimp bead and the jump ring. To do this, slide a crimp bead and then a jump ring onto the end of the nylon line. Thread the nylon line back through the crimp bead, and pull it tight so the crimp bead is close to the jump ring.

Step 17: Using needle-nose pliers or crimping pliers, flatten the crimp bead so it stays in place. Using a sharp pair of scissors, trim the excess line as close to the crimp bead as possible, but only on the short end. Before crimping down, make sure all three strands are even on both sides and that they fall neatly inside each other.

Continue reading to learn about a necklace that will make you really sparkle.

For more fun activities and bead crafts, check out:

Advertisement

What a Gem Necklace

Sparkle with this gem necklace.

This what a gem necklace is a great starting point for creating beaded jewelry. Sparkles are everywhere, and that's all you see.

What You'll Need:

  • 17 inches nylon line
  • 1 clasp and jump ring
  • 8 crimp beads
  • 3 flower gemstone charms

Tools:

  • Needle-nose pliers
  • Scissors

Step 1: Attach the clasp to one end of the nylon line with a crimp bead. To do this, slide a crimp bead and then a clasp onto the end of the nylon line. Thread the nylon line back through the crimp bead, and pull it tight so the crimp bead is close to the clasp.

Step 2: Using needle-nose pliers or crimping pliers, flatten the crimp bead so it stays in place. Using a sharp pair of scissors, trim the excess line as close to the crimp bead as possible, but only on the short end. Obviously, you need to leave the long end in order to string the beads.

Step 3: String on a crimp bead, and crimp down six inches from the clasp.

Step 4: String on a flower charm and another crimp bead, and crimp down snugly against the charm.

Step 5: String on another crimp bead, and crimp down one inch from the previous crimp bead.

Step 6: Repeat step 4.

Step 7: Repeat step 5 and then step 4 again.

Step 8: Finish the necklace with a crimp bead and jump ring. Make sure you leave six inches of line between the last crimp bead and the jump ring so that the charms hang evenly from the middle of the necklace.

From charming to radical -- find out how to make a rickrack necklace on the next page.

For more fun activities and bead crafts, check out:

Radical Rickrack Necklace

You can make a radical rickrack necklace to match each of your favorite outfits. All you need is different colors of rickrack, brightly colored beads, small shells, and some thread, and you'll have a whole wardrobe of exciting jewelry.

What You'll Need:

  • Blue rickrack
  • Strong thread
  • Seed pearl beads
  • 18 to 22 small shells

Tools:

  • Sewing needle
  • Scissors
  • Thimble

Step 1: Ask an adult to help you if you don't know how to sew. Cut a piece of thread about 56 inches long. Thread the needle so the thread is doubled and tie a knot in the end. Step 2: Make a couple of stitches in the very end of the rickrack to secure the thread. Poke the needle through the rickrack about 1/2 inch from the end. Pull the thread tight. The rickrack will fold into a little loop.Step 3: Put the needle through the rickrack a few times, about every 1/2 to 3/4 inch, along the length of the rickrack. Pull the thread tight again. You will have a few rickrack loops.Step 4: String two or three pearl beads on, then stitch a couple more rickrack loops. Repeat this step twice.Step 5: When the gathered rickrack is an inch long, add a shell. Poke your needle into the opening of a shell and push gently. Most small shells have thin walls and the needle should go through easily. Be careful not to poke your finger! You might want to use a thimble to protect your finger. If you can't easily poke through the shells, ask an adult to help you make tiny holes in them.Step 6: Pull the thread tight, being careful that it does not tangle around the shell or rickrack loops. Repeat Steps 2 through 5 until your necklace is about 22 inches long. Step 7: Cut the rickrack and stitch this end to the beginning of the necklace.

Find out on the next page how to make an awesome beaded necklace with some common household items.

For more fun activities and bead crafts, check out:

Beads and Baubles Necklace

Ordinary household items can become a beautiful necklace.

Turn common household items into a fashionable beads and baubles necklace. Just a few items are all you need to make a special necklace for a friend.

What You'll Need:

  • plastic drinking straws
  • assorted colors permanent markers
  • scissors
  • clean foam meat trays
  • pencil
  • yarn or embroidery floss
  • clear tape

Step 1: Color several drinking straws with permanent markers. Cut them into 1/4-, 1/2-, and 1-inch lengths.

Step 2: Cut a few fun shapes from foam meat trays -- before using, wash the foam in hot, soapy water. Decorate the shapes with markers, then punch a hole in the center of each foam bead using the tip of a pencil.

Step 3: String the straws and foam beads on colored yarn or embroidery floss. Putting a bit of tape around one end of the yarn makes it easier to string.

Step 4: Tie the ends of the yarn or floss together in a bow.

You'll have the coolest costume at your next Halloween party when you wear the necklace on the next page.

For more fun activities and bead crafts, check out:

Witch's Necklace

Complete your Halloween costume with

Get into the Halloween spirit with this witch's necklace. Wear it to your next costume party.

What You'll Need:

  • 8-1/4x10-3/4 inches opaque shrink plastic
  • Medium-point opaque paint markers: black, orange, purple, green
  • Tape (optional)
  • Scissors
  • Hole punch
  • Baking sheet
  • Spatula
  • 30-inch length black rattail cord
  • Beads: 20 orange pony beads, 639mm each; 6 black melon pony beads, 10mm each

Step 1: Using the patterns you can download here, trace the ghost, bat, and witch outlines onto the shrink plastic with the black paint marker. You may want to tape the shrink plastic on top of the patterns to hold the plastic in place.

Step 2: Trace the faces and other details from the patterns onto the shapes with the paint markers, using the colors shown. Use a smooth back-and-forth motion when you color so you cover the shrink plastic evenly. Let each color dry completely before adding the next color. Opaque plastic will appear white when it shrinks, so you don't have to color any areas that should be white.

Step 3: When the paint is dry, cut out each shape along its outline.

Use the hole punch to make two holes in each shape as indicated on the patterns.

Step 4: Ask an adult to help you bake the shapes in the oven according to the manufacturer's directions. (Note: Do not remove the shapes from the oven until they have completely flattened. Use a spatula to separate them if the parts stick to each other while baking and to press them after you take them out of the oven.) When the shapes are done baking, remove them from the oven and let them cool.

Step 5: Insert one end of the rattail cord through the holes on the witch's hat and slide the witch to the middle of the cord. Hold the two ends of the cord together in one hand and pull on the witch with the other hand to make sure it is in the middle, and keep it in the middle as you work.

Step 6: Slide two orange beads, one black bead, and two more orange beads onto the cord on the right side of the witch. Slide the ghost onto the cord on the right side of the beads, then add two orange beads, one black bead, two orange beads, one black bead, and two orange beads onto the cord on the right side of the ghost. Tie a knot in the cord to the right of the last bead.

Step 7: Slide two orange beads, one black bead, and two orange beads onto the cord on the left side of the witch. Slide the bat onto the cord on the left side of the beads, then slide two orange beads, one black bead, two orange beads, one black bead, and two orange beads onto the cord on the left side of the bat.

Step 8: Tie a knot in the cord to the left of the last bead. Tie the ends of the cord together to finish the necklace.

Continue reading to learn about another fun and easy-to-make beaded necklace.

For more fun activities and bead crafts, check out:

Rolled Bead Necklace

Handmade necklaces make perfect birthday presents.

With a little time, some simple tools, and colorful paper, you can make this stunning rolled bead necklace. Remember that mothers and grandmothers would be proud to wear creative, handmade beaded jewelry, too.

What You'll Need:

  • 11x14-inch orange art paper
  • 11x5-inch magenta art paper
  • 3-1/2x5-inch gold metallic paper
  • 24 inches of elastic, 1/8 inch wide

Tools:

  • Ruler
  • Pencil
  • Scissors
  • Dowel or knitting needle
  • Tacky glue
  • Toothpick
  • Tracing paper

Step 1: Measure a 6-1/2x11-inch rectangle of the orange paper. Along a 6-1/2-inch side, make a mark 3/4 inch from the right-hand corner of the paper. Make a mark 1/4 inch from the first mark and another mark 3/4 inch from the second mark. Continue measuring and making marks alternately 3/4 inch and 1/4 inch apart until you have 12 marks along the edge of the paper.

Step 2: Along the other 6-1/2-inch side, make a mark 1/4 inch from the right-hand corner of the rectangle. Make a mark 1/4 inch from the first mark. Continue measuring and making marks alternately 1/4 inch and 3/4 inch apart until you have 13 marks along the line. Use the ruler to draw a cutting line from the right-hand bottom corner of the paper to the first mark at the top. Draw lines between the other marks at both ends of the rectangle.

Step 3: Using scissors, cut along the lines to make 12 tapered strips.

Step 4: From the magenta paper, make six tapered strips, 11 inches long, following steps 1 through 3. (For 6 strips, you'll make six marks along the bottom of the paper and seven marks at the top.)

Step 5: Place the dowel over the wide end of one strip of paper. Wrap the paper once around the dowel and secure with a small amount of glue. Continue wrapping, taking care to keep the strip centered. Add glue to the end of the strip to secure bead. Remove the bead. Repeat with the other strips.

Step 6: On the orange paper, measure and mark 13 strips, 3/8x10 inches. (These strips are not tapered.) Cut the strips. Following the instructions in Step 5, roll the strips into beads. On the gold paper, measure and mark 13 strips, 3/8x1-1/2 inches. Cut out. Squirt a small amount of glue on the back of a gold strip and wrap it around a cylindrical orange bead. Cover the remaining cylindrical beads with gold paper.

Step 7: Trace a heart pattern that you like onto tracing paper and cut them out. Trace the smallest heart on gold paper and cut out. Cut the medium-size heart from magenta paper and the largest heart from orange paper. Trim the magenta heart slightly and make small snips all around it. Glue the gold heart to the magenta heart, then glue the magenta heart to the orange one.

Step 8: Make a hanging loop for the heart pendant by cutting a 1/2-inch strip of orange paper 11 inches long. Roll the paper into a bead (see Step 5), leaving the last inch of the strip free. Glue end of the strip to the back of the heart.

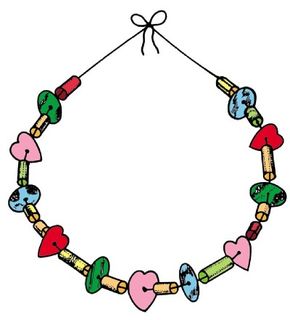
Step 9: String the beads on the elastic, placing the pendant in the middle and positioning the beads on either side of it (check the photo above for the pattern). Pull the ends of the elastic slightly, then tie with a square knot. Trim the excess elastic and hide the knot inside one of the gold beads.

For more fun activities and bead crafts, check out:

About the Craft DesignersNative Necklace by Lisa Lerner and Kersten HamiltonRadical Rickrack Necklace by Janelle Hayes and Kim SolgaRolled Beaded Necklace by Sharon Broutzas, Rice Freeman-Zachery, Connie Matricardi, Susan Milord, Lynette Schuepbach, Kim Solga, Florence Temko

Advertisement

Loading...