How to Make Beaded Jewelry

Beaded jewelry is an easy way to put a unique twist on your outfit.

Beaded jewelry is a great way to put a twist on an old outfit or add panache to a new one. And beads are affordable, proving that beautiful jewelry doesn't have to be expensive.

No matter what look you are going for, there is sure to be a perfect piece of beaded jewelry that will help you achieve it.

Advertisement

Springtime Jewelry

This beaded jewelry is perfect for your spring outfits, but you can customize it for any season.

Puttin' on the Glitz Jewelry

Feel like a glamorous night out on the town? This beaded jewelry is the perfect accoutrement.

Simply Ear-resistible Ear Cuff

Your friends will all want to know where you got this awesome piece of beaded jewelry.

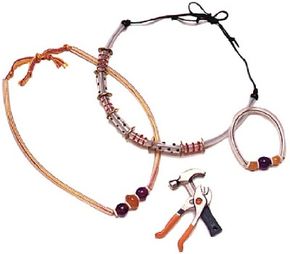
Hardware Store Jewelry

Sometimes common household items can be turned into cool beaded jewelry -- find out how.

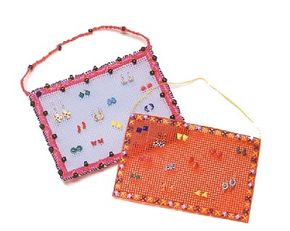
Awesome Earring Keeper

These are the perfect places to keep all the beaded jewelry you'll be making.

The first jewelry you'll learn how to make is a great way to celebrate the changing of the seasons. Click next to learn more.

For more fun activities and bead crafts, check out:

Advertisement

Springtime Jewelry

Wear this beaded jewelry to complement

This springtime jewelry will provide the perfect touch to your new spring outfit. Put your own twist on it for the other seasons -- you'll be bead-dazzling all year long.

What You'll Need:

  • 45 inches of stretchy beading cord
  • 200 to 300 green seed beads (depends on neck size)
  • 20 to 30 seed beads in an assortment of colors
  • 20 to 30 flower beads

Tools:

  • Needle
  • Scissors

Step 1: Tie a knot two inches from one end of the stretchy beading cord. Thread the other end of the cord through a needle.

Advertisement

Step 2: String six green seed beads onto the cord. Add on a different-color seed bead and then a flower bead.

Step 3: To make a leaf, string on nine green seed beads. Then thread the needle back down through the sixth bead from the bottom. Pull gently. Add six more green seed beads, a bead of a different color, and another flower bead.

Step 4: Repeat steps 2 and 3 until the necklace is the length you want. Tie the ends together, and trim any excess cord.

Have fun with this by trying variations for different seasons. For example, you can use orange and green beads and pumpkin charms to make a necklace for autumn, or clear and white beads for an icy cool necklace in winter.

Go to the next page for jewelry that will add some glamor to your life.

For more fun activities and bead crafts, check out:

Advertisement

Puttin' on the Glitz Jewelry

Add a touch of glamor with colorful jewelry.

You'll be ready for a night out on the town with this outtin' on the glitz jewelry. It's simple to make and, thanks to its rainbow of colors, will be simply perfect with any outfit.

What You'll Need:

  • 14 inches of clear stretchy beading cord
  • 16 small silver washer beads
  • 14 E beads in a variety of colors

Tools:

  • Needle
  • Scissors

Step 1: Tie a knot two inches from one end of the stretchy beading cord. Thread the other end of the cord through a needle.Step 2: Thread two silver washer beads onto the cord, then two E beads (choose any colors you like.) Repeat this pattern until there are eight sets of silver washer beads and seven sets of colored E beads. The rest of the clear stretchy cord will be left un-beaded so that the silver washer beads and E beads look as if they are floating around your neck.Step 3: Cut the knot and needle off the ends of the beading cord. Tie ends together in a knot at the desired length, and trim any excess cord.

Advertisement

There is more to jewelry than bracelets and necklaces -- next you'll learn how to make a more unusual piece.

For more fun activities and bead crafts, check out:

Advertisement

Simply Ear-resistible Ear Cuff

This ear cuff will add a stylish and unusual touch

This simply ear-resistible ear cuff will make all your friends want to know where they can get one of their own. This design is simply fun for any age.

What You'll Need:

Advertisement

  • 2-1/2 inches nylon line
  • 2 crimp beads
  • Silvertone ear cuff with hole on side
  • 2 hematite star beads
  • Silvertone twist tube

Tools:

  • Needle-nose pliers
  • Scissors

Step 1: String a crimp bead onto the nylon line, then thread the nylon line through the hole in the ear cuff. Pull the line back through the crimp bead so the short end just clears the crimp bead. Crimp down. The ear cuff is now attached to the nylon line. Trim the excess short line, leaving one line remaining.

Step 2: Next, string a star bead, the twist tube, and the other star bead onto the line.

Step 3: String the other crimp bead on the nylon line. Slide all the beads down, leaving 1/2 inch of nylon line between the ear cuff and the first star, and crimp down. Trim the excess line.

Don't throw out that stuff in the garage -- it just might be future jewelry. Keep reading to learn how to make jewelry out of household items.

For more fun activities and bead crafts, check out:

Advertisement

Hardware Store Jewelry

You can turn stuff from the garage into cool jewelry.

This hardware store jewelry proves that you don't need expensive jewels to have the coolest jewelry. Some basic hardware and craft supplies will make you the envy of all the girls.

What You'll Need:

  • 16 inches clear plastic tubing, 1/4 inch diameter
  • #5 perle cotton floss: purple, orange, and yellow
  • 18-gauge florist wire
  • 4 synthetic bone discs, 10mm each
  • 2 purple pony beads, 14mm each
  • 1 orange pony bead, 16mm

Tools:

  • Heavy-duty or utility scissors

Step 1: Cut tubing into two eight-inch pieces with scissors. Ask an adult for help.Step 2: Cut two 36-inch strands of each color of floss. Bend a hook in one end of the florist wire and slip all six strands of floss through the hook.Step 3: Slip wire with floss through a piece of clear tubing. Pull the floss through the tubing. Pull wire and floss through a disc, a purple bead, another disc, the orange bead, a third disc, another purple bead, and the last disc. Slide wire through the second piece of tubing.Step 4: Adjust and center all the pieces on the floss. Remove floss from wire and tie floss into a knot close to the end of the tubing on each side.

Advertisement

What You'll Need:

  • 1 foot clear plastic tubing, 5/16 inch diameter
  • Dimensional paint: black and red
  • 1 yard black beading cord
  • 8 brass washers, 1/4 inch each
  • 1 foot white opaque plastic tubing
  • 1/4 inch diameter
  • 2 black beads, 1/4 inch each

Tools:

  • 7 pencils
  • Glass

Step 1: Using scissors, cut clear tubing into three one-inch chunks and four 3/4-inch chunks. Step 2: To decorate the plastic chunks with paint, slip a plastic chunk onto the end of a pencil. Squeeze dots of black paint around the one-inch chunks, holding and rotating the pencil. Stand the pencil in a cup to allow paint to dry. Repeat for remaining one-inch chunks. Use red paint to squeeze three wiggly lines around the 3/4-inch chunks, rotating the pencil to make the job easier. Stand pencils in cup to dry.Step 3: Thread the length of beading cord through the opaque plastic tubing. Over this, slip on a washer, then alternate with a red painted chuck and a black painted chunk onto tubing, slipping a washer between each chunk. End with a washer.Step 4: Place a black bead on each end of the beading cord and secure it with a knot at both ends of the opaque tubing. Thread waxed cord through tubing and then the beads in the following order: disc, orange bead, disc, purple bead, disc, orange bead, disc. Tie the ends of the cording tightly together, pulling the tubing into a circle. Double knot the cord and trim tails. Hide the knot inside the beads.

What You'll Need:

  • 1 foot white opaque plastic tubing, 1/4 inch diameter
  • Permanent felt markers: pink and green
  • 15 inches waxed cord
  • 9 O-flat bibb washers

Step 1: Cut tubing into three four-inch sections. Step 2: With felt pens, color four inches of tubing green and 4 inches of tubing pink. Leave remaining tubing white. Step 3: Cut four-inch sections into random lengths from 1/4 inch to one inch. String tubing on cord alternating colors with the rubber washers. Step 4: Tie ends of cord together in a double knot. Trim tails.

Next you'll learn how to make keepers for all of this jewelry you're making.For more fun activities and bead crafts, check out:

Advertisement

Awesome Earring Keeper

Be creative and come up with your own designs for these handy earring keepers.

Make this awesome earring keeper for a friend's birthday -- and you can give them beaded jewelry to put in it.

What You'll Need:

  • 9x6-inch piece of hot pink plastic canvas, 60 holes wide and 40 holes high
  • 9 yards clear yellow lanyard lacing
  • 9 yards clear blue lanyard lacing
  • 20 blue pearlized pony beads

Tools:

  • Heavy-duty scissors
  • Cool-temp glue gun
  • Glue sticks

Step 1: When working with lanyard lacing, check after every stitch to make sure the lacing isn't twisted. When you start stitching, leave a small tail and stitch over it to hold the lacing in place. At the end of your row, or when you run out of lacing, push the remaining lacing under stitches on back.

Advertisement

Trim the tail. If the lacing doesn't stay put, use a glue gun to put a small dab of glue on the end. Be careful, even cool-temp glue gets very hot! Ask an adult for help.

Step 2: Adding beads is very simple. Just slip a bead on when you have the lacing on the front side of your piece.

Step 3: Make the handle about 10 inches longer than you want it to be. Slide an end of the lacing through the top right hole of your piece. Tie a knot, leaving a five-inch tail on the front.

Tie a knot above where you want to place a bead, slip on the bead and then tie a knot below the bead. Repeat for the other side.

Step 4: Cut two nine-inch pieces of lacing. From the back, slip an end of the lacing through the top right hole and the other end through the hole directly beneath it. Repeat the same procedure as above for adding beads. Repeat for the left side of the holder.

For more fun activities and bead crafts, check out:

Advertisement

Advertisement

Loading...