Science Projects for Kids: Crystals and Minerals

Creeping crystals science project
Create some creeping crystals.
©2007 Publications International, Ltd.

Animal, vegetable, or mineral? The answer is simple if you're starting science projects for kids: crystals and minerals -- crystals and minerals make a great subject.

Whether you want to watch the multiplying patterns of a growing crystal, or test and compare the properties of minerals, you'll find inspiration in these science projects for kids: crystals and minerals.

Advertisement

Follow the links below to learn how to conduct your own crystal and mineral science projects:

Mineral Testing Kit

Assemble the tools and perform the tests -- soon you'll know what kind of rock it is.

Sweet Crystal Science Project

Here's a science project with results that are good enough to eat! Sound good? Keep reading to learn more.

Creeping Crystals Science Project

Grow groups of crystals with this creative science project.

Keep reading to learn how to test the properties of minerals with simple household items next in science projects for kids: crystals and minerals.

For more fun science projects and activities, check out:

Advertisement

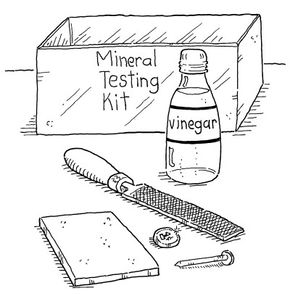
Mineral Testing Kit

Mineral testing kit.
Create your own mineral testing kit.
©2007 Publications International, Ltd.

Super rock hounds will want to put together this simple mineral testing kit for identifying minerals and testing their properties.

What You'll Need for the Bag:

  • Canvas or denim scraps
  • Needle and thread
  • Thick string

First, make a small, sturdy bag to carry your kit in:

Advertisement

Step 1: Cut two 6-inch by 8-inch pieces of canvas or denim and put them together, wrong side out.

Step 2: Sew three sides together.

Step 3: Fold over one inch of fabric on the top. Sew together to form a casing.

Step 4: Slit one of the seams open in the casing and slip a drawstring through it.

What You'll Need for the Kit:

  • Penny
  • Small piece of glass
  • Piece of unglazed tile
  • File or pocket knife
  • Small bottle of vinegar
  • Eyedropper
  • Rocks
  • Reference book about rocks

After you've assembled the supplies above, here's how you can use your kit to test rocks and minerals:

Step 1: Use the tile to test the 'streak' of the mineral. Do this by scratching the tile with your rock and seeing what color the scratches are.

Step 2: Vinegar is used to test for the presence of calcium carbonate. Put a drop of vinegar on the rock. If it fizzes, the rock contains calcium carbonate.

Step 3: Test the hardness of the rock, which is measured on a scale from 1 (the softest) to 10 (the hardest). Here's how it works:

  • If your fingernail can scratch the rock, it's a 1 or 2.
  • If a penny can scratch the rock, it's a 3.
  • If a knife blade or file can scratch the rock, it's a 4 or 5.
  • If a piece of glass can scratch the rock, it's a 6.
  • If the rock can scratch knife or file, or if the rock can barely scratch glass, it's a 7.

The highest numbers (8-10) are used for rocks that are harder than the common minerals that you're likely to find.

Now you can use what you learn to identify the rocks in a reference book.

The next science project in science projects for kids: crystals and minerals is an experiment in deliciousness.

For more fun science projects and activities, check out:

Advertisement

Sweet Crystal Science Project

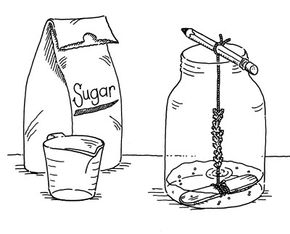
Sweet crystals science experiment
Grow delicious crystals with this experiment.
©2007, Publications International, Ltd.

With a sweet crystal science project, you'll do two things at once: see how crystals form in nature, and make candy!

What You'll Need:

  • Saucepan
  • Water
  • Sugar
  • Glass jar
  • String
  • Pencil
  • Popsicle stick

Step 1: With the help of an adult, boil half a cup of water in a saucepan.

Advertisement

Step 2: Add a cup of sugar one spoonful at a time until all the sugar is dissolved. Keep adding sugar until the solution turns into a clear syrup.

Step 3: Let the syrup cool for about 10 minutes, then pour it into a glass jar.

Step 4: Get a piece of string about six inches long. Tie one end of the string around a pencil, then tie the other end to a Popsicle stick. Put the pencil on top of the jar so the Popsicle stick hangs in the syrup.

Step 5: Set your 'crystal maker' aside. Take a look at it every day to see what's happening. In about a week, the syrup should be crystallized and ready to eat!

Now that you've grown candy crystals, you can try your hand at a more advanced crystal growing technique with the next experiment.

For more fun science projects and activities, check out:

Advertisement

Creeping Crystals Science Project

Creeping crystals science project
Create some creeping crystals.
©2007 Publications International, Ltd.

When you start work on a creeping crystals science project, be careful. You may feel like a mad scientist when you see the results!

What You'll Need:

  • Saucepan
  • Water
  • Measuring cup and spoon
  • Epsom salts
  • Mixing spoon
  • Green food coloring
  • Metal bottle caps
  • Pie pan
  • Strings
  • Pennies

Step 1: Get an adult to help you heat 1/2 cup water in the saucepan over medium heat. Measure 1/2 cup Epsom salts, and mix salts in hot water by spoonfuls until no more dissolves. Turn off heat.

Advertisement

Step 2: Add 2 drops green food coloring, and stir. Let mixture cool for 20 minutes or more.

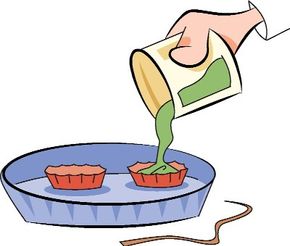
Step 3: Arrange the bottle caps in the pie pan. Carefully pour the warm solution into the bottle caps until the caps are full.

Step 4: Place strings in the caps. Use pennies to weigh down the strings so they can't float.

Step 5: Place the pan where the water will evaporate quickly. Warm areas with good airflow increase evaporation.

Step 6: Watch the caps for a few weeks for crystal growth. If a crust forms on the water's surface, use a pencil to make a hole so you can watch the crystals form.

What Happened? Epsom salts (magnesium dioxide) dissolve in water. Heating the water allows more salt to dissolve into the water. When you do this, you create what chemists call a supersaturated solution.

After the water is poured into the caps, it begins to cool. Now the water can't hold as much salt, and crystals begin to form. As the water evaporates, the crystals continue growing.

Look closely and compare a few grains of table salt and Epsom salt. You can see the crystals are different shapes. When large crystals grow, they are made out of the same repeated shapes.

For more fun science projects and activities, check out:

ABOUT THE DESIGNERS

Creeping Crystals Science Project by Peter Rillero, Ph.D.

Peter Rillero, Ph.D. is the Department Chair of Secondary Education and associate professor of science education at Arizona State University in Phoenix. He is the author of Time for Learning: Science; Time for Learning: The Human Body, and Totally Creepy Bugs, and the co-author of the best selling high school biology textbook in the United States. Rillero has conducted two program evaluations of the world's largest science fair, the Intel International Science and Engineering Fair. Visit Dr. Rillero's Web site.

Computer Illustration by: Rémy Simard
Advertisement

Advertisement

Loading...