Science Projects for Kids: Magnets and Metal

magnetic minerals in cereal
How magnetic is your cereal?
©2007 Publications International, Ltd.

Don't be surprised if you find yourself attracted to these science projects for kids on magnets and metal. What is more mysterious and somewhat magical than the pull of a magnet or the gentle turn of a compass as it rights itself north and south? Try these projects with your kids, and you can share the magic -- and all learn a little more about how magnetism works.

Follow the links below for magnetizing science projects you can do with kids:

Advertisement

Magnetized Paper Clip Chain

Discover how paper clips can click as a chain.

Magnetic Minerals

Find out if the iron in your breakfast cereal is magnetic.

Find Earth's Poles

Make this compass, and you'll know which direction you're going.

Choose a Compass to Make

Learn to make a floating compass or a Chinese hanging compass.

Read the next page to learn how paper clips can be attracted to each other.

For more fun science projects for kids, check out:

Advertisement
Magnetized Paper Clip Chain

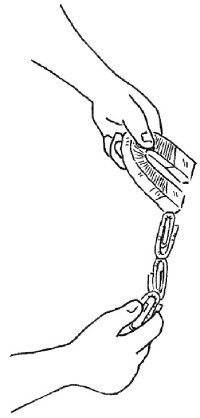
Magnetized paper clip chain
Make a chain of clips.
©2007 Publications International, Ltd.

A magnetized paper clip chain shows how magnetism can be created by induction. That means an object can become magnetized itself if it is placed next to a magnetized object. Try this science activity for kids to see how one paper clip in the chain magnetizes the next.

What You'll Need:

  • Strong magnet
  • Paper clips

Step 1: Take a strong magnet, and hold a paper clip to it.

Advertisement

Step 2: Touch a second paper clip to the first one that is hanging from the magnet. The second paper clip will be attracted to the first one because the first clip has become a magnet.

Step 3: Continue adding paper clips in this way to see how long of a chain you can create.

Step 4: Take the first paper clip off the magnet. Do the other paper clips stay joined together, or do they immediately fall?

Go to the next page to discover whether your breakfast cereal attracted to a magnet.

For more fun science projects for kids, check out:

Advertisement
Magnetic Minerals

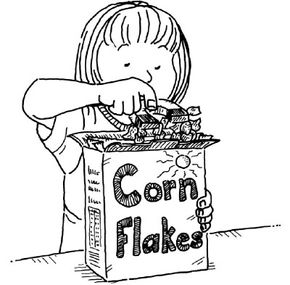
magnetic minerals in cereal
See if you have magnetic minerals in your cereal.
©2007 Publications International, Ltd.

Are there magnetic minerals in your cereal? With a little help from this science project for kids, you can perform breakfast table magic. The iron that your body needs to make healthy blood is the same iron found in the Earth. If the cereal you eat for breakfast is high in iron, it should be attracted to a magnet. Try this project, and see if it is.

What You'll Need:

  • Cereal
  • Plastic bag
  • Rolling pin
  • Strong magnet

Step 1: Put some cereal in a plastic bag, and close it.

Advertisement

Step 2: Use a rolling pin to crush the cereal into powder.

Step 3: Touch the magnet to the powder. Does the cereal cling to the magnet?

You can find the Earth's poles by using a magnet that you make. Learn how on the next page.

For more fun science projects for kids, check out:

Advertisement
Find the Earth's Poles

Find poles of Earth with a magnet
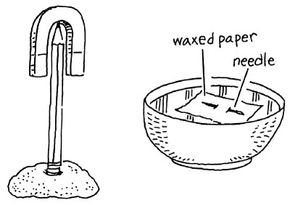
Use one of these magnets to find the Earth's poles.
©2007 Publications International, Ltd.

Make your own compass, and you can find the Earth's poles. You'll observe the magnetic pull of the poles when you do this science project for kids. And you'll have the chance to try finding the poles with two different types of compasses.

What You'll Need:

  • Modeling clay
  • Pencil
  • Horseshoe magnet
  • Needle
  • Waxed paper
  • Scissors
  • Bowl
  • Water

Pencil and Horseshoe Magnet Compass

Step 1: Roll out a lump of modeling clay to form a firm base for a compass stand.

Advertisement

Step 2: Set the eraser end of the pencil in the base so the pencil is standing upright with the point up.

Step 3: Balance a horseshoe magnet on the tip of the pencil.

Once balanced, the magnet will align itself on a north-south line. This happens because the earth itself acts as a huge magnet with lines of force running between the North and South Poles. The compass automatically aligns itself with these invisible magnetic lines.

Needle and Magnet Compass

Step 1: Rub one end of the needle on the positive side of the magnet and the other end on the negative side. (Run the needle in one direction only -- not back and forth.)

Step 2: Cut a small circle of waxed paper, and stick the needle through the paper.

Step 3: Gently place the waxed paper in a bowl of water so it floats, and give it a spin. When the paper stops spinning, the needle will be lined up on a north-south line.

Go to the next page to find out how you can make two more kinds of compasses.

For more fun science projects for kids, check out:

Advertisement
Choose a Compass to Make

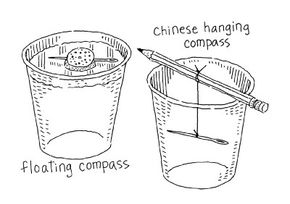
Make two types of compass
Make either of these types of compasses.
©2007 Publications International, Ltd.

Make a compass, and you'll always know which direction you're headed. You can make a floating compass or a Chinese hanging compass -- or both!

What You'll Need:

  • 2 needles (one for each compass)
  • Magnet
  • Straight pin
  • Cork
  • Scissors
  • 2 clear plastic cups (one for each compass)
  • Water
  • Thread
  • Pencil

Magnetized Needle for Both Compasses

Step 1: Rub the pointed end of the needle along one side of the magnet, always rubbing in the same direction. Do this about 30 times to magnetize the needle.

Advertisement

Step 2: Test the magnetized needle by trying to pick up the straight pin with it. If you can pick up the pin, the needle is ready.

Step 3: If you will be making both compasses, repeat the process with the other needle.

Floating Compass

Step 1: Cut a small piece of cork, and push the magnetized needle through it.

Step 2: Fill a plastic cup with water.

Step 3: Carefully place the cork with the magnetized needle into the cup so the cork floats in the center. The magnetized end will always face north.

Chinese Hanging Compass

Step 1: Tie an end of a short piece of thread to the center of the magnetized needle.

Step 2: Tie the other end of the thread to a pencil.

Step 3: Place the pencil over the rim of the plastic cup. Again, the magnetized end of the needle will point north.

For more fun science projects for kids, check out:

Advertisement

Advertisement

Loading...