How to Make Games

Balloon badminton kids game
Balloon badminton is one of many games you can create yourself.
pub int

What could be more fun than having a collection of different games? Whether you're looking for a rainy-day activity or an entertaining way to spend an evening, learning how to make games is a great project for kids and adults to do together.

The following articles describe a variety of games that are just as much fun to make as they are to play. Kids will be able to handle most of the directions by themselves, but it's good to have an adult nearby for any tricky parts, like using a craft knife.

Advertisement

Wheel of Measure

Discover how long or how wide things are in your home with this measuring game. Find out how to make it.

A-Maze-ing

Create your own maze game to play with friends. See how easy it is to make a maze -- but how tricky it is to get through it!

Auto Bingo

Playing auto bingo is a great way to pass the time on long car trips. Find out how to make this fun game.

Beanbag Game

Check out these great ideas for games you can play with beanbags -- and learn six new games.

Balloon Badminton

Here's a great variation on a familiar game -- you use balloons to play badminton. Find out how.

Craft Stick Puzzle

Create your own puzzles using craft sticks and markers. See how to make one that's uniquely your own.

Flip Ball Paddle

Try your luck with flipping the ball through the hole in the paddle. Learn how to make this game.

Baseball Target Game

You can play baseball in the house -- when you use this target game. Find out how to make this game.

Game Pieces

Have you lost a piece to a game? Find out how to make new ones.

Twist-Tie Pickups

See if you can be the one to pick up the most twist-tie figures. Learn how to make this game of skill.

Toddler Can

Create a special game just for toddlers -- they'll love dropping objects into a can. See how easy it is to make one.

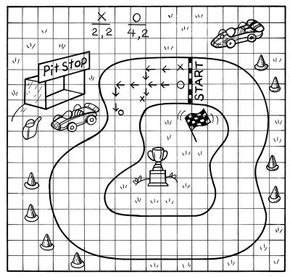
Car Race Game

Draw a curvy track and add some place-markers -- now you have a car race game. Find out how to get started.

Code Wheel

Send and receive messages in code with a code wheel -- only you and your friends will know what the message is. Learn how to make it.

Box Maze

Tilt and turn the box to move a marble through a maze, but watch out for the holes! Find out more about this game.

Start the fun by making a "wheel" for a measuring game. Keep reading to find out more.

For more fun games and activities, check out:

Advertisement
Wheel of Measure

Discover some little-known facts about your home when you play "Wheel of Measure"! First, you'll create the measuring wheel from a paper plate; then, you'll use it to measure objects around the house -- that's doing it the fun way.

Once you've found out how long or wide things are, play the Wheel of Measure game by quizzing your family and friends. See whose guess is closest to the actual measurement.

Advertisement

What You'll Need

Cloth measuring tape

Marker

Stiff paper plate

Ruler with hole at one end

Paper fastener (also called a brad)

How to Make the Wheel of Measure

Step 1: Use a cloth measuring tape to mark off the inches around the paper plate.

Step 2: Attach the middle of the paper plate through the hole in the ruler with a paper fastener.

Step 3: Run your measuring wheel along any surface to see how long the surface is in inches. Count how many times the wheel goes around from one end of a surface to the other, and multiply by the number of inches you marked on the wheel.

For example, did you mark off 12 inches on your wheel? If a 12-inch wheel goes around 4 times from one end of a table to the other, then the table is 48 inches long (12 x 4 = 48). Now, start the quiz game!

Do you think you'd get lost in a maze? Play the "A-Maze-ing" maze game to see if you can find your way out. Keep reading to learn more.

For more fun games and activities, check out:

Advertisement
A-Maze-ing

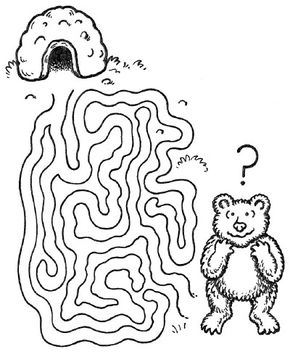
A-maze-ing kids game
Try your luck with this "a-maze-ing" game.
pub int

A "maze" is a confusing network of passages, and that's what makes this game truly "a-maze-ing." When you create your own maze game to play with your friends, you can make the passages are difficult or confusing as you like.

Follow the easy instructions below to create the maze game -- but it won't be as easy for your friends to find their way out of your maze!

Advertisement

What You'll Need

Pencil

Tracing paper

Black felt-tip pen

Graph paper

Colored pencils

How to Make the A-Maze-ing Maze Game

Step 1: Use a pencil to draw a zigzag track on tracing paper. Add detours and dead ends off the track, and add more tracks that go nowhere. You can also make more maze tracks that are curved or triangular.

Step 2: Once you've completed the maze, go over it with a black felt-tip pen.

Step 3: Then trace over your maze with graph paper so that you won't see any pencil marks.

Step 4: Add a drawing at the entrance and exit, such as a lost bear looking for its den. Color the maze with colored pencils.

Step 5: Make copies of your maze game, and give it to your friends to play.

Long car trips don't have to be boring -- not when you can play auto bingo. Keep reading to find out more.

For more fun games and activities, check out:

Advertisement
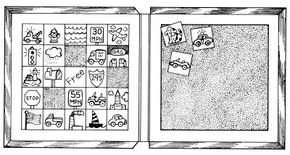
Auto Bingo

Auto Bingo kids game
Auto Bingo is a fun way to pass the time on car trips.
pub int

The next time you take a long car trip, play Auto Bingo. The time will fly by as you watch for the many different objects along the road.

You can play this game by yourself, or you can make several boards and play against others in the car. See who can be the first to call out "Bingo!" (Just remember to call out softly -- so you don't distract the driver!)

Advertisement

What You'll Need

Three 10x10-inch pieces of felt

Marker

Ruler

Large, clean pizza box

Craft glue

Old magazines

Blunt scissors

How to Make Auto Bingo

Step 1: Use a marker to draw a checkerboard on two pieces of felt. On two pieces of felt, draw lines two inches apart, down and across, so that you have twenty-five 2-inch squares. There should be five squares down each side.

Step 2: On one checkerboard, write "free" in the middle space. Glue this felt piece inside the pizza box on one side.

Step 3: Glue the third, unmarked felt piece on the other side of the pizza box.

Step 4: Look through old magazines for pictures of objects you see when you travel -- a mailbox, speed limit sign, police car, traffic light, gas station, cow, and so on. You will need 24 pictures. Cut out the pictures, making sure they are small enough to fit in a 2-inch checkerboard square.

Step 4: On the second felt piece with a checkerboard, glue each picture onto a 2-inch square. (If you can't find the pictures you need, just draw the objects on the squares.)

Step 5: Cut out the picture squares and arrange them on the blank checkerboard felt piece pasted in the box. Fill in all the squares except for the "free" space.

To play Auto Bingo:

Look for the objects on your bingo card when you are taking a car trip. When you see one, remove the picture square from your bingo card and place it on the third, unmarked felt piece. (Felt sticks to itself so your picture squares won't get lost.)

When you have an empty row across, down, or diagonally, you win! To play again, rearrange the picture squares on the felt checkerboard. This way, you create a different game every time you play.

You can play lots of different games with beanbags. Find out how on the next page.

For more fun games and activities, check out:

Advertisement
Beanbag Games

You can play lots of different beanbag games -- each one is different from the others, but they all are lots of fun. You can buy beanbags at most toy stores, or you can make your own with dried beans and fabric squares. Then, get your friends together for a beanbag game marathon. Get ready, take aim, and toss!

What You'll Need

Cardboard box

Advertisement

Markers

Scissors

Poster board

Empty coffee can

Construction paper

Transparent tape

6 paper towel tubes

Beanbags

How to Make Beanbag Games

Game 1: Draw a face on the bottom of a cardboard box, with two big eyes and a big mouth. Have an adult cut out the mouth and eyes. To play, throw the beanbags through the holes.

Game 2: Draw a tic-tac-toe board on poster board. Toss the beanbags on the board to get three in a row.

Game 3: Draw a design on a sheet of construction paper. Tape the paper around a large coffee can. Standing at all different distances from the can, try to toss your beanbags in it.

Game 4: Decorate six paper towel tubes. Stand them up and try to knock each one down with a toss of a beanbag.

When you use balloons to play badminton, it isn't just an outdoor game anymore. Learn more about it on the next page.

For more fun games and activities, check out:

Advertisement
Balloon Badminton

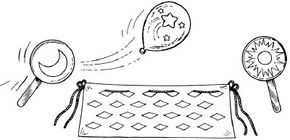
Balloon badminton kids game
It's okay to play badminton in the house -- when you use balloons.
pub int

Playing balloon badminton is an interesting twist on the traditional outdoor game. Best of all, this one can be played in the house, so it's a great rainy-day activity. And it's just as much fun to make your badminton "rackets" and badminton court as it is to play.

Get creative, and decorate your rackets and the balloon to match. For instance, if you draw a sun or a moon on a racket, draw stars on the balloon. (Hint: It's easier to draw on the balloon before it's inflated.) Make sure you discard any broken balloon pieces immediately because they can pose a choking hazard for small children.

Advertisement

What You'll Need

2 craft sticks

2 plastic coffee can lids

Craft glue

Markers

Balloons

Newspaper

Blunt scissors

String or yarn

2 chairs

How to Make Balloon Badminton

Step 1: Glue a craft stick to each plastic coffee can lid to make the badminton rackets. Use markers to decorate your rackets with pictures.

Step 2: To make the net, fanfold a sheet of newspaper. Cut out V-shaped sections.

Step 3: Open the paper and thread some string through the top row of the cutouts.

Step 4: Tie the net between two chairs. Blow up a balloon, and play a slow-motion, fun game of badminton inside the house.

Ready for a quieter activity? It's fun to make your own puzzles with crafts sticks and colored markers. Keep reading to find out how.

For more fun games and activities, check out:

Advertisement
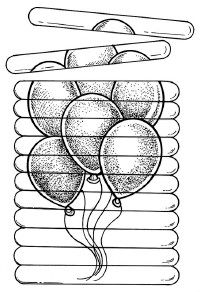
Craft Stick Puzzles

Craft stick puzzle
It's fun to make your own puzzle with craft sticks.
pub int

Craft stick puzzles are fun and challenging. Because the puzzle pieces (the craft sticks) are all the same shape, the only clue to the correct placement of the puzzle piece is the color and design.

You can make your puzzle as difficult or easy as you like, but for a tricky twist, draw two puzzles -- one on each side of the sticks. Shake them all in a bag to mix them up, and then see if you can do the puzzle when you don't know which side is up!

Advertisement

What You'll Need

12 to 16 craft sticks

Transparent tape

Markers

How to Make Craft Stick Puzzles

Step 1: Place the craft sticks side by side. You may want to put a piece of tape on one side of the sticks to hold them together while you draw.

Step 2: Draw a picture on the sticks and color it in.

Step 3: To make a two-in-one puzzle, draw another picture on the other side. Remove the tape and turn the sticks over. Add tape to the other side again to hold the sticks in place.

Step 4: Draw the second picture. Now remove the tape and mix up the sticks. Then put your picture back together.

For a game of skill, why not create a flip ball paddle? Keep reading to find out how.

For more fun games and activities, check out:

Advertisement
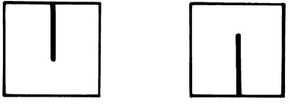
Flip Ball Paddle

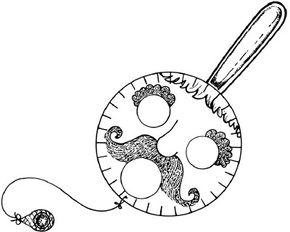
Flip ball paddle
Test your skill -- see if you can flip the ball through the paddle.
pub int

Start with a paper plate, follow the instructions, and soon you'll have a Flip Ball Paddle game. This easy-to-make paddle game challenges your hand/eye coordination, and it's a great game to play against a friend. See who can flip the ball through the paddle the most times in a minute or two.

What You'll Need

Paper plate

Advertisement

Markers

Blunt scissors

Paint-stirring stick

Craft glue

Hole punch

Small ball

Netted fruit bag

String

How to Make a Flip Ball Paddle

Step 1: Draw a face on the paper plate.

Step 2: Cut out the eyes and mouth. Make sure the holes are slightly bigger than the ball.

Step 3: Glue the paint-stirring stick to the back of the plate.

Step 4: Punch a small hole in the plate just below the mouth.

Step 5: Cut a piece of netting from the fruit bag large enough to cover the ball. Wrap the ball in the netting and tie it closed with one end of the string.

Step 7: Tie the other end of the string through the small hole in the plate. Try to flip the ball through the holes.

Can you play baseball in the house? Yes, you can -- when the game is played on a target with Ping-Pong balls. Keep reading to find out more.

For more fun games and activities, check out:

Advertisement
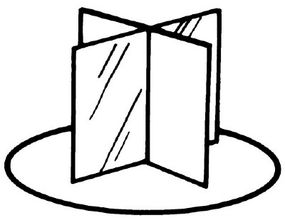
Baseball Target Game

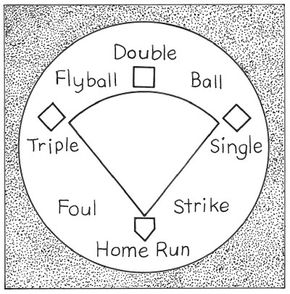
Baseball target game
Step 4: Label the baseball diamond
pub int

When you have a baseball target game, there'll be no more rained-out baseball games. Of course, this one isn't played with a real bat and ball, but the advantage is that you can play it in the house. The game is fun to make, and you'll have even more fun when it's time to call out "Batter up!"

What You'll Need

12 inches of 1/2-inch-wide hook-and-loop tape (just the hook part)

Advertisement

Ruler

Blunt scissors

4 Ping-Pong balls

Fabric glue

16x18-inch piece of light-colored felt

2 pieces of cardboard (one 16x18-inch piece and one 4x6-inch piece

Permanent markers

How to Make the Baseball Target Game

Step 1: Cut the hook-and-loop tape into four 2-inch pieces.

Step 2: Glue a piece around each Ping-Pong ball.

Step 3: Glue the felt on the large cardboard piece. Let the glue set.

Step 4: Draw a baseball diamond on the felt, and label it as shown.

Step 5: Cut four baseball players about 1-inch wide from the small cardboard piece. Glue a square of hook-and-loop tape to the back of each player.

Place the players on the baseball diamond to keep track of balls, strikes, outs, and runs scored.

Have you ever lost a game piece to a board game? Learn how to create a new one on the next page.

For more fun games and activities, check out:

Advertisement
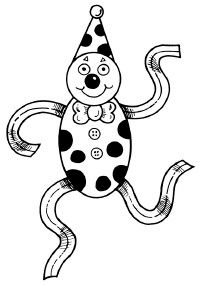
Game Pieces

Game pieces, step 1
Step 1: Cut two identical shapes from craft foam.
pub int

Design custom game pieces for your family and friends, or replace missing pieces from your favorite board game. It's easy to do when you follow the simply instructions for this craft. You just might want to use your custom-made game piece with every game you play.

What You'll Need

Craft foam (available at craft stores)

Advertisement

Blunt scissors

Permanent markers

Craft glue

How to Make Game Pieces

Step 1: Cut two identical shapes from the foam. Cut geometric shapes such as a square, circle, or hexagon to replace missing pieces from a board game, or customize the pieces for your family or friends.

Step 2: On both pieces, draw the features of a friend or family member -- same color eyes, hair, and so on. Add earrings, a hat, or any other feature that represents that person.

Step 3: In the top of one shape and the bottom of the other, cut a slit about 1/2 of the length of the shape. Fit the shapes together.

Game pieces, last step
Step 4: Glue a circle to the connected pieces.
pub int

Step 4: Cut a circle about the same size as the shapes from the foam. Glue the circular base to the game piece. Let the glue dry.

You won't need a game piece to get "hooked" on the twist-tie pickup game. Keep reading to learn more about it.

For more fun games and activities, check out:

Advertisement
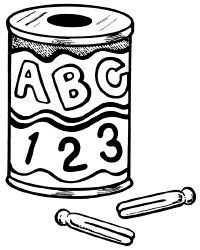
Twist-Tie Pickups

Twist tie pickups
See how many figures you can hook together without dropping any!
pub int

The game of Twist-Tie Pickups is challenging -- and fun! See how many of the twist-tie figures you can hook together without letting one drop from the chain. You'll get "hooked" on this fun game, but be careful -- one wrong move and your chain will fall apart.

What You'll Need

Large piece of thin poster board

Blunt scissors

Colored markers

Twist ties (about 40)

Craft glue

How to Make the Twist-Tie Pickups

Step 1: On the poster board, draw a figure with a head and body. Cut it out and trace it 19 times on the remaining poster board.

Step 2: Cut out all the figures and decorate them.

Step 3: Glue two figures together, with twist ties between the pieces for legs and arms. Make nine more two-sided figures the same way.

Step 4: Let the glue set.

Step 5: Bend the arms and legs in different directions to make hooks.

To play the game:

Hold one figure and try to pick up another by hooking it to the first. Holding only the first figure, hook another figure to the second figure. See how many figures you can pick up before the chain breaks.

You can make a special game just for the toddler in your family. Keep reading to learn how.

For more fun games and activities, check out:

Toddler Can

Toddler can kids games
Toddlers will love to drop objects into the can.
pub int

A "toddler can" is an educational toy that's sure to please any little girl or boy. Toddlers will love to drop objects -- like clothespins or blocks -- into the hole in the top of the can, and you will love the fact that they'll get hours of pleasure from your gift.

What You'll Need

Empty coffee can

Can opener

Blunt scissors

Assorted colors of felt

Craft glue

Fabric markers

3 plastic coffee can lids

Clothespins

Blocks

Large poker chips

How to Make a Toddler Can

Step 1: With an adult's help, use a can opener to cut the tin lid and bottom from a coffee can.

Step 2: Cut a piece of felt to fit around the can. Cut the width about 1 inch wider than the can. Glue the felt around the coffee can. Fold and glue the 1-inch excess over the bottom edge of the can to cover rough edges.

Step 3: Decorate the felt with cut felt shapes and fabric markers.

Step 4: Have an adult cut in the following, one in each lid: a circle to fit clothespins, a square to fit blocks, and a slit to fit large poker chips. You also could cut each shape into one lid for a shape-sorter toy.

To play, put a lid on the can and place it on a flat surface. Have the toddler put the shapes in the can.

Here's a fun game for older kids: Draw your own race track on graph paper -- and get ready to start your engines! Keep reading to find out more.

For more fun games and activities, check out:

Car Race Game

Car race game
Create this car race game on graph paper.
pub int

Here's a car race game that you can play anywhere. And it's just as much fun to make your "race track" as it is to play the game. You can design the track to with lots of curves or with sharp angles.

This game can be played alone (race against yourself) or with a friend. Get ready, get set -- start your engines!

What You'll Need

Graph paper

Colored markers

One die

How to Make a Car Race Game

Step 1: Draw a curvy track at least 1 inch wide on a piece of graph paper.

Step 2: Draw a tiny grandstand, start/finish line, pit stop area, and walls.

Step 3: To make your "race cars," cut 2 squares from another piece of graph paper the same size as the squares on the graph paper track. Mark one with an X and one with an O. (Instead of an X and O, you could draw one type of car on one square and a different car on the other square.

To play the game:

Place your cars at the start line. Roll the die to determine how many squares to move.

You may move your car in only one direction -- either across or down. You may not move diagonally. If your move sends your car off the track, you lose a turn. When it's your turn again, go back to your last spot on inside the track. If you land on the same spot as the other car, go back to your last spot before that and skip a turn.

Take turns with your friend. The first one to cross the finish line is the winner.

It's also fun to send secret messages to your friends -- all you need is a code wheel. Find out how to make one on the next page.

For more fun games and activities, check out:

Code Wheel

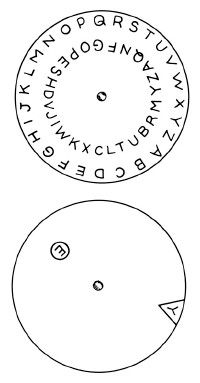
Code wheel kids game
Use a code wheel to send secret messages.
pub int

If you have a code wheel, you and a friend can pretend you're secret agents and send each other secret messages. You'll use a code that only the two of you can understand. You also might use your code to write entries in a diary or journal. Your secrets are safe!

What You'll Need

Poster board or two small paper plates

Blunt scissors

Ruler or compass

Pencil

Brass paper fastener

Ballpoint pen

How to Make a Code Wheel

Step 1: Cut two circles, 6 inches each, from poster board. (You can also use two small paper plates.)

Step 2: Cut a 1/2-inch-wide V-shape and a 1/2-inch-round window in one circle wheel, as shown.

Step 3: Use the pencil to poke a small hole in the center of both wheels. Attach the wheels with a brass paper fastener.

Step 4: Write the letter A in the V-shape opening, then turn the wheel 1/2 inch and write the letter B. Continue with the rest of the alphabet around the wheel.

(Hint: You can measure 1/2 inch without a ruler. Make a small pencil mark on the right side of the V, then turn the wheel so the left side lines up with the mark.)

Step 5: Now fill in the window. Turn the wheel. Write the letter A in the window. (Make sure the V-shape is not pointing to the letter A -- then there'd be no code!) Turn the wheel several inches and write a B in the window.

Step 6: Place the rest of the alphabet in the window, always making sure the window letter is different than the letter in the V-shape opening.

Make a second wheel for your friend that matches yours exactly so you can write and decode secret messages.

Later, challenge your friend to a marble race through a maze. Learn how to make a box maze on the next page.

For more fun games and activities, check out:

Box Maze

After you create a box maze, you can have marble races with a friend. Making this game starts with a shoe box lid in which you design a maze. Then you erect a few walls, cut a few holes (ask a grown-up to help with this part) -- and you're off! The person who gets through the maze in the shortest amount of time without losing his or her marble is the winner.

What You'll Need

Drawing paper

Pencil

Scissors

Markers

Small marble

Shoe box with lid

Craft glue

How to Make a Box Maze

Step 1: Practice drawing a maze design on a piece of paper. Think of a theme for your maze. For example, it might be a swamp game, such as "Watch Out for the Alligator Ponds."

Step 2: Draw lines for the maze walls, and mark places along the maze to cut holes (these will be the "ponds") for the marble to fall through.

Step 3: Mark the starting and finishing points of the maze.

Step 4: Once you've created a design you like, draw the maze lines and hole marks on the inside of the shoe box lid. Cut the pond holes where indicated. Make sure the holes are slightly larger than the marble.

Step 5: Use colored markers to decorate the maze.

Step 6: To make the walls of the maze, cut 1/2-inch-wide strips of cardboard from the shoe box (not the lid). The strip should be the length of the maze line.

Step 7: Apply glue along the lines in the lid, and stand a cardboard strip in the glue to make each wall. Let the glue dry.

To play, place a marble at the starting point. Then tilt and turn the lid to move the marble along the maze to the finishing point. Be sure to watch out for the alligator pond holes!

For more fun games and activities, check out:
ABOUT THE GAME DESIGNERS

Wheel of Measure by Lisa Lerner, Kersten Hamilton

Advertisement

Loading...