How to Make a Picture Frame from an Altoids Tin

Kate Pruitt's Altoids tin picture frame and photo album is a perfect DIY gift.
Courtesy Kate Pruitt/Design*Sponge


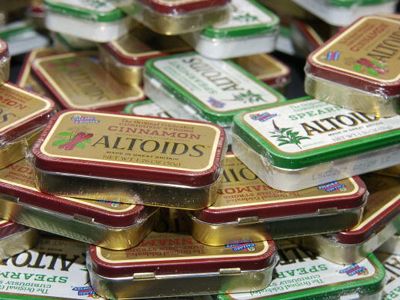
Artist and blog editor Kate Pruitt knew she'd struck the mother lode when she happened upon a pile of old Altoids tins at a secondhand store near her home in Oakland, Calif. As an editor at the blog Design*Sponge, Pruitt must create four projects each month, all based on the same source material. In the past, she's made vintage wine clips using earring hoops and note boards from old canvas landscape paintings. When she laid eyes on the pile of Altoids tins, however, she didn't know she was entering the world of tinnovation -- finding unique uses for old Altoids tins. Like many other tinnovators, she simply saw that the classic tins had some latent use that only needed to be discovered with a little fiddling and a lot of imagination.

Advertisement

Pruitt says she bought the whole lot and went home to see what she could come up with. In short order, she had several ideas in mind. With four Altoids tins projects under her belt, she says, "I like to consider myself a tinnovator" [source: Pruitt].

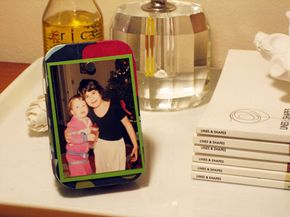
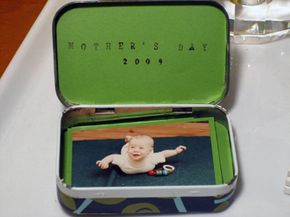
Pruitt's first brush with Altoids tinnovation took place in April 2009. With Mother's Day on her mind, Pruitt says that she naturally thought of finding a way to use an Altoids tin to display all those family photos that moms tend to like so much. The compact metal design of the tin inspired Pruitt to create a picture frame and accompanying album. "I think what made me interested is that you can stick magnets to the metal and hold photos in place," she says. Because of its small size, the Altoids tin also makes a very portable personal photo album as well.

Head to the next page to learn how to make Kate Pruitt's Altoids tin picture frame and photo album.

Advertisement

Making the Altoids Tin Picture Frame

With the stand attached, the Altoids tin album and frame can display photos vertically or horizontally.
Courtesy Kate Pruitt/Design*Sponge

What makes Kate Pruitt's Altoids tin picture frame so cool is that its purpose is actually twofold. Attach a favorite photo to the front and the tin serves as a picture frame. The box has enough space inside to hold several more pictures as well.

To make the photo frame and album, Pruitt first disassembles the Altoids tin by removing the screws from the hinges. This makes decorating the tin easier, but hang onto everything, as you'll want to reassemble the tin once you're finished. Using Mod Podge glue and sealer, Pruitt attaches decorative paper to the sides, inside and top of the tin. She seals it with more clear-drying Mod Podge and follows the same steps for the bottom of the tin.

Advertisement

As the glue and sealer are drying, Pruitt creates a stand for the album and frame out of heavy but pliable cardboard, like the kind used to make a cereal box. She traces the shape of the stand -- you've seen them before, attached to the back of other picture frames -- and cuts out two copies, gluing them together for added stability. Using more decorative paper, Pruitt glues and seals the entirety of the stand.

Once everything's dry, make sure that the top of the stand is bent where it meets the back of the Altoids tin. This allows you to move the stand away from the tin when it's supporting the frame and move the stand toward the frame while the stand is being stored. Once the stand is complete, Pruitt hot glues it to the back of the tin. To protect the stand from damage while it's being toted around, she also hot glues one side of a Velcro assembly to the back of the stand's bottom and the corresponding side to the back of the Altoids tin. All of have to do now is reassemble the tin and trim your photos to fit your new album.

Because of the tin's unusual size -- 3.75 inches (9.52 centimeters) long by 2 inches (5.08 cm) wide -- you'll need to crop your photos a bit. Pruitt says using digital photos printed out to a size that already fits the Altoids tin makes the process easier. Once you've trimmed your photos, support and matte the photos using paper backing. Choose your favorite and attach it to the front of the Altoids tin with two small magnets, and you've got yourself an Altoids tin picture frame and photo album.

Advertisement

Lots More Information

Related HowStuffWorks Articles

More Great Links

  • Pruitt, Kate. "DIY project: Kate's tin travel frame." Design*Sponge. April 29, 2009. http://www.designspongeonline.com/2009/04/diy-project-kates-tin-travel-frame.html
  • Pruitt, Kate. Personal interview. June 29, 2009.

Advertisement

Loading...