Handmade beaded bracelets for kids are a fun and simple way to spruce up any outfit. These bracelets are very popular to wear as an everyday accessory -- just for the fun of it -- as well as on special occasions like a school dance, a party, or the holidays.
The great thing about beaded bracelets is that they look much more complex than they really are. Even if you have never created beaded jewelry before, you will find that beaded bracelets are quite simple to do.
Advertisement
Follow the links below to learn how to make your own beaded bracelets:
Start a new trend at your school with a velvety forever friends friendship bracelet. This easy beaded bracelet project results in a pretty, colorful gift, and could start a new trend.
What You'll Need:
3 different colors of thick, chunky-weight chenille yarn
Scissors
Ruler
Masking tape
Large wooden or plastic beads
Make bright friendship bracelets using three strands of yarn that are nine inches long each.
Advertisement
Step 1: Line up the strands and knot them; leave one inch free at the end.
Step 2: Tape the end to a table edge, then thread a large bead next to the knot. Braid the yarn down to one inch from the end.
Step 3: Thread on the other large bead. Tie an end knot after the bead.
Step 4: Wrap your cool bracelet around your wrist, and push the beads through the braids on the opposite sides, or simply tie the ends off. Make plenty of bracelets for your friends, too.
The next bracelet you'll learn how to make is a real gem. Continue reading to find out how it's made.
For more fun activities and bead crafts, check out:
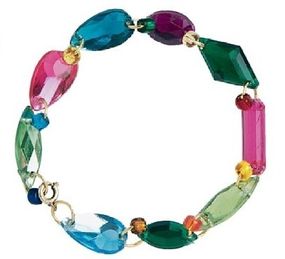
A jewel of a bracelet uses colorful faux jewels and beads to make a dazzling piece of jewelry for your wrist.
What You'll Need:
10 to 15 gold-tone jump rings, 7mm each
10 to 15 sew-on faux jewels with holes at each end (depends on wrist size)
10 to 15 E beads in various colors
1 gold-tone clasp closure
Tools:
Needle-nose pliers
Step 1: Using needle-nose pliers, open up a jump ring, and insert one end in either hole of a faux jewel. String an E bead onto the jump ring, then close the ring with your pliers. This will be the ring you attach your clasp closure to.
Advertisement
Step 2: Open and insert another jump ring through the jewel's other hole. Then string on an E bead, and insert the jump ring through a hole of another faux jewel. Close the jump ring to attach the two jewels together.
Step 3: Continue attaching jewels and E beads with jump rings until the bracelet is big enough to fit around your wrist.
Design with colors and patterns you like.
Step 4: When you come to the last faux jewel, insert its jump ring through the small hole of the clasp closure. Add on an E bead, and close the jump ring with your pliers. Connect the clasp closure to the first jump ring of your jeweled bracelet.
Keep reading to learn about a charm bracelet your friends are sure to love.
For more fun activities and bead crafts, check out:
This pin pal charm bracelet is so easy to make, you'll want to give one to all of your best pals. Safety pins play a key role in this beaded bracelet craft. Personalize and tweak your style each time you make one.
What You'll Need:
19 small gold-tone safety pins
1 package of seed beads
8 gold-tone jump rings, 7mm each
14 E beads in various colors
80 inches of light-gauge, gold-tone beading wire
4 small luster beads
Tools:
Needle-nose pliers
Metal fingernail file or small screwdriver
Wire cutters
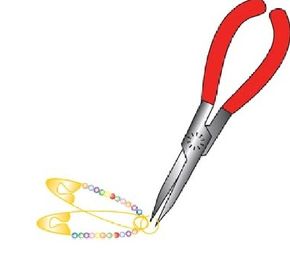
Step 1: Open a safety pin, and thread as many seed beads as you can onto its point. Make sure you're still able to close the pin. Repeat this step with 13 more pins.Step 2: Place two beaded pins face-to-face, with beads on opposite sides. Using your needle-nose pliers, open a jump ring, and put it through the "o" ends of the two pins.
Advertisement
Step 3: Place two more pins face-to-face. You will join these two pins together with the ones from step 2 with the same jump ring. Again, put the jump ring through the "o" ends of the two pins. Add one or two E beads to the jump ring before closing it.
Use the jump ring to combine two sets of pins.
Step 4: Open another jump ring, and join the "heads" of another two sets of pins. Continue joining the "head" and "o" ends of all seven sets of pins.
Step 5: To make the closure for your bracelet, take another pin, and use a metal fingernail file or small screwdriver to open the loop at the end of the pin. Thread seed beads onto the point of the pin, and push them around the open loop to the opposite side. Close the loop with the needle-nose pliers. With a jump ring, attach the "o" end of this pin to the end of the bracelet. Use this pin to fasten and unfasten your bracelet.
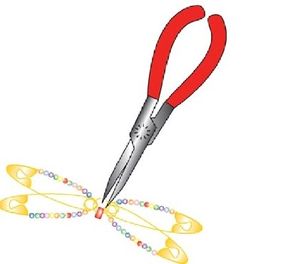
Step 6: To make the charms for your bracelet, cut four lengths of wire, each five inches long. Holding the four pieces of wire together, thread about 3/4 inch through the "o" end of a safety pin. Twist the wire to secure.
Step 7: Thread on a luster bead for the head of your Pin Pal Charm, and then add one seed bead for the neck. Separate one strand of wire for an arm, and thread on six seed beads. Run the wire back through the arm, and pull to the center. Separate another strand of wire, and repeat for the other arm.
Step 8: Trim wires to an even length. Then thread one seed bead onto all four wires to form the torso. Separate wires into two groups of two strands. String on eight seed beads to form each leg. Thread wire over the last bead and back through the leg to secure. Trim excess wire.
Step 9: Repeat steps 6-8 for the other three Pin Pal Charms. Then attach them to jump rings on your bracelet.
Attach the charms with jump rings to the bracelet.
After completing a pin pal charm bracelet, consider working with flowers. On the next page, learn how to make a ring around the rosy bracelet.
For more fun activities and bead crafts, check out:
There's nothing prettier than a garland of flowers. Make this ring around the rosy bracelet, and adorn your wrist with "fresh" flowers.
What You'll Need:
3 strands nylon line, 9 inches each
1 clasp and jump ring
2 crimp beads
5 transparent flower beads in assorted colors, 5mm
4 transparent flower beads in assorted colors, 10mm
Tools:
Transparent tape or masking tape
Needle-nose pliers
Scissors
Step 1: Holding all three strands of nylon line together at one end, attach them to the clasp with a crimp bead. To do this, slide a crimp bead and then a clasp onto the end of the nylon line. Thread the nylon line back through the crimp bead, and pull it tight so the crimp bead is close to the clasp.
Advertisement
Step 2: Using needle-nose pliers or crimping pliers, flatten the crimp bead so it stays in place. Using a sharp pair of scissors, trim the excess line as close to the crimp bead as possible, but only on the short end. Obviously, you need to leave the long end in order to string the beads.
Step 3: Tape the clasp to a table or other flat work surface to hold it in place.
Step 4: Braid the three strands together for about 1/2 inch, then string a 5mm flower bead onto the middle strand.
Step 5: Continue braiding for another 1/2 inch, then string a 10mm flower bead onto the middle strand.
Step 6: Repeat steps 4 and 5 until all nine flower beads have been strung on the bracelet.
Step 7: Continue braiding for another 1/2 inch before finishing with a crimp bead and jump ring.
From flowers to fish -- on the next page, learn how to make a beaded bracelet fish.
For more fun activities and bead crafts, check out:
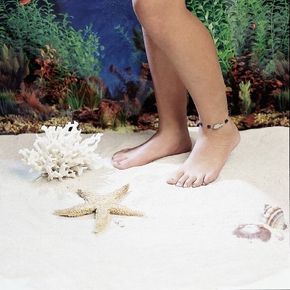
Fishy, fishy, in the brook...You've caught the coolest fish in the pond with this fun "a little fishy bracelet" for your ankle.
What You'll Need:
19 inches nylon line
1 clasp and jump ring
2 crimp beads
6 cobalt blue square beads, 5mm
1 iridescent fish bead
Tools:
Needle-nose pliers
Scissors
Step 1: Attach the clasp to one end of the nylon line with a crimp bead. To do this, slide a crimp bead and then a clasp onto the end of the nylon line. Thread the nylon line back through the crimp bead, and pull it tight so the crimp bead is close to the clasp.
Advertisement
Step 2: Using needle-nose pliers or crimping pliers, flatten the crimp bead so it stays in place. Using a sharp pair of scissors, trim the excess line as close to the crimp bead as possible, but only on the short end. Obviously, you need to leave the long end in order to string the beads.
Step 3: String a blue bead onto the nylon line. Bring the line around the bead and back through the same side of the bead. Leaving a one-inch space between the crimp bead and the blue bead, pull the nylon line snugly against the bead to hold it in place.
Step 4: Repeat step 3 twice, leaving a 1/2-inch space between blue beads.
Step 5: Next, string on the fish bead.
Step 6: Repeat step 3 three more times.
Step 7: Finish the ankle bracelet with a crimp bead and jump ring. Before you crimp down, make sure there is a one-inch space between the last blue bead and the jump ring.
Keep reading to learn about another cool bracelet.
For more fun activities and bead crafts, check out:
Wear the butterfly stitched bracelet on your wrist or ankle.
No sewing is required to wrap your ankle with this butterfly stitches bracelet.
What You'll Need:
2 strands nylon line, 12-1/2 inches each
1 clasp and jump ring
6 crimp beads
5 silvertone butterfly beads
Tools:
Needle-nose pliers
Scissors
Step 1: Hold both strands of nylon line together at one end, attach them to the clasp with a crimp bead. To do this, slide a crimp bead and then a clasp onto the end of the nylon line. Thread the nylon line back through the crimp bead, and pull it tight so the crimp bead is close to the clasp.
Advertisement
Step 2: Using needle-nose pliers or crimping pliers, flatten the crimp bead so it stays in place. Using a sharp pair of scissors, trim the excess line as close to the crimp bead as possible, but only on the short end. Obviously, you need to leave the long end in order to string the beads.
Step 3: Separate the strands. Thread one strand through a butterfly bead from head to tail, and thread the other strand through the same butterfly from tail to head.
Step 4: Pull the strands lightly until the butterfly is 3/4 inch from the crimp bead. Leave the line loose to form a loop, and make sure both sides of the loop are even.
Step 5: String a crimp bead onto both strands at once, and slide it up until it's 3/4 inch from the butterfly. Crimp down.
Step 6: Repeat steps 3 through 5 until only one crimp bead is left.
Step 7: To finish, bring the two strands back together and add the last crimp bead and the jump ring. Leave a 3/4-inch space between the last butterfly and the last crimp bead.
Find out what the future holds with a crystal ball bracelet -- continue reading to find out how it's made.
For more fun activities and bead crafts, check out:
The crystal ball says you'll look cool in this bracelet.
When you look into the future, you'll see yourself having a great time wearing this crystal ball bracelet. Slip it on and have a ball.
What You'll Need:
2 strands nylon line, 14 inches each
1 clasp and jump ring
2 crimp beads
7 silver-lined seed beads, 2mm
108 transparent pink seed beads, 1mm
6 plastic faceted transparent beads, 8mm
Tools:
Needle-nose pliers
Scissors
Step 1: Holding both strands of nylon line together at one end, attach them to the clasp with a crimp bead. To do this, slide a crimp bead and then a clasp onto the end of the nylon line. Thread the nylon line back through the crimp bead, and pull it tight so the crimp bead is close to the clasp.
Advertisement
Step 2: Using needle-nose pliers or crimping pliers, flatten the crimp bead so it stays in place. Using a sharp pair of scissors, trim the excess line as close to the crimp bead as possible, but only on the short end. Obviously, you need to leave the long end in order to string the beads.
Step 3: String a silver-lined seed bead onto both strands, then separate the two strands.
Step 4: On one strand, string on 18 pink seed beads.
Step 5: On the other strand, string on one faceted bead.
Step 6: Bring the two strands back together.
Step 7: Repeat steps 3 through 6 until all the beads have been strung.
Step 8: Finish with a crimp bead and jump ring.
When you're in the mood for an evening party you'll want to wear the elegant bracelet on the next page.
For more fun activities and bead crafts, check out:
Decorate your wrist with these dainty pearls, and you'll feel like a lady all day long.
What You'll Need:
2 strands nylon line, 9 inches each
1 clasp and jump ring
12 crimp beads
12 round white pearlized beads, 2mm
6 round lavender pearlized beads, 2mm
5 silvertone heart beads
Tools:
Needle-nose pliers
Scissors
Transparent or masking tape
Step 1: Holding both strands of nylon line together at one end, attach them to the clasp with a crimp bead. To do this, slide a crimp bead and then a clasp onto the end of the nylon line. Thread the nylon line back through the crimp bead, and pull it tight so the crimp bead is close to the clasp.
Advertisement
Step 2: Using needle-nose pliers or crimping pliers, flatten the crimp bead so it stays in place. Using a sharp pair of scissors, trim the excess line as close to the crimp bead as possible, but only on the short end. Obviously, you need to leave the long end in order to string the beads.
Step 3: Separate the strands. String two white beads on one strand, and string one lavender bead on the other.
Step 4: Bring the strands back together and string on a crimp bead. Crimp down one inch from the previous crimp bead. The pearl beads will float loosely on the nylon line.
Step 5: String a heart bead and a crimp bead onto both strands, and crimp down snugly against the bead.
Step 6: Repeat steps 3 through 5 until all beads have been strung.
Step 7: Finish with a jump ring and crimp bead. Before you crimp down, make sure there is one inch of space between the last two crimp beads.
Get the party started with the stylish bracelet you'll learn about next.
For more fun activities and bead crafts, check out:
Step 1: Holding the three strands of nylon line together at one end, attach them to the clasp with a crimp bead. To do this, slide a crimp bead and then a clasp onto the end of the nylon line. Thread the nylon line back through the crimp bead, and pull it tight so the crimp bead is close to the clasp.
Advertisement
Step 2: Using needle-nose pliers or crimping pliers, flatten the crimp bead so it stays in place. Using a sharp pair of scissors, trim the excess line as close to the crimp bead as possible, but only on the short end. Obviously, you need to leave the long end in order to string the beads.
Step 3: String another crimp bead onto all three strands, leaving approximately 1/2-inch space between crimp and clasp. Crimp down.
Step 4: String a tubular bead and another crimp bead onto all three strands, sliding them up so they are snugly against the other crimp bead. Crimp in place.
Step 5: Next, separate the strands and string one frosted round bead on each strand.
Step 6: Bring the strands back together and string another crimp bead onto all three strands. Slide it up so there is one inch between crimp beads. Crimp in place.
Step 7: Add a tubular bead and a crimp bead. Crimp down snugly against the bead.
Step 8: Repeat steps 5 through 7 until all the beads have been strung and crimped in place.
Step 9: Finish the bracelet with a crimp bead and jump ring. Before you crimp down, make sure there is a one-inch space between the last bead and the jump ring.
For more fun activities and bead crafts, check out: