Kite Activities for Kids

Learn how to make a tiny straw kite.
©2007 HowStuffWorks

Kite activities for kids take many forms, from decorating a kite to flying it.

Soar to new heights with these fun kite activities for kids. Over the next few pages, you'll learn everything you need to know about kites. Enjoy the flight!

Advertisement

Kite Heights

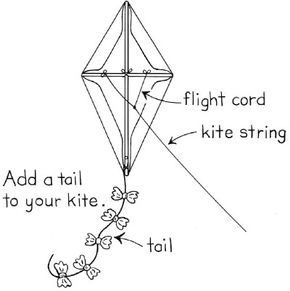
Learn some of the basics of kite-flying, including how to measure your kite's flying height.

Fly a Kite

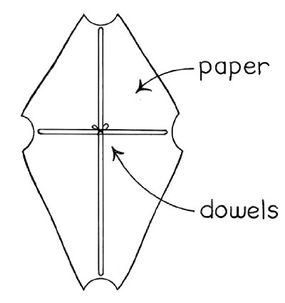
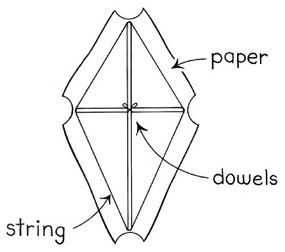
Once you know the basics about kite-flying, try building and flying a kite of your own -- these step-by-step instructions will show you how.

Tiny Straw Kite

Made with straws and tissue paper, this delicate kite allows you to experiment with different design ideas.

Go Fly a Kite

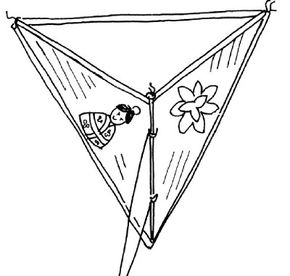
Experiment with another kite-making method and use your imagination to create a kite that suits you.

From small to big, kites offer plenty of diversion -- start making a kite of your own right now by continuing to the next page.

For more fun activities and spring crafts, check out:

Advertisement

Kite Heights

Soar your kite to kite heights -- and measure your success. Mark the kite's string to get an idea of how high in the sky you've managed to fly.

What You'll Need:

  • Kite
  • String
  • Yardstick
  • Colored markers

The next time you fly a kite, take steps to find out just how high it will rise.

Advertisement

Before you launch your soaring beauty, mark your string in 10-foot stretches. Measure out 10 feet of string. Color it blue. Measure out the next 10 feet, and color it green. Make the next 10 feet of string red.

Keep going with as much of the string as you have the patience to mark. Then launch your kite. Keep track of how many different colors slip through your hands, then multiply that number by 10.

Hint: Make a note of how much string you tied onto your kite so you'll know how high it's gone when it comes to the end of its string.

Now that you've learned how to tell how high your kite flies, consider making one of your own.

For more fun activities and spring crafts, check out:

Advertisement

Construct a Kite

Make your own kite.

Learn how to make your own kite with this kite activity. You can let it soar on a windy day. In between flights, use your bedroom wall as a hangar.

What You'll Need:

  • One 12-inch wood dowel with 1/8-inch diameter
  • One 24-inch wood dowel with 1/8-inch ­diameter
  • Strong string or cord
  • Ruler
  • Blunt scissors
  • Wrapping paper
  • Craft glue
  • Colored tissue paper

Step 1. Make a cross with the wood dowels. The longer dowel should be positioned vertically. Use a piece of strong string or cord to tightly tie the two dowels together at the cross section. Cut a piece of wrapping paper in a 16 × 28-inch diamond shape. Cut off the corners to make the tabs as shown. Place the crossed dowels in the center of the paper diamond.

Advertisement

Cut the wooden dowels.

Step 2. Put a dot of glue at the end of each dowel. Run a long piece of string around the dowel frame through the glue. Add another dot of glue to each end to cover the string. Let the glue set. Fold the wrapping paper tabs over the string and glue each tab in place. Let the glue set.

Cut the string and tie it around the dowel.

Step 3. To make the flight cord, cut a piece of string and tie each end to the horizontal dowel. To make the kite string, cut a long piece of string and tie it to the center of the flight cord. Tie a piece of string to the bottom of the vertical dowel for the kite tail. Make tissue paper bows to fold over the string and glue in place. Let the glue dry, then fly your kite!

Now that you've made your own kite, go to the next page to find out how to decorate a kite.

For more fun activities and spring crafts, check out:

Advertisement

Tiny Straw Kite

Decorate your own kite when you make this tiny straw kite.

Diminutive and cute, the tiny straw kite is -- of course -- an easy project, but it also lets future aerospace engineers try out their first, simple designs. Use straws and tissue to create a simple kite.

What You'll Need:

  • Dental floss
  • 6 straws
  • Thread
  • Tissue paper
  • Glue
  • Paint
  • Fine paintbrushes
  • String

Step 1. Thread one long piece of dental floss through three straws. Tie the ends of the floss together, which will form the straws into a triangle.Step 2. Cut three pieces of dental floss two inches longer than the straws. Thread a piece of floss through each of the last three straws, leaving an inch sticking out of each end.

Advertisement

Step 3. Tie together one end of the floss from all three straws. You will have a three-armed star. Tie the floss hanging from the other end of each straw to a corner of the triangle. You will have a four-sided shape called a tetrahedron.

Step 4. Cover two sides of the tetrahedron by gluing tissue paper to the straws.

Step 5. On the triangles with tissue paper, poke small holes in the paper 1/3 of the way from the top of the kite. Thread a piece of floss through each hole, and tie them around the straw.

Step 6. Tie a slightly longer piece of floss around the straw near the bottom 1/3 of the kite. Tie the floss together, then tie a long string to this to fly the kite. Paint a Hina-doll or a peach blossom on your kite, and see how high it can fly!

Making a small kite is easy -- now try a bigger one. Learn how to make a full-sized kite on the next page.

For more fun activities and spring crafts, check out:

Advertisement

Make and Fly a Kite

Make and fly a kite, then watch it soar in the breeze. Step-by-step instructions, below, will show you how.

What You'll Need:

  • Two thin, lightweight wooden sticks (36 inches and 18 inches long)
  • String
  • Colorful wrapping paper
  • Tape
  • Cloth strips

There's no better way to "see" the wind than to make and fly a kite. Here's how:

Advertisement

Make a cross out of two wooden sticks (one 36 inches long and the other 18 inches long) placing the shorter stick one foot from the top of the longer stick.

Use string to fasten the two sticks together where they cross. Put string around the outside of the crossed sticks to make a diamond shape, and connect the string to the ends of the sticks with tape. This will make the outline of the kite.

Cut wrapping paper 1-1/2 inches larger than the outline of the kite. Put the paper over the outline. Fold the extra 1-1/2 inch over the string and tape it down.

Tie a ball of string to the place where the sticks are joined. Tie cloth strips to another piece of string, and attach the string to the pointy end of the kite for a tail. Now you're ready to sail on the wind.

For more fun activities and spring crafts, check out:

ABOUT THE CRAFTERS:

Tiny Straw Kite by Lisa Lerner, Kersten Hamilton.

Advertisement

Advertisement

Loading...