Garden Activities for Kids

Cucumber in a bottle
Show kids how to grow a cucumber in a bottle.
Publications International, Inc.

Garden activities for kids unlock the magic of growing plants, provide keys to the mysteries of living things, and open the world of beautiful flowers. By sowing seeds or planting gardens, you and your kids can share the wonder of an ever-changing leafy world.

By decorating flowerpots and putting plants in them, you can create living gifts for special friends and family members. By making a flower press, you can preserve memories of a gorgeous garden. And by conducting some fun and simple botany experiments, you can be in the know about how plants grow.

Advertisement

Garden activities are great for kids because they don't require expensive materials, and kids of all ages can enjoy working together on a project outdoors. A few simple tools or supplies, seeds or plants, and a junior gardening crew are all you need to have fun all season long.

Follow the links below to learn about garden activities you can do with your kids.

Secret Seed Garden

Find out what will grow from the secret seeds in different soil.

Fancy Painted Flowerpots

Paint a beautiful pot and add a plant for a special gift.

Rainbow Flowerpot

Wind a rainbow around a pot for a spectrum of colors.

Flower Press

Preserve your memories with pressed flowers from your garden.

Miniature Garden

Give the fairies a home with a Victorian-style miniature garden.

Day and Night Flip Stones

Show the equality of night and day -- and play a toss game with flip stones.

Plant Power Experiment

Discover the surprising strength of plants with this experiment.

Sunflower Fort

Plant a living, sunflower-topped fort where kids can play.

Fruit Seed Garden

Recycle seeds from the fruit you eat to start a garden.

Cucumber in a Bottle

Learn the trick of growing a cucumber in a bottle.

Sunny Flower Garden

Enjoy color all season long with a garden of sun-loving flowers.

Secret seeds are hiding in soil everywhere. Go to the next page to find out how to unlock their secrets.

For more fun outdoor activities and games for kids, check out:

Advertisement
Secret Seed Garden

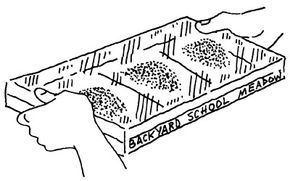
Garden soil samples
Soil samples arranged in a Secret Seed Garden.
Publications International, Inc.

Maybe you've planted something with your kids and watched it grow, but how about trying a Secret Seed Garden as a gardening activity? Seeds are all around us, just waiting in the soil to grow. By gathering dirt from several areas, you can grow a garden and see what pops up from those secret seeds.

What You'll Need:

  • 3 scoops of dirt, each from a different location
  • Spoon
  • Shoe box lid
  • Marker
  • Plastic bags or plastic wrap
  • Scissors
  • Water
  • Tape

Step 1: Collect several spoonfuls of dirt from three different places. Keep the samples of soil separate.

Advertisement

Step 2: Divide the inside of a shoe box lid into three sections, and mark them off with a marker.

Step 3: Label each section with the name of the place where you collected the soil sample.

Step 4: Line the lid with a plastic bag that has been cut open or a piece of plastic wrap.

Step 5: Place each sample of soil in the section with its place name. Sprinkle water over the soil in each section.

Step 6: Cover the lid with a piece of plastic wrap or another plastic bag. Seal the cover with tape to create a greenhouse.

Step 7: Set the lid in a sunny window, and check every day or two for signs of any plants growing from secret seeds.

Need to give a gift to someone special? Keep reading to learn how to decorate a fancy painted flowerpot.

For more fun outdoor activities and games for kids, check out:

Advertisement
Fancy Painted Flowerpot

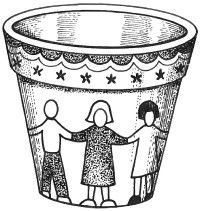
Painted flowerpot
The painted flowerpot is a great gift kids can make.
Publications International, Inc.

Help your kids design a fancy painted flowerpot as a garden activity. They'll be able show off their art and a beautiful plant or floral arrangement. And this makes a great gift!

What You'll Need:

  • Clay flowerpot
  • Dish detergent
  • Newspaper
  • Pencil
  • Acrylic paints
  • Paintbrush

Step 1: Wash the flowerpot, even if it is new, with dish detergent. Rinse it thoroughly, and place it in the sun to dry.

Advertisement

Step 2: Cover your work surface with newspaper.

Step 3: Sketch a pattern or picture on the flowerpot. You can draw an apple pattern, a picture of your family, or an abstract design.

Step 4: Paint the design with acrylic paints. Let the paint dry.

Step 5: Once the paint is dry, put a plant in the flowerpot.

Go to the next page to see how you can brighten a flowerpot with a rainbow of colors.

For more fun outdoor activities and games for kids, check out:

Advertisement
Rainbow Flowerpot

You don't need to wait for the sun after a storm to find a rainbow with this gardening activity for kids. This rainbow flowerpot adds color to any plant.

What You'll Need:

Advertisement

  • 6-inch clay flowerpot
  • Dish detergent
  • Craft glue
  • Old paintbrush
  • Yarn in these colors: Violet, blue, green, yellow, orange, and red

Step 1: Wash the flowerpot, even if it is new, with dish detergent. Rinse it thoroughly, and place it in the sun to dry.

Step 2: When the flowerpot is dry, apply a 1-inch band of glue around its base. Wrap violet yarn around the flowerpot, covering the band of glue.

Step 3: Apply another band of glue around the flowerpot above the violet yarn. Wrap the next rainbow color, blue, around the pot.

Step 4: Continue gluing and wrapping the yarn in rainbow order up the flowerpot until it's covered completely.

Step 5: Let the glue set, and then put a plant in the flowerpot.

Preserve the beauty of garden flowers. Look on the next page to discover how to make a simple flower press.

For more fun outdoor activities and games for kids, check out:

Advertisement
Flower Press

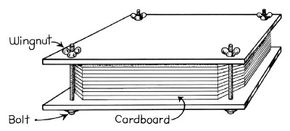
Flower press
Preserve memories from the garden with this homemade flower press.
Publications International, Inc.

You can preserve the beauty of the season and its lovely flowers with this gardening activity for kids -- a flower press that you make together.

What You'll Need:

  • Large piece of thin plywood
  • C-clamp
  • Power drill
  • 1/4-inch drill bit
  • Sandpaper
  • Blunt scissors
  • Cardboard
  • Construction paper
  • Assorted flowers
  • Four 2×1/4-inch bolts
  • Four wing nuts
  • Four washers

Step 1: Saw two 10-inch squares from the plywood (you'll want to do this part for your kids). Clamp the pieces together.

Advertisement

Step 2: Drill a 1/4-inch hole in each corner all the way through both boards (you'll also want to do this step for your kids).

Step 3: Take the clamps off the plywood pieces, and sand the edges.

Step 4: Cut four 10-inch squares from cardboard and six 10-inch squares from construction paper. Cut the corners off each square.

Step 5: Place a cardboard square on top of one plywood piece and a square of construction paper on top of the cardboard. Arrange your flowers on top of the construction paper.

Step 6: Place a second square of construction paper on top of the flowers, and then another cardboard square. Continue with additional layers of materials following the same order.

Step 7: After all the layers are arranged, place the second piece of plywood on top of everything. Insert the bolts in each hole, put on the washers, and tighten down the wing nuts.

Step 8: Put your flower press in a warm, dry place for at least six months. The longer the flowers are allowed to dry, the less likely their color is to fade when you use them in a design.

Keep reading to find out how you can make a miniature garden for fairies, as Victorian children did, or update the concept for today's dolls and action figures.

For more fun outdoor activities and games for kids, check out:

Advertisement

Miniature Garden

Victorian kids made "fairy gardens," and you can create your own miniature garden as a gardening activity. In the shelter of a large, shady shrub, you can design a miniature world. Use dolls and toy animals as inhabitants if you like, or pretend (as Victorian children did) that the "little people" visit your garden when you're not looking.

What You'll Need:

  • Shady 3' x 3' garden spot
  • Rocks, sticks, and moss
  • Shade-loving plants
  • Trowel
  • Toy animals or dolls

Step 1: Decide where the edges of your garden will be. Mark the edges with a tiny wall made of rocks or sticks. Use stones to make paths.

Advertisement

Step 2: Build miniature houses by stacking sticks log-cabin style. Cover the houses with moss.

Step 3: Fill the rest of the space with shade-loving plants, such as annuals like impatiens, coleus, polka-dot plants, and violas, or perennials like dwarf ferns, dwarf hostas, and violets.

Go to the next page to see how you can show night and day and play a simple game with flip stones.

For more fun outdoor activities and games for kids, check out:

Advertisement

Day and Night Flip Stones

Day and night flip stones
Day and night flip stones spruce up any garden.
Publications International, Inc.

Show the concept of the vernal equinox and play a simple game with day and night flip stones, an easy garden activity for kids. On the day of the vernal equinox (March 20 or March 21), the hours of day are nearly equal to the hours of night. The flip stone shows this with a painted sun on one side and a moon on the other.

What You'll Need:

  • Smooth round stones
  • Old newspapers
  • Acrylic paint
  • Paintbrushes
  • Water cup
  • Clear varnish or nail polish

Step 1: Find a smooth, round stone. Wash it, and let it dry for several hours.

Advertisement

Step 2: Lay out some old newspaper on your work surface.

Step 3: On one side of a stone, paint a bright sky-blue background. Make sure you don't get any paint on the other side of the rock.

Step 4: When the blue paint dries, paint a large, smiling sun in the middle of it.

Step 5: When that side dries, paint the other side black.

Step 6: Add a crescent moon when the black background is dry.

Step 7: To protect your painted stones, coat them with clear varnish or nail polish once you're done painting them. You might want to do two or three coats, waiting for each coat to dry before you add another.

Now you are ready to play a toss game, much like heads or tails. Take turns calling "day" or "night" and tossing the stone on the grass to see if the side you called lands face up. Keep score, and see how many "days" and "nights" you can guess.

Paint other rocks with pretty spring scenes, and give them out as prizes.

How powerful are plants? You'd be surprised. Look on the next page for an experiment that shows plant power.

For more fun outdoor activities and games for kids, check out:

Advertisement

Plant Power Experiment

Plants have amazing power, as this garden activity for kids shows. You might think that rocks would be stronger than plants, but plants are strong enough to break through rock. This experiment will show you how strong plant power can be.

What You'll Need:

  • Beans
  • Water
  • Bowl
  • Plaster of Paris
  • Aluminum-foil baking pan

Step 1: Soak a handful of beans in water overnight.

Advertisement

Step 2: Pour plaster of Paris into the aluminum foil baking pan. The plaster of Paris should be a couple of inches deep.

Step 3: Sprinkle the soaked beans on top.

Step 4: Cover the beans with another layer of plaster of Paris about an inch thick.

Step 5: Watch what happens. When the beans sprout, they will break right through the rock-like plaster of Paris.

You can see examples of this in nature. When you go for a walk, look for plants and trees growing up through rock, or tree roots breaking up a concrete sidewalk.Imagine playing in a leafy fort topped by big yellow flowers. Keep reading to learn how you can make a sunflower fort in your backyard.

For more fun outdoor activities and games for kids, check out:

Advertisement

Sunflower Fort

Create your own yellow-topped sunflower fort as a garden activity with kids. Why build a fort? You can all work together to grow an ever-changing leafy playhouse that gets taller and taller through the summer.

What You'll Need:

  • 7' x 7' garden patch
  • Shovel
  • Short stakes
  • String
  • Tall-growing sunflower seeds (such as giant greystripe or Russian mammoth)
  • Cheesecloth (optional)

Step 1: Late in spring when the weather is warm, mark a 7-foot square in the garden. Dig the ground around the edges a foot deep. The soil should be loose and crumbly.

Advertisement

Step 2: Push a stake in the ground at each corner. Mark the "doorway" with stakes.

Step 3: To help you plant seeds in straight lines, tie string to a doorway stake and run the string around the stakes in a square around your fort.

Step 4: Plant seeds an inch deep and six inches apart. (Poke a hole in the dirt with your finger, put a seed in, and cover it up.) Plant seeds around the edges of your fort -- but not in the doorway.

Step 5: Water the seeds.

Step 6: Cover the seeds with a layer of cheesecloth to protect them from squirrels. Leave the cloth loose so the plants can grow; weigh down the edges with dirt.

Step 7: When the plants are several inches tall, remove the cheesecloth. Thin out the plants; sunflowers get huge and need the room.

Step 8: Keep the plants watered, as sunflowers need plenty of moisture.

Go to the next page to discover how you can start a garden with seeds from the fruit you eat.

For more fun outdoor activities and games for kids, check out:

Advertisement

Fruit Seed Garden

You don't need to buy seeds to plant a fruit seed garden -- and you don't have to wait for warm weather to start this simple garden activity for kids. You'll be recycling seeds from the fruit your family eats. A few days before starting the garden, have members of your family save seeds they find in any fruit that they eat. You can do the same. That way, you'll have plenty of seeds for your garden.

What You'll Need:

  • Seeds from fruit (like apples, oranges, grapefruit, lemons, or limes)
  • Dish of water
  • Plant pot
  • Soil

Step 1: Once you have eight to 10 fruit seeds, fill a small dish with water and soak the seeds for a day or two.

Advertisement

Step 2: Fill a plant pot with soil.

Step 3: Bury the seeds about a quarter of an inch deep in the soil, and water them.

Step 4: Over the next few weeks, watch your seeds carefully. Keep the plant pot in a sunny place, and water the seeds every couple of days. Soon you'll see plants pop through the soil.

As the plants get bigger, you may want to separate them into bigger pots or plant them outdoors, if the weather is warm enough.

Have you ever seen a cucumber growing in a bottle and wondered how that's done? Check the next page to learn the tricks that make this possible.

For more fun outdoor activities and games for kids, check out:

Advertisement

Cucumber in a Bottle

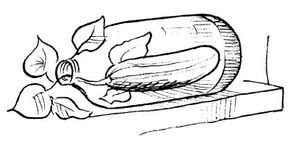
Cucumber in a bottle
Grow a cucumber in a bottle.
Publications International, Inc.

Almost anyone can grow cucumbers in a garden, but you can do something trickier -- growing a cucumber in a bottle as a gardening activity with kids. It's not as hard as you might think, and your kids will be amazed.

What You'll Need:

  • Two-liter soda bottle
  • Soil
  • Cucumber seeds
  • Nut pick
  • Water
  • Sunshine

Step 1: Take a two-liter plastic soda bottle and poke several ventilation holes in it.

Step 2: When cucumbers start to develop, gently insert them (still attached to their vines) through the bottle's top.

Step 3: Shade the bottle with some cucumber leaves so that the small cukes won't cook from too much heat.

Step 4: Water every few days.

You might have to try this with several cucumbers before you get one to full size -- but eventually it will work!

Go to the next page to learn how to plant a garden of sun-loving flowers for color all season long.

For more fun outdoor activities and games for kids, check out:

Sunny Flower Garden

Plants from the nursery can make a colorful splash as a sunny flower garden in your yard. This garden activity for kids has a great payoff and can launch them on a lifetime of gardening for fun.

What You'll Need:

  • 4' x 3' garden patch
  • Shovel
  • Bagged compost
  • Bagged mulch (optional)
  • Plants
  • Trowel
  • Hose
  • Small sprinkler

Step 1: Choose a garden spot that gets six or more hours of sun a day.

Step 2: Pull weeds, and dig up soil until it crumbles.

Step 3: Spread a one-inch layer of bagged compost over the soil and mix it in.

Step 4: Buy plants at a garden center. Buy small, healthy annuals that aren't flowering.

Step 5: Set your plants on the bed and arrange them. Give the young plants plenty of room.

Step 6: With your trowel, dig a hole for each plant.

Step 7: Turn the pot over, and tap the plant into your hand. Loosen the root ball with your fingers, and set the roots into the soil.

Step 8: Water your plants with a sprinkler every few days.

Step 9: Pick your flowers often to keep the plants blooming.

For more fun outdoor activities and games for kids, check out:

ABOUT THE DESIGNERS

Advertisement

Loading...