How to Make Paper Puppets

It's showtime for these Circus Act Finger Puppets!

Making paper puppets for kids is a fun, inexpensive paper craft that the whole family can enjoy. Using simple tools and craft supplies from around the house, your kids can create a whole cast of playtime characters.

Once your paper puppets are made, ask your kids to put on a show. Set up behind the couch or construct your own puppet theater out of a shoe box. Either way, your kids will love singing, dancing, and acting out stories with their new paper puppet friends.

Advertisement

These paper crafts are appropriate for children of all ages, but little ones will need adult supervision and assistance with some of the cutting and gluing. Below you'll find links to a wide variety of imaginative kids' paper crafts:

Character Collage Puppets

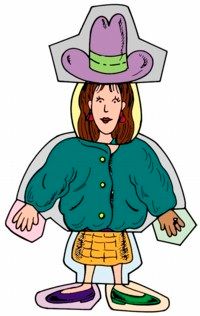
Construct one-of-a-kind character puppets using snippets from old magazines and catalogs.

Circus Act Finger Puppets

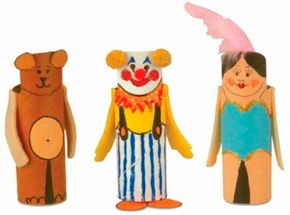
See how a wrapping paper tube can be transformed into the greatest show on earth.

Shoe Box Theater

Set the scene for your kids' puppet performances with this colorful shoe box theater.

Big Mouth Puppets

Turn empty pudding boxes into wacky, chatty, paper craft puppets.

Storyteller Box

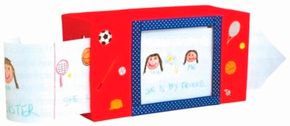
Tell a story frame by frame with your own moving picture show.

Picture Puppets

Use snapshots of family and friends to create super personalized puppets.

Keep reading to see how you and your kids can make a whole slew of silly puppets using old magazines and a bit of imagination!

For more fun paper crafts and kids' crafts, check out:

Advertisement

Character Collage Puppets

The Character Collage Puppet is a ton of fun and a cinch to make!

Create a family of silly paper craft characters using some old magazines, scissors, glue, and your imagination.

What You'll Need:

  • Old clothing catalogs or magazines
  • Scissors
  • Craft glue

How to Make Character Collage Puppets:

Step 1: Look through old clothing catalogs or magazines. Cut out different heads, hairdos, arms, hands, bodies, clothes, legs, and shoes. Step 2: Paste the different parts together on a piece of construction paper to make a mixed-up, new character. Be creative -- paste a great big hat on a small head and tiny arms on a big body. Make a whole family of characters and give them a silly family name. You can even paste together parts of objects to make an alien character. For example, the alien could have a car-tire head, gift-box body, feather arms, and key legs.Now it's time to take your kids to a show at the big top. Learn how to make circus act finger puppets in the next section.For more fun paper crafts and kids' crafts, check out:

Step 1: Look through old clothing catalogs or magazines. Cut out different heads, hairdos, arms, hands, bodies, clothes, legs, and shoes. Step 2: Paste the different parts together on a piece of construction paper to make a mixed-up, new character. Be creative -- paste a great big hat on a small head and tiny arms on a big body. Make a whole family of characters and give them a silly family name. You can even paste together parts of objects to make an alien character. For example, the alien could have a car-tire head, gift-box body, feather arms, and key legs.Now it's time to take your kids to a show at the big top. Learn how to make circus act finger puppets in the next section.For more fun paper crafts and kids' crafts, check out:

Advertisement

Advertisement

Circus Act Finger Puppets

Your kids will have the big top at their fingertips with these Circus Act Finger Puppets.

These little paper craft characters come alive when kids slip them onto their fingers. Work with your family to make a whole circus act complete with bears, clowns, trapeze artists, elephants, and more!

What You'll Need:

  • Wrapping paper tube
  • Acrylic paint: assorted colors
  • Clear gloss acrylic spray
  • Decorative items: poms, glitter, felt, scrap paper, card stock, feathers
  • Pencil
  • Ruler
  • Craft knife
  • Paintbrushes
  • Markers
  • Scissors
  • Craft glue

How to Make Circus Act Finger Puppets:Step 1: Measure and mark a 4-inch section of the paper tube. Help kids use a craft knife to cut the tube at this line.

Advertisement

Cut the wrapping paper tube into a four-inch-tall section.

Step 2: For the head, measure and mark a line around the tube one inch from the end. Mark a 1-1/4-inch vertical section in this 1-inch space. Help kids cut around the tube at the horizontal line, leaving only the 1-1/4-inch section intact to create a head that extends above the body.Step 3: Use a pencil to sketch out the basic design of your puppet, and use paint, markers, and decorative items to add detail. Cut arms out of felt, and make hair out of paper, poms, or feathers. Note: Seal the tube with clear gloss spray after it's painted and before you draw on it with marker. If marker is used first, it may run when spray is applied.Keep reading to learn how make a puppet theater out of a shoe box -- the perfect place for your kids to stage a puppet show!

For more fun paper crafts and kids' crafts, check out:

Advertisement

Shoe Box Theater

It's always show time at the Shoe Box Theater!

With this paper craft, all the world's a stage -- even a shoe box! Using colorful craft foam and glue, you can transform a shoe box into a puppet theater in the blink of an eye. Ladies and gentlemen, on with the show!

What You'll Need:

  • 13x9-inch shoe box
  • Colored card stock
  • Newspaper
  • 12 x18-inch piece craft foam
  • Craft foam scraps
  • Ruler
  • Pencil
  • Craft knife
  • Scissors
  • Craft glue

How to Make a Shoe Box Theater:

Step 1: Remove the lid from the shoe box. On the bottom of the box, measure and mark a rectangular opening one inch in from all edges.

Advertisement

Help kids use the craft knife to cut along the top line and both side lines only. Score the bottom line with the craft knife, and fold the rectangle to the inside of the box for the stage floor.

Step 2: Cut a piece of card stock to cover the stage floor. Glue it on top of the floor.

Step 3: To make the complete stage front pattern, fold a piece of newspaper in half and then in half the other direction. Align the edges of the stage front pattern with the folded edges of the newspaper.

Trace around the pattern; cut out. Unfold the newspaper, and there's the full stage front pattern. Trace around this pattern onto a piece of craft foam; cut out, cutting out the center as well.

Step 4: Cut out 6 circles and 6 triangles from scraps of craft foam; glue around the stage front border. Center and glue the border around the opening in the shoe box. Let dry.

In the next section your kids will meet a wacky big mouth puppet that has a lot to say.

For more fun paper crafts and kids' crafts, check out:

Advertisement

Big Mouth Puppets

The Big Mouth Puppet

Put on a puppet show with this crazy box puppet paper craft. This crazy puppet will give you an earful!

What You'll Need:

  • 2 empty instant pudding boxes
  • White acrylic paint
  • Construction paper or card stock: red, blue, black
  • 2 wiggle eyes, 18mm
  • Tissue paper: yellow, orange (20x8 inches each)
  • Craft glue
  • Craft knife
  • Paper clip
  • Paintbrush
  • Pencil
  • Black felt-tip marker
  • Scissors
  • Ruler
  • Stapler and staples

How to Make Big Mouth Puppets: Step 1: Glue the end flaps down on the boxes. Help kids use a craft knife to cut one box in half across the front and 2 sides only.

Advertisement

Fold the 2 halves of the box back, one against the other. This becomes the mouth. Use a paper clip to temporarily hold the mouth closed from the back.

Step 2: Help kids cut the second box in half completely with a craft knife. Discard one half.

Step 3: Remove the paper clip from step 1, and paint the boxes with several coats of white paint, letting each coat dry before applying the next. (It's not necessary to paint the insides of the boxes.) Let dry completely.

Step 4: Glue the half-box, open end up, to the top half of the folded mouth box.

Step 5: Draw lips on red paper. Outline both pieces with black marker; cut out. Glue the lower lip to the bottom section of the mouth box and the upper lip to the top section of the mouth box.

Step 6: On blue paper, trace around the eye pattern twice; cut both eyes out. Turn one eye to face the other direction, and then outline both with black marker. Glue a wiggle eye to the center of each eye.

Step 7: Cut two 1x1-1/2-inch strips of black paper; use scissors to fringe them for eyelashes. Glue an eyelash to the back of each eye, and glue the eyes on the top box.

Step 8: To make hair, place yellow tissue paper on top of orange tissue paper, and staple together in 5 or 6 places along one of the long sides. Fold 1/2 inch of this edge over; glue. Fold the tissue in half widthwise, then fold it in half again.

Fringe the tissue all the way to the stapled edge. Glue this edge to the inside of the open end of the top box.

When you're ready to play with the puppet, put your fingers inside the backs of the boxes to operate the puppet's mouth.

In the next section, your kids will learn how to draw and display their own storyteller box, a moving picture show.

For more fun paper crafts and kids' crafts, check out:

Advertisement

Storyteller Box

The pictures move in this Storyteller Box!

Tell a story frame-by-frame with this moving paper craft project.

What You'll Need:

  • Shoe box
  • Acrylic paint
  • Stickers
  • Coordinating trim
  • Several sheets 11x17-inch white paper
  • Compact disc jewel case
  • Pencil
  • Craft knife
  • Ruler
  • Paintbrush
  • Craft glue
  • Scissors
  • Tape
  • Crayons

How to Make a Storyteller Box:

Advertisement

Step 1: Place a jewel case in the center of the box bottom and trace around it. Help kids cut out the square using a craft knife. This is the front of the storyteller box.

Step 2: Run a pencil along one edge of the jewel case on both ends of the box, 1 inch from the front of the box. Draw another line about 1/8 inch behind each of these lines. Help kids cut out these slits using a craft knife.

Step 3: Paint all surfaces of the box, and let dry. Decorate with stickers, and glue trim around the front edges.

Step 4: Cut a few sheets of white paper to the height of the jewel case. Tape the paper end-to-end, and cut the corners off the ends of the strip to make it easier to thread through the cuts at the ends of the box.

Pull the paper through slowly, using a pencil to mark the beginning and end of each frame.

Step 5: Remove the paper, and draw pictures between the pencil marks, with each panel telling part of a story. When you pull the paper through the box, the scenes will tell your story.

Have lots of pictures of family and friends? Find out how to turn them into personalized stick puppets in the next section.

For more fun paper crafts and kids' crafts, check out:

Advertisement

Picture Puppets

Picture Puppets bring your family and friends to life in puppet form.

This creative paper craft gets the whole family involved! Personalized puppets make each of you a star.

What You'll Need:

  • Jumbo craft sticks
  • Photos of family and friends
  • Cardboard
  • Glue stick
  • Scissors
  • Craft glue

How to Make Picture Puppets:

Step 1: Choose photos that show a person's entire body, head to toe. Use a glue stick to mount these photos on cardboard.

Advertisement

Step 2: Cut around the shape of the person in the photo, outlining the body.

Step 3: Glue the body to the end of a jumbo craft stick with craft glue; let dry.

It might be fun to make a puppet of your family pet, too, or cut out pictures from a magazine. The more puppets you make, the bigger your puppet show can be!

For more fun paper crafts and kids' crafts, check out:

Advertisement

Advertisement

Loading...