How to Make Paper Hats

Making paper hats is a great choice for a party activity for kids. Jose Luis Pelaez Inc / Getty Images

Newspapers, paper plates, paper bags -- they all can be used to make paper hats! Whether you're looking for a party activity for a group of kids or a craft project for some "Mommy (or Daddy) and Me" time, paper hats are a great choice.

The following articles offer simple instructions for making different kinds of paper hats for kids. With a little help from an adult, these hats are easy enough for kids to make and lots of fun to decorate and wear.

Advertisement

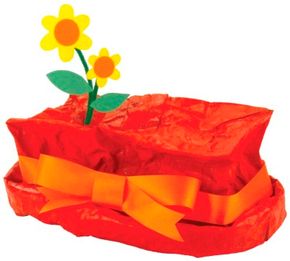
Crazy Clown Hat

Here's a clown hat that looks amazing, whether you wear it on your head or use it as a table decoration. Learn how to make it here.

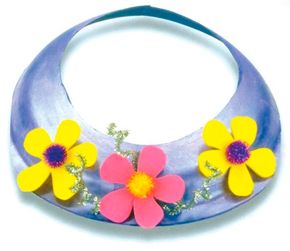
Flower Power Sun Visor

Who knew a paper plate could be turned into something so cute? Here's a visor that will have you singing "Let the Sun Shine In." Find out more.

Newspaper Hats

Newspaper hats have been popular for generations. Why? Because they're easy to make -- and lots of fun. See how to make newspaper hats here.

Start clowning around with a paper hat that's colorful, decorative, and a little crazy. Keep reading to find out more.

For more fun crafts and activities, check out:

Advertisement

Crazy Clown Hat

A crazy clown hat is a fun project for adults and kids to work on together.

It's such fun to wear a crazy clown hat that you've created! This one looks so good, you might even be tempted to become a professional clown. But regardless of your career aspirations, this hat is definitely as much fun to wear as it is to make. (It also makes a great table decoration.)

What You'll Need

Paper grocery bag

Advertisement

Red acrylic paint or spray paint

2-inch foam ball

Green chenille stem

Construction paper or card stock (yellow, orange, green)

2 yards orange ribbon, 1-1/4 inch wide

Paintbrush

Serrated knife

Scissors

Craft glue

How to Make a Crazy Clown Hat

Step 1: Crumple and open up the paper bag several times to soften it. Roll up the bottom edge to make the brim. To make a tall hat, roll a smallish brim; to make a shorter hat, roll a bigger brim.

Step 2: Paint the hat red. (If using spray paint, make sure you have adult help.) Let dry.

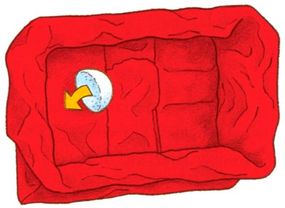
Glue the half-ball, flat side down, inside the bag.

Step 3: Ask a grown-up to cut a foam ball in half using a serrated knife. Discard one half. Turn the hat upside down so the opening faces up, and glue the foam piece flat side down inside the bag. Let dry; turn the hat right side up.

Step 4: Fold a green chenille stem so one side is longer than the other. Poke the folded end through the top of the bag, and push it into the foam ball. (Use scissors to poke a starter hole in the bag if necessary.) Cut two flowers out of yellow paper, two orange circles to fit in the center of the flowers, and two green leaves. Glue the pieces onto the ends of the chenille stem to make flowers.

Step 5: Wrap the orange ribbon around the hat, just above the brim, and tie it into a bow in front.

Keep the sun out of your eyes with a decorative, flower-laden sun visor. Find out how to make it on the next page.

For more fun crafts and activities, check out:

Advertisement

Flower Power Sun Visor

You'll be a vision in a Flower Power sun visor.

A Flower Power sun visor is a cute and colorful way to keep the sun out of your eyes. Start with a simple paper plate, a few crafts supplies, and your imagination. Before you know it, you'll be singing "Let the Sun Shine In"!

What You'll Need

9-inch paper plate

Advertisement

Purple paint

Purple glitter spray

Craft foam (yellow, pink)

Sparkle poms (2 purple, 1 yellow)

2 silver glitter chenille stems

Scissors

Craft glue or low-temperature glue gun and glue sticks

Paintbrush

Pencil

How to Make a Flower Power Sun Visor
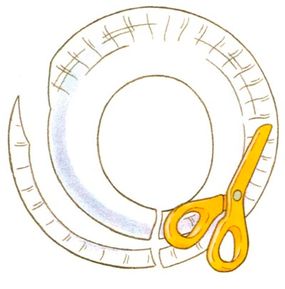
Cut the paper plate to fit your head.

Step 1: Make a cut in the rim on one side of the plate, and cut an oval shape from this slit around the center of the plate, closer to this edge than to the others. Make the oval a little smaller than you think it should be to fit around your head. (You can always go back to enlarge it, but once it's cut you can't make it smaller.) Cut off the rim around the back and the sides, leaving it intact at the front of the visor.

Step 2: Glue the cut in the back of the visor back together, adjusting the size of the hole if necessary. Let dry.

Step 3: Paint the top and bottom of the visor. Let dry. Spray with glitter if desired, and let dry.

Step 4: Draw three flowers on craft foam; cut out. Glue the flowers to the front of the visor, and glue poms to the centers of the flowers. Let dry.

Step 5: Coil silver chenille stems around a pencil to form spirals. Remove the pencil, cut each spiral to the desired length, and glue them onto the visor. Let dry.

Don't toss out those old newspapers -- make a hat! Keep reading to find out how.

For more fun crafts and activities, check out:

Advertisement

Newspaper Hats

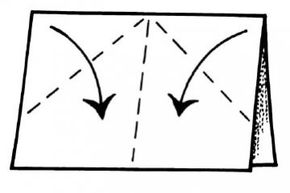
Fold the top corners to the center.

Newspaper hats have been around since Grandpa was a boy -- and even before that. Why not try your hand at making one? All it takes is a few simple folds and some pieces of tape.

Whether you're making a pirate hat or unique fashion statement, gather up your old newspapers and have some old-fashioned fun.

Advertisement

What You'll Need

Newspaper

Transparent tape

Trims (such as pom-poms or tissue paper fringe)

How to Make a Newspaper Hat
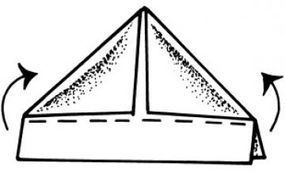
Fold up the bottom edges.

Step 1: To make a basic newspaper hat, fold one newspaper page in half horizontally. (If you want to make a large hat, use two newspaper pages, and fold it in half vertically.)

With the fold at the top, fold the top corners in to the center. Tape the points down.

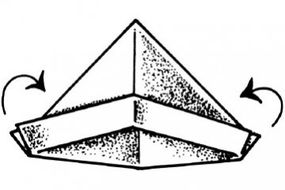
Tuck in corners.

Step 2: Fold up the bottom edges.

Step 3: Tuck in the corner edges and add tape to hold them in place.

If you want, trim your hat with pom-poms or tissue paper fringe. Put your hat on and wear it with the points at the front and back or to the side.

For more fun crafts and activities, check out:

Advertisement

Advertisement

Loading...