How to Make Kids' Costumes

Dressing in costume is half the fun of make-believe.

It's a simple fact: Kids love to dress up in costumes. Halloween is probably the most popular occasion for dressing up, but costumes are an important part of everyday play as well. From a fairy princess to a superhero to an alien being, costumes add to the enjoyment of pretending.

The following articles offer suggestions for a number of different costumes for kids. Most are intended as adult-and-kid projects -- some parts of the costume construction are a little difficult for small hands. Regardless of whether you're the adult helper or child creator, it's definitely fun for all when you get creative and jump into make-believe.

Advertisement

Goddess of Liberty Crown

Celebrate Juneteeth by wearing the traditional Goddess of Liberty crown to your family gatherings.

Safe Cape

Here's a cape that won't tug at your neck; it uses arm loops. Create a safe cape.

Box Costume

An empty box can become a charging steed when you create a horse costume from a box. Learn how on this page.

Fit for a King or Queen

Play at being royalty by creating and wearing these special crowns.

Superhero Cape

Everyone will know your super-powers by the special symbols on your cape. Find out how to decorate your superhero cape.

Mermaid Crown

Even on dry land, this coral-shaped crown is perfect for a little mermaid. Create this pretty mermaid crown.

Coat-of-Arms Crown

When you wear a jewel-studded crown with an attached coat of arms, make-believe will seem more like real life. Learn more on this page.

Creature from Outer Space

Are there aliens among us? It might be you! See this fun headband that lets you become a creature from outer space.

Hawaiian Hula Skirt

You can't properly dance the hula without a grass skirt. Find out how to create your Hawaiian hula skirt here.

Space Helmet

In this space helmet, you'll feel almost like a real astronaut. Wear it when you explore the alien terrain of your backyard.

Native Clothing

Every culture has its own native clothing. Learn how to create a costume that reflects our multiculturalism.

Night Sprite

Use your imagination to create a mask for the mystical night creature, the night sprite! It's fun to pretend.

For more fun activities and crafts, check out:

Advertisement
Goddess of Liberty Crown

Wear a Goddess of Liberty crown at the next Juneteenth celebration. Juneteenth, which is observed each June 19, commemorates the end of slavery in the United States. It's often celebrated with picnics, parades, and family gatherings -- the perfect occasions to wear a Goddess of Liberty crown.

What does the Goddess of Liberty look like? You decide! Let your imagination be your guide. Just gather together your materials and have fun.

Advertisement

What You'll Need:

Construction paper

Blunt scissors

Ruler

Glue

Stapler

Staples

Markers

How to Make a Goddess of Liberty Crown

Step 1: Cut out a 10-inch-high piece of construction paper that will be long enough to fit around your head, plus a few inches to staple it closed.

Step 2: Cut long, pointed triangle shapes in the long end of the paper to make a crown shape.

Step 3: Cut two different-colored pieces of construction paper the same length and with the same pointed triangle shapes at the top. One piece should be 8 inches high, and the other should be 6 inches high.

Step 4: Glue each piece onto the next largest piece, and staple all the ends together. Now you have a beautiful layered crown.

Step 5: Use markers to write "Goddess of Liberty" on your crown. Decorate it with pretty designs.

Capes are fun for pretending, but that usually means fastening it around your neck. Now you can make a cape that's safe to wear. Keep reading to find out how.

For more fun activities and crafts, check out:

Advertisement
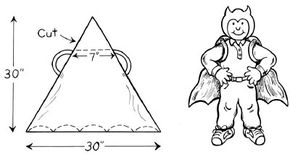
Safe Cape

A "Safe Cape" lets you have fun -- without tying the cape around your neck.

Dressing up in costumes isn't just for Halloween -- it's for any time you want to have fun. Whether you're a superhero or a wizard, a fairy princess or a sorceress, this safe cape will work with your costume.

Making a safe cape is easy, as long as you have help from an adult. Some basic sewing is necessary, but this cape isn't complicated -- just follow the instructions and check out the illustration.

Advertisement

What You'll Need:

1 yard of fabric

Yardstick

Scissors

14 inches of elastic

Sewing machine

Fabric paints (optional)

How to Make a Safe Cape

Step 1: Cut a triangle of fabric about 30 inches long and 30 inches wide at the bottom. Cut off the tip so that the new edge is 7 inches long. Cut points along the bottom edge to make a bat cape. Cut the elastic in half.

Step 2: Sew one end of an elastic piece to the top of one corner of the cape. Measure 6 inches down the side and sew the other end of the elastic to the cape. Repeat with the second piece of elastic.

Step 3: If you want, decorate the cape with fabric paint. Let the paint dry. Put your arms through the elastic to wear the cape.

Kids love to play in old boxes, but how about wearing one? A box costume is limited only by your imagination. Keep reading to learn more.

For more fun activities and crafts, check out:

Advertisement
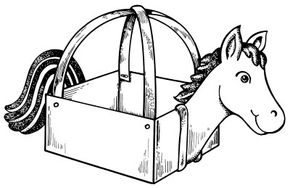
Box Costume

You can make a great-looking horse costume out of a box.

Almost all kids have crawled into an empty box and pretended it was a fort or a race car. But those boxes can be used to make costumes, too. With a little ribbon, a stapler, and your imagination, your race car will actually move -- because you'll be wearing it.

It's easy to turn an oversized box into a great costume for Halloween or playtime. The instructions that follow suggest making a horse, but you can create any animal or vehicle that you'd like. This is a fun project that adults and kids can do together.

Advertisement

What You'll Need:

Large cardboard box

Scissors

Markers

Newspaper

Poster paints

Masking tape

Wide cloth ribbon

Stapler

How to Make a Box Costume

Step 1: With an adult's help, cut the bottom and top off of a cardboard box. Use the top and bottom pieces to make a horse's head and tail. Draw the shape of a horse's head and tail on the cardboard pieces. Decorate the shapes with markers, and cut them out.

Step 2: Cover your work surface with newspaper. Paint the horse body with poster paints. After the paint has dried, tape the head and tail to the box body.

Step 3: Make suspenders to hold the horse costume around your body. With an adult's help, staple a long piece of wide ribbon to one inside corner of the box. Staple the other end of the ribbon to the opposite inside corner. Staple a second piece of ribbon to the inside of the remaining corners so that the ribbon suspenders cross over one another.

Pretending to be a king or queen is a popular choice for playtime or Halloween. Keep reading to find out how to make a special crown.

For more fun activities and crafts, check out:

Advertisement
Fit for a King or Queen

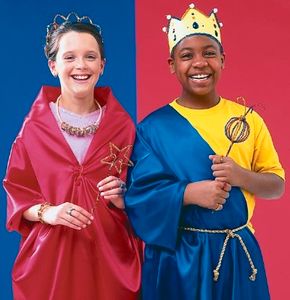
Your crown will be fit for king or queen after you decorate it in your own special way.

Here's a craft project that's fit for a king or queen! You can wield all the power in your castle when you wear a special crown you've made yourself. Whether you want a Halloween accessory or a playtime prop, your crown will give you just the right look.

You can complete your costume by making other accessories fit for a king or queen, such as royal jewels (the press-on kind are fun), or a scepter or tiara made from sparkly chenille stems.

Advertisement

What You'll Need

Construction paper, tagboard, or craft foam

Decorations (chenille stems, fancy poms, and faux gems)

Glue

How to Make the Fit for a King or Queen Craft

Step 1: Cut a crown shape out of construction paper, tagboard, or craft foam. (Make sure it's wide enough to fit around your head. If you don't have a big enough piece, try gluing or taping 2 pieces together.)

Step 2: Decorate the crown with chenille stems, fancy poms, and faux gems. For extra sparkle, use metallic stems and poms. Use plenty of glue, and make sure you let it dry completely.

Let the superhero in you fly high with a special superhero cape. Learn how to create it on the next page.

For more fun activities and crafts, check out:

Advertisement
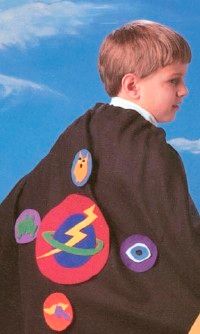
Superhero Cape

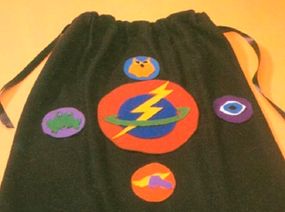
Attach "power symbols" to your superhero cape.

Kids will feel like a superhero in this superhero cape. It's a easy cape to create, using either a simple sewing stitch or a line of glue -- and it's a great adult-and-kid project.

The special touch for this basic black cape is the addition of "power symbols" -- colored felt pieces that you create to show your superhero power: an eye for X-ray vision, a frog for leaping ability, an owl for wisdom.

Advertisement

What You'll Need

3/4-yard black, non-ravel fabric

1-inch-wide ribbon

Paper

Colored felt

Scissors

Glue

Safety pins or Velcro

How to Make a Superhero Cape

Step 1: Cut a 3/4-yard rectangle of 45-inch-wide (or larger) black, non-ravel fabric.

Step 2: Fold over 1-1/2 inches along one edge to the inside and sew (or glue, using a thin line) close to the cut edge to form a casing.

Step 3: Thread a long piece of 1-inch-wide ribbon through the casing, leaving enough ribbon at both edges to tie a bow.

Step 4: Tack or glue the ribbon in place at the casing edges.

Step 5: Make patches by drawing a series of 3-inch circles on paper.

Step 6: Draw a "power" symbol inside each -- an owl for wisdom, a muscular arm for strength, a shoe with wings for running, a ghost for invisibility, a cat for multiple lives, an eye for X-ray vision, an ear for supersonic hearing.

Step 7: Cut the symbols and 3-inch circles from different felt colors. Glue a power symbol on each circle.

Step 8: Secure the patches to the cape -- use Velcro fasteners or safety pins.

Power symbol patches are the finishing touch to your superhero cape.

You may not live under the sea, but the little mermaid you know will love a mermaid crown. Find out how to make it on the next page.

For more fun activities and crafts, check out:

Advertisement
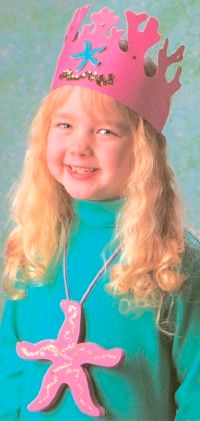
Mermaid Crown

A coral-shaped crown is perfect for a little mermaid.

A mermaid crown is just what you need to be the queen of all mermaids. Decorated with cut-outs and sparkly sequins, your crown will truly befit the little mermaid you know.

Creating the crown is best for adults and kids to do together -- cutting the coral-shaped tips of the crown can be a little tricky for small hands. You also can add to the mermaid look by cutting a starfish shape from craft foam and attaching it to a length of yarn for a necklace.

Advertisement

What You'll Need

Colored poster board

Pencil

Scissors

Glue

Stapler and staples

Sequins

How to Make the Mermaid Crown

Step 1: Measure the poster board around your head, leaving enough extra so that you can staple overlapping ends.

Step 2: Cut out a crown from the poster board so that the points of the crown look like coral (see photo).

Step 3: Staple the ends of the crown together. (You might want to check your head measurement once more.)

Step 4: Draw a starfish shape on the poster board. Cut it out.

Step 5: Glue the starfish to the center of the crown; then glue on sequins.

Crowns are fun to make and wear. Another craft idea for making a crown -- this one with a coat of arms -- can be found on the next page.

For more fun activities and crafts, check out:

Advertisement
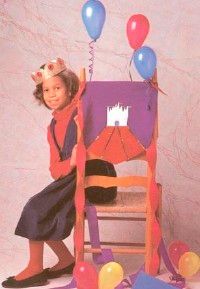
Coat-of-Arms Crown

Attach your coat of arms to your crown or use it to create a throne.

A coat-of-arms crown is just right for the special "king" or "queen" in your family. A coat of arms is a family badge or crest. The symbols on the badge show the interests or strengths of the family. You would have seen a coat of arms in a castle in medieval times, but people often use a coat of arms today to display their family heritage.

Your coat of arms can be added to your king's or queen's crown, but it also looks great when attached to a cape or to a piece of fabric that's draped over a chair for your throne.

Advertisement

What You'll Need

Poster board

"Jewels" (stick-on earrings, pieces of metallic papers, glitter, sequins, beads, or craft jewels)

Felt

Decorations (strung sequins, glitter, ribbons, or braid)

Paper

Scissors

Glue

How to Make the Coat-of-Arms Crown

Step 1: Cut out a crown from poster board.

Step 2: Add "jewels" (stick-on earrings, pieces of metallic papers, glitter, sequins, beads, or craft jewels).

Step 3: Personalize the crown by adding your name in glitter.

Step 4: Draw a coat of arms pattern on the paper.

Step 5: Pin the pattern to the felt. Cut around the pattern.

Step 6: Discard the paper pattern and then decorate the felt with strung sequins, glitter, ribbons, or braid.

Step 7: Glue the coat of arms to your crown, pin it to a cape, or hang it over a chair.

Are there space aliens among us? Keep reading to find out how to become a creature from outer space.

For more fun activities and crafts, check out:

Advertisement
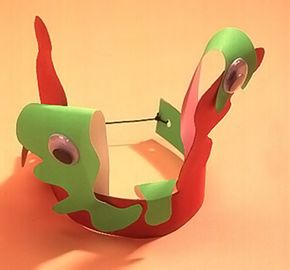
Creature from Outer Space

Creature from Outer Space? This headband is perfect for a space alien.
ugkj

Use your imagination to create a headband that makes you a creature from outer space. What kind of space alien would you like to be? Funny? Monsterlike? It's all up to you.

This is a fun adult-and-kid craft. Grown-ups can do the cutting and assembling of the craft; kids will enjoy decorating and deciding how wild or scary or humorous to make the pattern.

Advertisement

What You'll Need:

  • Poster board in different colors
  • Pencils or markers
  • Double-stick tape
  • Scissors
  • Goggle eyes
  • Round-cord elastic

How to Make the Creature from Outer Space Headband:

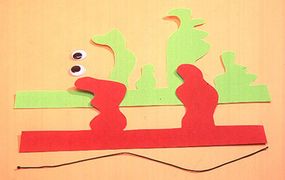
Step 1: Make a pattern, starting with a 1-1/2 × 14-inch rectangular band.

Step 2: Add two squiggly lined projectiles, approximately 7 inches tall, along one long edge, positioning each slightly off-center. If desired, draw two smaller projectiles in part of the remaining space.

Step 3: Draw another, same-sized band and add two projectiles, slightly off-center to the projectiles on the first band; cut both patterns out.

Cut out two patterns from different colored poster board.
gjgk,

Step 4: Trace patterns onto two different colors of poster board; cut them out (see photo).

Step 5: Add goggle eyes where desired to complete your look.

Step 6: Punch holes near the ends of the band and tie closed to fit around your head with a piece of round-cord elastic.

Have you ever seen a hula dancer? You can make your own "grass skirt" to hula dance. Keep reading to find out how.

For more fun activities and crafts, check out:

Advertisement
Hawaiian Hula Skirt

It's easy and fun to make a Hawaiian hula skirt.

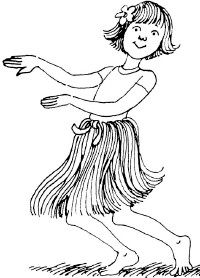
You can learn to dance the hula, but it just doesn't look right unless you're wearing a Hawaiian hula skirt. Traditionally, the hula skirt was made from long grasses, but you can make one much easier out of raffia (and it'll be less itchy too!).

Raffia is a soft, natural fiber that's used in many craft projects. You'll find it in craft stores in a variety of colors, so you can decide whether you want to make a hula skirt that looks like real grass or something more colorful. Once you make this simple skirt, all that's left is to start dancing.

Advertisement

What You'll Need

Rope

Scissors

Green raffia

How to Make a Hawaiian Hula Skirt

Step 1: Measure the rope around your waist and add a few extra inches. Cut the rope this size.

Step 2: Take a piece of green raffia, and hang it from the rope so the ends are even. Tie a knot to hold the raffia in place.

Step 3: Keep adding and tying pieces of raffia onto the rope until it looks like a grass skirt.

Step 4: When the rope is covered (except for the extra inches), tie it around your waist.

Now it's time for hula dancing!

The hula is a dance with hand movements that tell a story. You may not have classes in your area to learn how to dance the hula, but you can make up your own stories. Act them out with your hands, and move your body in a rhythmic pattern. Teach a few of your friends your new-style hula, and put on a show for the neighborhood or your families!

When you're ready for something a bit out of this world, why not make a space helmet? Keep reading to find out how.

For more fun activities and crafts, check out:

Advertisement
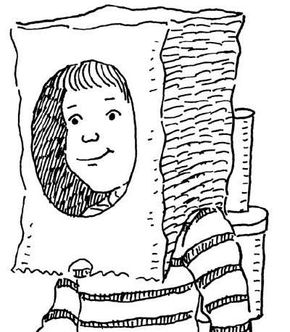
Space Helmet

You'll soon be ready to blast off in your space helmet.

Practice walking in outer space -- in your own backyard -- with this cool space helmet. It even has its own make-believe oxygen tanks, so you'll look almost like a real astronaut as you explore an "alien planet" in your backyard.

This is a great adult-and-kid project. Some of the construction of the helmet is a little tricky for small hands, so adults can handle the hard part, and kids can have fun decorating.

What You'll Need

Paper grocery bag

Crayons or markers

Scissors

2 oatmeal boxes

2 paper towel tubes

Tape or stapler and staples

How to Make a Space Helmet

Step 1: Put a paper grocery bag over your head. Using a marker, have your adult helper trace a circle on the bag where your face is. Take the bag off your head, and cut out the circle. You may also want to cut the bag around your shoulders so it is more comfortable to wear.

Step 2: In the middle of each oatmeal box lid, trace the end of a paper towel tube. Cut around the traced shape to make a hole (have an adult help you, if necessary).

Step 3: Staple or tape the oatmeal boxes side by side to the back of your helmet, lid side up.

Step 4: Stick an end of each paper towel tube through the top of each oatmeal box. Tape the top of each tube to the helmet so the tubes look like oxygen tank hoses.

Step 5: Decorate your helmet so it looks like one on a real space suit -- or you can make your helmet look like one on an alien space suit. Then, put on your space helmet, and blast off!

Back on earth, we live in a multi-cultural world. Each culture has a different native costume. Keep reading to find out how to create some of those costumes.

For more fun activities and crafts, check out:

Native Clothing

Every culture has its own native clothing.

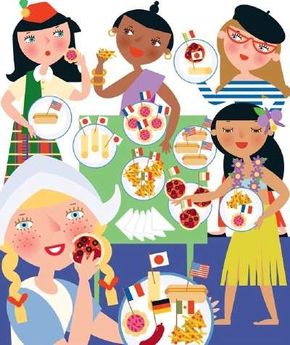
We live in a colorful, multicultural world, and every culture has different native clothing. Whether it's a grass skirt from Polynesia, a sari from India, or a kimono from Japan, native clothing is part of our cultural heritage.

You can create costumes that reflect the clothing of other countries with items you probably have around your house. Why not gather your friends together and have each one dress in the native clothing of a different country? It's a great way to celebrate our multicultural connections.

How to Make a Native Clothing Costume

Make a grass skirt from Polynesia from a few brown paper grocery bags. Cut the bags to fringe the edges, wrap the bags around your waist (you may need to tape two or more bags together), and tape them in place.

Women in India and Sri Lanka wear beautiful saris. Take a long piece of colorful, flowing material and wrap one end around your waist. Place the other end over your shoulder.

You might decide to represent the country of your choice by wearing its national colors. While not specifically native clothing, you can find modern dress -- such as T-shirts or sneakers -- in the colors of a particular country. Dress in red, white, and green for Italy. Or red, white, and blue for America and for England!

What happens once the sun goes down and stars come out? It's time for the night sprites to play. Keep reading to find out how to make a night sprite mask.

For more fun activities and crafts, check out:

Night Sprite

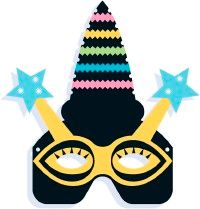
Make a night sprite mask with craft foam -- and your imagination.

Become a night sprite by creating this special disguise. After dark, night sprites are just beginning to have fun. They love starry nights, fireflies, and the sound of crickets.

No one knows what they look like, of course. These mysterious creatures stay well hidden in the dark. But you can imagine -- and become a mysterious night sprite yourself.

What You'll Need

Body glitter and face paint

Craft foam, in several different colors

Gauzy fabric, streamers, or wide ribbon

How to Make the Night Sprite Craft

Step 1. Cover yourself with body glitter and glow-in-the-dark face paint.

Step 2. Make wings by draping gauzy fabric, streamers, or wide ribbon over your arms.

Step 3: Use layers of craft foam to make a mask. The bottom layer should be black; the next layer should be yellow.

Step 4: Decorate the rest of the mask by using your own imagination. Add stripes, dots -- anything creative and original.

For more fun activities and crafts, check out:

ABOUT THE CRAFT DESIGNERS

Goddess of Liberty Crown by Lisa Lerner and Kersten Hamilton

Superhero Cape by Michaeline Bresnahan and Joan Macfarlane

Mermaid Crown by Michaeline Bresnahan and Joan Macfarlane

Coat-of-Arms Crown by Michaeline Bresnahan and Joan Macfarlane

Creature from Outer Space by Michaeline Bresnahan and Joan Macfarlane

Native Clothing by Laurie Freehafer

Night Sprite by Laurie Freehafer

Advertisement

Loading...