How to Make Paper Dolls

Tube Friends are some of the paper dolls you will learn to make on the following pages.

Once you learn how to make paper dolls for kids, you won't need to go to the store whenever you want a new toy. Learn how to make fun, colorful dolls with supplies you can find in your very own home.

Paper dolls for kids come in all shapes and sizes -- some even stand up on their own! Once you get the hang of it, you can design your own dolls and impress your friends with your new creations.

Advertisement

On the following pages, you will find easy-to-understand instructions for making paper dolls.

Family Paper Dolls

Surprise your family by making paper dolls that look just like them. Get directions on how to create quirky paper dolls that resemble family members.

Japanese Paper Doll

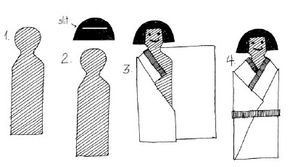
In Japan, the holiday Hina Matsuri is devoted to paper dolls. Find out how to make a traditional Japanese Paper Doll.

Paper Doll Chain

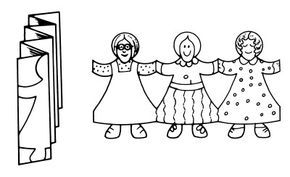
Decorate your room with a colorful Paper Doll Chain. Read about how to construct and decorate paper dolls chains of any length.

Tube Friends

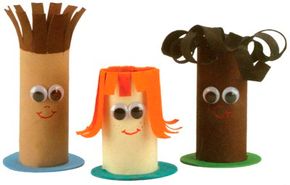
These funky paper dolls are not only fun for playing around, but also function as storage for jewelry or writing utensils. Learn how to make Tube Friends.

Little Worry Dolls

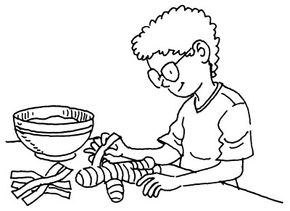
Forget your troubles when you make learn how to make Little Worry Dolls. These clever dolls worry about your problems for you!

Ready to get started on our first project, Family Paper Dolls? Learn how to make paper dolls that look like the members of your family on the next page.

Want to learn more paper crafts that are great for kids? See:

Advertisement

Family Paper Dolls

Once you learn how to make Family Paper Dolls, you can surprise the whole family with a set of paper dolls that look just like them.

How to Make Family Paper Dolls

What You'll Need:

  • Construction Paper
  • Pencil
  • Scissors
  • Family Photographs
  • Glue
  • Markers
  • Old Wrapping Paper

1. Draw the head and body shape of each member of your family on construction paper that matches their skin tone. The dolls will probably be different sizes, just like the members of your family. Cut out the dolls.

Advertisement

2. Find photographs of family members' heads that will be the right size for the cutout bodies (make sure it is all right to cut these photos). Carefully cut out the heads, and glue them onto the dolls. Use markers to draw underclothes on the dolls.

3. Trace around each doll on the wrapping paper to make clothing and shoes. Before you cut out the clothes and shoes, add small tabs that can be folded over the doll's body to attach them. You can make lots of different outfits for your family.

4. Does each family member have a favorite outfit? Draw and color it on white construction paper. Then dress up your doll family, and invite your real family to meet themselves!

In Japan, there is a national holiday dedicated to paper dolls. Find out how to make a Japanese Paper Doll on the next page.

Want to learn more paper crafts that are great for kids? See:

Advertisement

Japanese Paper Doll

Fit the construction paper clothing onto the poster board shape.

Learn how to make a Japanese Paper Doll for Hina Matsuri (March 3), a Japanese holiday. In Japan, this day is devoted to Japanese paper dolls that wear traditional kimonos.

How to Make a Japanese Paper Doll

What You'll Need:

  • Poster board
  • Ruler
  • Scissors
  • Construction Paper
  • Markers or Colored Pencils
  • Tape

1. From poster board, cut out a rectangle that measures 7-1/2 inches tall. At a short end of the rectangle, cut out a round head shape. Trim below the head to make sloping shoulders. (This should look like a large, round-headed clothespin.)

Advertisement

2. For the kimono, cut out a 6-inch square from colored construction paper. For the sash, cut out a 6-3/8 inch rectangle from black paper. Cut out a wig from the black paper. In the center of the wig, cut a horizontal slit that is wide enough to fit over the doll's head. Fit the wig onto the doll's head.

3. With markers or pencils, draw a face on the doll. Fold down the top 3/8 inch of the kimono to make a collar. Color the collar with a marker or pencil. Lay the kimono flat so the folded collar is face down.

4. Center the body on top of the kimono. Fold a top corner of the kimono down over the doll's shoulder. Working on the same side of the kimono, fold the paper vertically to cover the doll's body. Use the same method to fold the opposite side of the kimono. Wrap the sash around the doll from front to back, and tape the ends together in the back.

Make dolls for your friends or to decorate your table for a special March 3 tea party! You don't have to be in Japan to celebrate dolls!

A Paper Doll Chain is a great way to decorate for a party, or just for fun. Find out how to make one on the next page.

Want to learn more paper crafts that are great for kids? See:

Advertisement

Paper Doll Chain

Start your Paper Doll Chain by folding paper like a fan.

When you make a Paper Doll Chain, you will notice that all the dolls have the same shape. Even though these paper dolls are identical, you can color each one to look different.

How to Make a Paper Doll Chain

What You'll Need:

  • Drawing Paper
  • Blunt Scissors
  • Pencil
  • Markers
  • Trims such as Ribbon, Yarn, or Fabric Scraps
  • Craft Glue

1. Fanfold a piece of drawing paper evenly.

Advertisement

2. Draw your design for the paper dolls. Make sure the design touches both sides of the paper so the dolls "hold hands." Draw only one half of the doll since the other half will be across the top fold.

3. Cut out the doll pattern. Then decorate each doll with markers, or glue on trims such as ribbon, yarn, or fabric scraps.

You can also make holiday decorations with paper chains of hearts, shamrocks, bunnies, or stars -- just remember to leave a part touching each edge.

Tube Friends are unique paper dolls that you can hide small things inside. Read about how you can make Tube Friends on the next page.

Want to learn more paper crafts that are great for kids? See:

Advertisement

Tube Friends

Decorate Tube Friends to look like people you know.

Learn how to make Tube Friends -- unique, free-standing paper dolls. Make a whole crowd of tube friends to hold your stuff or just for fun.

How to Make Tube Friends

What You'll Need:

  • Toilet Paper Tube
  • Acrylic Paint
  • Wiggle Eyes
  • Cardboard
  • Ruler
  • Pencil
  • Scissors
  • Paintbrush
  • Craft Glue
  • Markers

1. Measure and mark a line 3 or 4 inches from the top of the tube. Cut slits down the tube 1/2 inch apart from the top to this mark. Bend these strips to create hair; trim for style. Wrap the ends of each strip around a pencil to curl it.

Advertisement

2. Paint the tube and the hair the color of your choice. Let dry. Recurl the strips if necessary. Glue on wiggles eyes, and add facial features with markers.

3. Cut a 3-inch circle out of cardboard, paint it, and glue the tube to the top of it when dry.

Tube friends can hold your pencils, but Little Worry Dolls can hold all of your cares. Find out how to make Little Worry Dolls on the next page.

Want to learn more paper crafts that are great for kids? See:

Advertisement

Little Worry Dolls

You will cover the doll with newspaper strips dipped in paste.

After you learn to make Little Worry Dolls, you can send your worries away with miniature dolls who will do all your worrying for you!

Follow this Central American tradition, and keep a set of worry dolls under your pillow. Each night before going to sleep, whisper a worry to each doll. After your troubles have been told, as the tradition goes, you can forget about them. The dolls will do all the worrying that's needed!

Advertisement

How to Make Little Worry Dolls

What You'll Need:

  • Aluminum Foil
  • Masking Tape
  • Newspaper
  • Flour
  • Water
  • Large Mixing Bowl
  • Measuring Cup
  • Plastic Wrap
  • Gesso (available at an art or craft store)
  • Paintbrush
  • Paints

1. To make the dolls, mold the basic body shape for each doll out of aluminum foil. You can mold the body in 1 piece or create separate body parts and then attach them using masking tape. When the doll's shape is finished, cover the whole surface of the doll with masking tape. Now the dolls are ready for papier-mâché.

2. Cover your work surface with newspaper. Tear other sheets of newspaper into small, thin strips, and set aside. Make a thick paste out of flour and water in the mixing bowl; mix 1 cup of flour for every cup of water. Dip the newspaper strips into the paste, and run the strips through your fingers to get rid of excess paste.

3. Lay the strips over the dolls. Cover each doll completely by overlapping the newspaper strips. Set the dolls on newspaper, and let them dry for a day. Then cover them with a second coat of newspaper strips, and set them to dry again. (Keep the paste covered with plastic between uses.)

4. When the dolls are fully dry, paint them with gesso. Let them dry again for about 15 minutes. Now paint the dolls in the colors of your choice. Let them dry completely.

Now it's time to tell them all your troubles!

Want to learn more paper crafts that are great for kids? See:

ABOUT THE CRAFT DESIGNERS

Family Paper Dolls by Lisa Lerner and Kersten Hamilton

Advertisement

Advertisement

Loading...