Craft Stick Projects

Dress up your door with this Christmas wreath made from craft sticks.

For many people, working with their hands to build original projects can be quite a thrilling experience. It's fun for children of all ages to make projects as well, and the craft stick projects for kids you will find in this article are guaranteed to keep everyone busy and engaged.

All of the craft stick projects in this article are explained in detail, and there are many pictures available to help you through the process. Please note that adult supervision is required for many of these craft stick projects.

Advertisement

Girls Rule Hanger Project

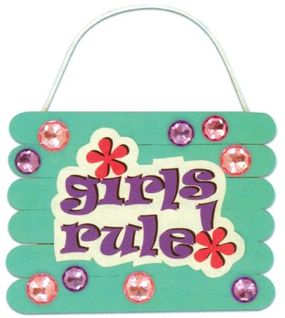
Let everyone know you mean business with this girls rule hanger project.

Christmas Wreath Project

Colorful Basket Project

Turn the ordinary into something extraordinary with this colorful basket project. You'll be glad you did.

Gemstone Jewelry Box Project

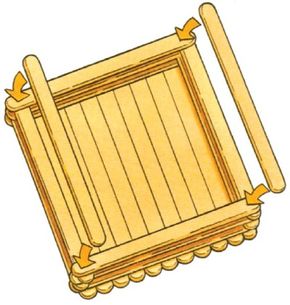
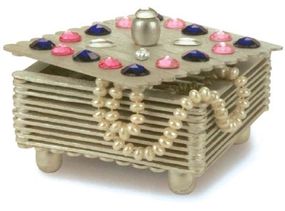
Make a keepsake that's a jewel itself. Learn more about the gemstone jewelry box project.

Bull's-eye Project

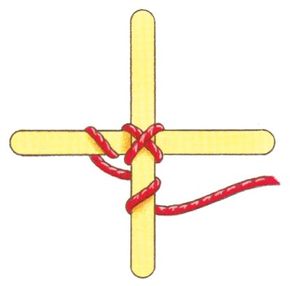
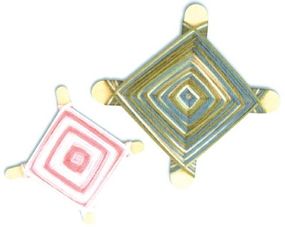
This project is fun and easy to do! Learn how to make a bull's-eye project.

Mini Basket Project

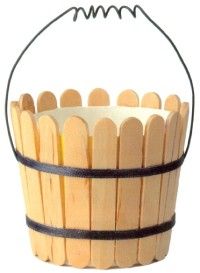
Good things come in small packages. Try this mini basket project on for size.

Mini Message Board Project

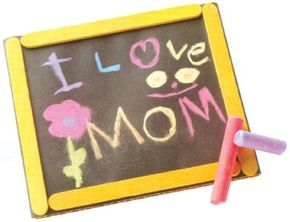
Need a place to jot down a quick note? Make this mini message board!

Napkin Holder Project

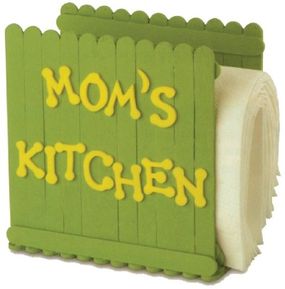
Searching for an essential kitchen accessory? Try this napkin holder project.

Picket Fence Project

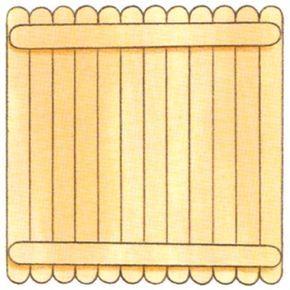
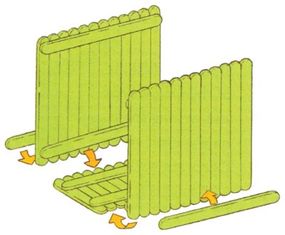
This picket fence project is a wonderful addition to any living room.

Rhyming Game Project

Do you like to play rhyming games? If you do, try this rhyming game project with craft sticks.

Snowflake Ornaments Project

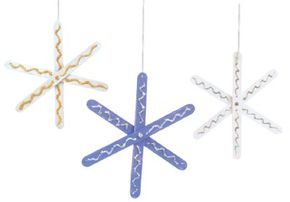
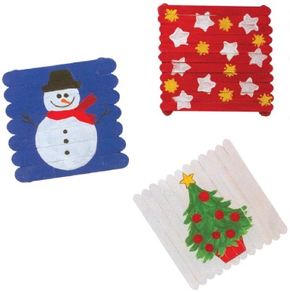
Try this snowflake ornaments project and add something extra to the Christmas tree this holiday season.

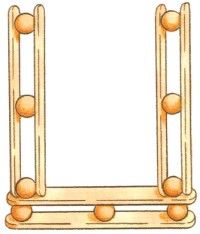
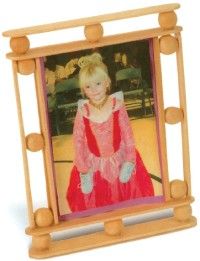
Sticks and Beads Frame Project

Treasure special photographs with the sticks and beads frame project.

Wintertime Trivets Project

Try this wintertime trivets project and make useful accessories for the holiday season. These trivets are the perfect accompaniment to a Christmas kitchen.

Pick the craft you like best from the links above, or just head to the next page and learn how to make your very own girls rule hanger.

For more fun crafts, try:

Advertisement

Girls Rule Hanger Project

Don't forget the diagonal stick across the back.

The girls rule hanger project lets you write any message you like, and hang it from your door or on your wall. Either way, the world will know that you mean business.

What You'll Need:

  • 7 jumbo craft sticks
  • 2 mini craft sticks
  • Satin cord, 10 inches
  • Acrylic paint
  • Paper, markers, magazines (optional)
  • Faux gems
  • Craft glue
  • Paintbrush
  • Scissors

How to Make a Girls Rule Hanger

Step 1: Place six jumbo craft sticks side-by-side on your work surface. Glue another jumbo stick diagonally across all of them to hold them together, and glue a mini craft stick vertically on each side of the diagonal stick for added support. This will be the back.

Advertisement

Step 2: Glue one end of the satin cord to each side of the top stick; This will be the plaque hanger.

Step 3: Turn the plaque over, and paint the fronts of the sticks. Let dry.

This project is fun for girls of all ages.

Step 4: Write a message or draw a picture on paper, cut a picture out of a magazine, or design something on your computer and print it out. Trim to fit the plaque, and glue in place. Glue gems around the message.

Continue reading to the next page to learn how to make a Christmas wreath with craft sticks.

For more fun crafts, try:

Advertisement

Christmas Wreath Project

Arrange the jumbo sticks in a pentagon shape.

Holly berries and a pretty ribbon turn this Christmas wreath project into a holiday masterpiece.

What You'll Need:

  • 15 jumbo craft sticks
  • Green acrylic paint
  • 4 feet Christmas ribbon
  • Red craft foam
  • Gold metallic chenille stem
  • Craft glue
  • Paintbrush
  • Tape measure
  • Scissors
  • Paper punch

How to Make a Christmas Wreath

Step 1: Arrange and glue five jumbo craft sticks in a pentagon (a five-sided shape.) Repeat two more times for a total of three pentagons. Let the glue dry, and paint the front of each pentagon green. Let dry.

Advertisement

Step 2: Glue the pentagons one on top of the other, each turned slightly so all corners are visible. Let dry.

Lay the craft stick pentagons on top of each other.

Step 3: Cut 3 feet of ribbon, and wrap it loosely around the wreath. Secure in place with a drop of glue at the beginning and the end. Tie the remaining ribbon into a bow, and glue it to the top of the wreath.

Step 4: Punch 18 circles out of red craft foam, and glue them to the wreath in groups of 3.

A finished Christmas wreath.

Step 5: Cut the chenille stem in half; discard one piece. Bend the remaining piece in half, and glue the ends to the top of the wreath, behind the bow, to form a hanger.

Find out how to make a colorful basket with craft sticks on the next page -- you'll be glad you did!

For more fun crafts, try:

Advertisement

Colorful Basket Project

Don't forget to glue the handle.

Try this colorful basket project using craft sticks and craft foam and turn a brown box into something special. This colorful basket is a great place to store the treasures you collect.

What You'll Need:

  • Colored craft sticks, at least 20
  • Small box, 4-1/2 inches or shorter
  • Craft foam, 1 or 2 sheets
  • Scissors
  • Ruler
  • Pencil
  • Low-temperature glue gun and glue sticks

How to Make a Colorful Basket

Step 1: Cut the top flaps from the box; discard. Measure the height of the box, and divide that number by 4. (Ask a grown-up for help with the math if you need to.) Measure and mark the craft foam into 4 strips that are each as wide as the number you just figured and long enough to wrap around all sides of the box. If the piece isn't long enough, cut 4 more strips from a second piece of craft foam and glue them onto the ends of the first.

Advertisement

Step 2: Cut another, wider strip for the handle (about 14 inches long and 1-1/2 inches wide.) With a grownup's help, glue one end of the handle to one side of the box, loop it across to the opposite side, and glue the other end in place there. Hold it in place until the glue sets.

Step 3: Line up the 4 craft foam strips alongside each other on your work surface. Weave a craft stick through the strips, close to one end, and glue the stick in place. Weave the rest of the sticks in, each about an inch from the last. Keep weaving in sticks and gluing in place until about 1 inch from the end.

Step 4: When the woven strip is long enough to fit around the box, glue it in place, starting near one corner and working your way around. Tip: Leave the very beginning of the piece unglued so you'll be able to tuck the ends of the weaving under the beginning to finish it off neatly.

Continue reading to the next page to learn how to make a gemstone jewelry box.For more fun crafts, try:

Advertisement

Gemstone Jewelry Box Project

Glue the sticks in place where they overlap.

Try this gemstone jewerly box project and keep your jewelry in a dazzling box decorated with gems that match the colors of your room.

What You'll Need:

  • 63 craft sticks
  • 5 wooden barrel beads
  • Silver acrylic paint
  • Assorted faux gems
  • Craft glue
  • Paintbrush

How to Make a Gemstone Jewelry Box

Step 1: Line up 12 craft sticks side by side on your work surface. Glue a craft stick across the top and another across the bottom to hold the sticks in place. (This piece will become the box lid.) Set it aside for now.

Advertisement

Step 2: Repeat step 1, using 11 sticks instead of 12, to make the box base.

Step 3: With the cross-sticks facing up, place another set of craft sticks on the opposite 2 edges of the base, perpendicular to the first set of cross-sticks. Glue in place where the sticks overlap each other. Build up the sides in this manner, alternating the top and bottom edges with the left and right, until there are a total of 10 sticks on each side. Let dry.

Step 4: Glue a barrel bead to the bottom of each corner of the base, and glue the last barrel bead to the middle of the lid (on the top side -- not the side with the cross-sticks). Let dry.

Step 5: Paint all surfaces of the box and lid silver. Let dry. Glue gems to the lid to decorate.

A finished gemstone jewelry box.

Learn how to make a bull's-eye project on the next page.

For more fun crafts, try:

Advertisement

Bull's-eye Project

Pull the yarn over each leg of the two sticks.

Use big sticks, little sticks, any sticks at all to make this Bull's-eye project in a variety of sizes.

What You'll Need:

  • 2 craft sticks, any size
  • Multicolor yarn
  • Craft glue
  • Scissors

How to Make a Bull's-eye Project

Step 1: Glue two craft sticks together to form a cross. Glue the end of the yarn to the middle of the cross, where the sticks cross.

Advertisement

Step 2: Begin by wrapping the yarn over and around one leg of one craft stick, then over and around the next leg. Pull the yarn tight each time, and push it toward the center so it's neat.

Step 3: Keep wrapping the yarn until the craft sticks are covered. Trim the end of the yarn, and secure the end to the Bull's-eye with a drop of glue.

A finished bull's-eye project.

Continue reading to the next page to learn how to make a mini basket with a paper cup and craft sticks.

For more fun crafts, try:

Advertisement

Mini Bucket Project

A finished mini bucket.

Try this mini bucket project -- an adorable little container just the perfect size to hold a party favor or a small flower such as a pansy or violet.

What You'll Need:

  • 18 mini craft sticks
  • 9-ounce paper cup
  • 10 inches black craft wire, 20 gauge
  • 18 inches black ribbon, 1/8 inch wide
  • Scissors
  • Craft glue
  • Bamboo skewer or thin wood dowel

How to Make a Mini Bucket

Step 1: Cut the top off the paper cup so only 2-1/4 inches remain.

Advertisement

Step 2: Glue mini craft sticks vertically all the way around the cup. Let dry.

Step 3: Wrap and tightly coil the middle of the wire around a skewer or thin dowel to create a coiled handle. Remove the skewer.

Step 4: Use the skewer to poke holes in each side of the cup, between the sticks. Insert about 1 inch of the wire handle into each side, and bend the wire up to secure the handle.

Step 5: Cut the black ribbon into two lengths, glue one around the top and one around the bottom of the bucket.

Continue reading to the next page and learn how to make a mini message board.

For more fun crafts, try:

Advertisement

Mini Message Board Project

A mini message board.

Try this mini message board project and you'll be writing mini messages in no time.

What You'll Need:

  • 4 mini colored craft sticks
  • 1 piece corrugated cardboard
  • Black sandpaper, 320 grit
  • Adhesive-back magnet sheet
  • Ruler
  • Pencil
  • Craft knife
  • Scissors
  • Craft glue

How to Make a Mini Message Board

Step 1: Ask a grown-up to help you cut a piece of cardboard 5-1/4 x 4-1/2 inches. Trace this rectangle onto the back of a piece of sandpaper; cut out using scissors. Glue the sandpaper onto the cardboard; let dry.

Advertisement

Step 2: Glue craft sticks around the edges of the sandpaper; let dry.

Step 3: Cut a magnet sheet just smaller than the message board, and adhere to the back.

Wash clean with a damp paper towel when you're done.

Looking for an essential kitchen accessory? Learn how to make a paper napkin holder on the next page.

For more fun crafts, try:

Advertisement

Napkin Holder Project

Glue a craft stick across the top and bottom edge.

There's no better way to show Mom, Dad, Grandma or Grandpa you love them than with a homemade gift made straight from the heart. This napkin holder project will earn a place of honor in the kitchen.

What You'll Need:

  • 34 regular craft sticks
  • 12 mini craft sticks
  • Acrylic paint
  • Adhesive craft foam letters
  • Craft glue
  • Paintbrush

How to Make a Napkin Holder

Step 1: To make the side panels, place 12 regular craft sticks alongside each other. Glue one regular craft stick across the top, 1/4 inch from the ends, and another regular craft stick across the bottom, 1/4 inch from the ends. Repeat for the second side panel. Let dry.

Advertisement

Step 2: To make the base, line 12 mini craft sticks side by side. Glue one regular craft stick across the top edge, 1/4 inch from the ends, and another across the bottom edge, 1/4 inch from the ends. Let dry.

Step 3: Paint all surfaces of the holder the color of your choice. Let dry.

Step 4: Glue the side panels perpendicular to the long edges of the base panel, with the cross sticks to the inside. Glue a regular craft stick to the outside of each side panel (at the bottom) to provide extra support. Place the glue bottle inside, and lean other objects on the outside on each side to hold up the side panels until the glue dries completely.

Glue the side panels to the base.

Step 5: Glue one more regular craft stick at the inside bottom of both sides for extra support.

Step 6: Apply craft foam alphabet stickers to spell out a special message.

A finished napkin holder.

Continue reading to the next page to find out how to make a picket fence project that can hold pictures and messages.

For more fun crafts, try:

Advertisement

Picket Fence Project

A finished picket fence.

Try this picket fence project, and clip in a reminder note or a memorable picture.

What You'll Need:

  • 10 mini jumbo craft sticks
  • 2 regular craft sticks
  • White acrylic paint
  • Green floral foam block
  • Decorative green moss
  • Small silk flower bunches with leaves
  • Craft glue
  • Paintbrush
  • Serrated knife
  • Ruler

How to Make a Picket Fence Project:

Step 1: Stack two mini jumbo sticks one on top of the other, and glue them together at one end only. Repeat this four more times, so you have five total sets. These are the fence posts.

Advertisement

Step 2: Paint both sides of these and the regular craft sticks white, letting the first side dry before painting the second. Let dry.

Step 3: While the paint is drying, ask a grown-up to use a serrated knife to carefully cut a 6 x 1-1/2-inch block from the green floral foam.

Step 4: Push the glued ends of the fence posts down about 1/2 inch into the foam block, 1/4 inch apart from each other and centered between the two long edges. Push every other fence post in about 1/4 inch deeper. Add a dollop of glue for added support where the posts meet the foam. Glue the two regular sticks horizontally across the front of the mini jumbo sticks.

Push the sticks down into the foam block.

Step 5: Glue decorative green moss to cover the foam block base. Arrange small flower bunches on each side of the fence, and glue in place into the foam.

Step 6: Slide a note or photo between the craft stick posts (remember, the top ends aren't glued together.)

Do you like to rhyme? Continue reading to the next page to learn about a project that combines rhyming with craft sticks.

For more fun crafts, try:

Advertisement

Rhyming Game Project

Red, green, yellow, blue -- a rhyming game for me and you! This rhyming game project is perfect for a group of friends.

What You'll Need:

  • Jumbo colored craft sticks
  • Stickers
  • Black fine-point marker

Have fun thinking of rhyming words and writing them on the craft sticks. Decorate each with stickers.

To play, scatter all sticks and mix them up, and take turns finding rhyming pairs.

Do you need a little something special for your Christmas tree this holiday season? Continue to the next page to learn more about a snowflake ornament project.

For more fun crafts, try:

Snowflake Ornaments Project

Decorate your snowflake ornaments however you like.

Bring a little bit of winter inside with this snowflake ornaments project. Imagine a tree full of these snowflakes -- and they won't even melt!

What You'll Need:

  • 3 craft sticks
  • Acrylic paint
  • 12 inches silver cord
  • Glitter glue
  • Paintbrush
  • Craft glue

How to make a Snowflake Ornament

Step 1: Paint both sides of the sticks, letting the first side dry before painting the

Step 2: Crisscross 2 of the sticks to form an X, and glue them together. Glue the other stick through the middle of the X; let dry.

Step 3: Fold the cord in half, and knot the ends together. Glue the knotted end to the tip of one of the sticks; let dry.

Step 4: Draw squiggly lines with glitter glue on each stick. Let dry, then repeat on the other side of the ornament.

Continue to the next page to learn how to make a frame with craft sticks and beads.

For more fun crafts, try:

Sticks-and-Beads Frame Project

Keep the beads evenly spaced.

Try this sticks-and-beads frame project and create a stylish frame for a special picture using craft sticks, wooden beads, and glue.

What You'll Need:

  • 4 regular craft sticks
  • 11 mini jumbo craft sticks
  • 2 mini craft sticks
  • 12 wooden beads, 1 inch each
  • 8 inches ribbon or string, 1/2 inch wide
  • Clear overhead transparency film or plastic
  • Craft glue
  • Scissors
  • Ruler

How to Make the Sticks-and-Beads Frame Project

Step 1: To make the sides of the frame, glue three beads evenly spaced across the top of a regular craft stick. Let dry, and glue another regular stick on top of the beads. Repeat with two more regular sticks and three more beads; let dry.

Step 2: To make the top and bottom of the frame, repeat Step 1, using mini jumbo craft sticks instead of regular craft sticks.

Step 3: Place one of the short pieces on its side on your work surface, and glue one of the long pieces at one end to form an L. Make sure the angles are square and the pieces are straight. Hold the pieces together until the glue sets. Repeat at the other end with the second long piece. Set aside to dry, making sure the piece doesn't get bumped or moved while it's drying.

Step 4: Glue the other short piece to the top of the long pieces; let dry.

Step 5: To make the back of the frame, lay five mini jumbo sticks side by side, and glue a mini craft stick 1/2 inch from the top and another 1/2 inch from the bottom; let dry.

Step 6: When all pieces are completely dry, run a line of glue along the back of the inner stick edges of the frame. Set the frame back (from step 5) to cover the inner opening; let dry.

This stick-and-beads frame is ready to hold your favorite photo.

Step 7: To make a stand for the frame, cut 1 1/4 inches off the end of two mini jumbo sticks. Run a bead of glue above the lower horizontal stick on the solid frame back, and place the cut ends of these sticks in the glue. Prop the frame against a heavy object to hold it in position until the stand pieces dry. Or, to make a hanger for the frame, simply double up a piece of ribbon or string and glue both ends to the back.

Step 8: Measure and trim a piece of clear transparency film or plastic to make a protective cover to fit exactly in the frame opening. Cut your favorite photo to fit, insert it into the frame, and place the clear cover on top.

Paint the craft sticks and beads any color you like for a colorful variation of this simple frame.

Continue reading to learn how to make wintertime trivets on the next page.

For more fun crafts, try:

Wintertime Trivets Project

Decorating your wintertime trivets is half the fun!

This "hot" wintertime trivets project makes a perfect gift for the special person who serves all your favorite meals. Create a trivet like any of the ones shown, or choose your own design.

What You'll Need:

  • 14 regular craft sticks or 9 mini jumbo craft sticks
  • Acrylic paint (assorted colors)
  • 4 wooden beads, 12mm
  • Small stamps or compressed sponge cut into stars
  • Clear gloss acrylic spray
  • Craft glue
  • Paintbrush

How to Make a Wintertime Trivet

Step 1: Line up 12 regular craft sticks or 7 mini jumbo craft sticks alongside each other.

Step 2: Using regular sticks with regular sticks, or mini jumbo with mini jumbo, glue a craft stick horizontally across the top and the bottom of the lined-up group.

Step 3: Paint the top of the trivet. Let dry, then paint the bottom the same color. Let dry. If necessary, apply a second coat.

Step 4: Paint four wooden beads the same color as the trivet. Glue one bead at each end of the horizontal craft sticks to create four feet. Let dry completely.

Step 5: Paint or stamp a design on top of the trivet.

Step 6: With adult help, spray acrylic sealer over the surface to protect the finished trivet.

For more fun crafts, try:

Advertisement

Loading...