Stamp and Stencil Crafts

Potato Printer Stamp
Make a run-of-the-mill tuber into this Potato Printer Stamp!
none

Stamp and stencil crafts are fun for kids of all ages, and they don't cost a fortune to make. Did you know you and your kids can make your own ink stamps and stencils from everyday things like art gum erasers or potatoes?

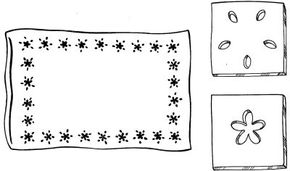
Once you've made your stamps and stencils, the art crafts you can create are practically endless. Design your own greeting cards and invitations, decorate gift bags and wrapping paper, or add a personal touch to place mats, pillowcases, and other fabrics around the house.

Advertisement

Your kids are sure to come up with some really neat designs -- from geometrics and florals to their very own initials. You might even choose to host a stamp and stencil party to get all your kids' friends in on the fun!

Follow the links below to learn how your kids can have a blast making personalized stamps, stencils, and art crafts:

Art Gum Printer Stamp

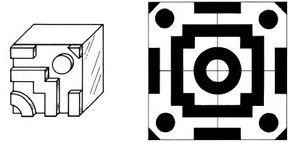
Carve out personalized rubber stamps using simple art supplies.

Potato Printer Stamp

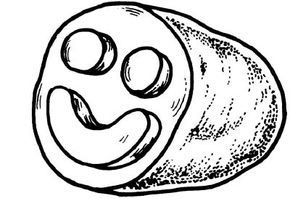
Amaze your kids by turning a pantry potato into a cool customized ink stamp.

Craft Foam Stamps

Create your own ink stamps to decorate cards, invitations, and more.

Custom Stencil Pillowcases

Design a special floral pillowcase to bid your child sweet dreams.

Keep reading to learn how your kids can make their own rubber stamps from simple art gum erasers.

For more fun art crafts and kids crafts, check out:

Advertisement

Art Gum Printer Stamp

Art Gum Printer Stamp
Make cool geometric designs with the Art Gum Printer Stamp.
none

Show kids how to make their own rubber stamp from a simple art gum eraser. They can use the art gum printer stamp to create different geometric patterns on everything from stationery to gift boxes.

What You'll Need:

  • Pencil
  • Art gum eraser
  • Craft knife
  • Stamp pad
  • Drawing paper

How to Make an Art Gum Printer Stamp:

Step 1: Lightly draw a simple design on one side of an art gum eraser. To make the raised part of your design, use a craft knife to help your kids carve out the parts they don't want to print.

Advertisement

Step 2: Press the carved side of the eraser down on a stamp pad. Position the eraser on a piece of paper and press down firmly to print your design.

Stamp it in repeated patterns, re-inking it every 1 or 2 prints. Be sure to wash the printer when you change colors and when you're done using it.

Make your eraser into a personal stamp for your kids. Instead of carving out a geometric design, carve out their initials on the eraser. They can use the printer to sign notes and papers with their "mark."

Have some potatoes on hand? Learn how your kids can turn them into decorative ink stamps in the next section.

For more fun art crafts and kids crafts, check out:

Advertisement

Potato Printer Stamp

Potato Printer Stamp
The Potato Printer Stamp
none

Amaze your kids by turning a pantry staple into a great potato printer stamp! They can use the stamp to transform ordinary paper into decorative gift wrap, book covers, or stationery.

What You'll Need:

  • Newspaper
  • Potato
  • Knife
  • Ballpoint pen
  • Poster paints
  • Clean foam food tray (from fruits or vegetables only)
  • Drawing or brown mailing paper

How to Make a Pattern Printer Stamp:

Step 1: Cover your work surface with newspaper. Clean a potato, and help kids cut it in half.

Advertisement

Step 2: Draw a shape on the cut surface with a pen. Assist kids by cutting away the edges so that the shape stands out.

Step 3: Place some poster paint on a clean foam food tray. Dip the potato shape in the paint, and then press it on a piece of paper.

Step 4: Continue stamping the paper until you've created a pattern you like. Let the paint dry.

Keep reading to learn how to create personalized ink stampers from craft foam.

For more fun art crafts and kids crafts, check out:

Advertisement

Craft Foam Stampers

These craft foam stampers are ideal for making holiday greeting cards or invitations to your kids' birthday parties.

What You'll Need:

  • Craft foam (available at craft stores)
  • Blunt scissors
  • Fabric glue
  • Blocks of wood
  • Poster paints or stamp pads

How to Make Craft Foam Stampers:

Step 1: Cut out shapes from craft foam. Glue each shape on a block of wood.

Advertisement

Step 2: Use poster paints or stamp pads to ink your stampers. Wash your stamps after each use.

You can make 1 large stamp to decorate the front of a birthday card or small stamps to create repeating shapes on wrapping paper or gift bags.

Combine 2 or 3 small shapes on a single block of wood to make interesting repeating patterns. Try hearts, circles, squares, or stars.

You can also make letter or word stamps. Cut out letters or words that you want to print, and glue them to a block in a mirror image.

In the next section, you'll learn a special stencil craft to bid your kids sweet dreams.

For more fun art crafts and kids crafts, check out:

Advertisement

Custom Stencil Pillowcase

Custom Stencil Pillowcase
Dress up any bed with the Custom Stencil Pillowcase.
none

Turn a plain pillowcase into a special custom stencil pillowcase for your child's room. Design and paint your own floral border!

What You'll Need:

  • Pencil
  • Plastic coffee can lids
  • Scissors
  • Plain pillowcase
  • Plastic garbage bag
  • Binder clips
  • Acrylic paints
  • Paper plates
  • Stencil brush

How to Make a Custom Stencil Pillowcase:

Step 1: Draw a flower shape on one plastic coffee can lid. Draw leaf shapes on another coffee can lid. Help kids cut the shapes out to create a flower stencil and a leaf stencil.

Advertisement

Step 2: Put the plain pillowcase flat on your work surface, and place a plastic garbage bag inside the pillowcase. Place the flower stencil on the edge of the pillowcase, and secure it with a binder clip.

Step 3: Pour some acrylic paint on a paper plate. Dip a stencil brush in the paint, and dab off the excess paint on a piece of paper. Dab the brush inside the stencil shape until it is filled in.

Step 4: Continue stenciling the flower design along the edge of the pillowcase to make a border.

Step 5: Once the paint has dried, repeat the stenciling process using the leaf stencil and a different color paint. Let the paint dry.

If you want, stencil the same border on the bed's dust ruffle or curtains to match your child's bedroom.

For more fun art crafts and kids crafts, check out:

Advertisement

Advertisement

Loading...