How to Make Beads

Learn to create these pretty flower power beads.

Beaded jewelry is always a popular choice, and imagine how much more fun you'll have when you're not just stringing beads together, but actually making them yourself.

You may be surprised at how easy many of these bead projects are to make, and to learn that beads can be made from everything from paper to flower petals. Intrigued? Pick one of the projects below and get started!

Advertisement

In this article you can learn to make the following types of beads:

Dough Beads

You thought play dough was ruined once it dried out! Learn how to make play dough beads here.

Paper Magic Beads

No one will ever guess how these beads were made -- unless you tell them. Find out more!

Flower Power Beads

Smaller beads make flower beads in this multi-layered project. See how to make these pretty beads here.

Rose Beads

Real roses are an ingredient in these fragrant beads. Keep reading to learn more.

Rolled Paper Beads

Wait! Don't take out the recycling -- there's jewelry in there! See how to make rolled paper beads using stuff around the house.

Beaded Beauties

Sand forms the base for these beads, which you can decorate any way you want. Learn about sand beauties here.

Ready to get started? This first type of bead is easy to make, so it's the perfect way to begin your bead-making adventure. Learn more on the next page.

For more creative craft and jewelry projects, see:

Advertisement

Dough Beads

You'll have fun making these dough beads.

You'll have all the fun you want with these dough beads -- and none of the mess that comes with mixing flour and food coloring. When finished, these dried-dough delights are perfect for making bold necklaces and bracelets.

What You'll Need:

Different colors of play dough

Advertisement

Toothpicks

Tiny cookie cutters

Rolling pin

Waxed paper

String or embroidery floss

What To Do:

Roll the dough out 1/4- to 1/2-inch thick for round beads, and about 1/4-inch thick for flat shapes. Use cookie cutters to cut out flat beads.

Use a toothpick to carve small details into the beads and to make holes. Make sure the holes are equally wide at both ends and also big enough for whatever string you will use.

To make a very cool-looking marbled bead, mix two colors thoroughly, then roll out and shape as desired. (Note: Adding shapes of another color on top won't work, because they will fall apart when dry.) Let your beads dry for a day or two on waxed paper until they are hard. Then string up your colorful creations.

Continue to the next page to learn how to use a different material to make beads: colored paper!

For more creative craft and jewelry projects, see:

Advertisement

Paper Magic Beads

Who would have guessed, but simple paper makes gorgeous beads! And the sky's the limit when it comes to the colors and designs you can create, because paper comes in every color and texture and pattern imaginable. How will you ever decide what to use? Just imagine what you can make!

What You'll Need:

Gift wrap or Sunday comics

Advertisement

Ruler

Pencil

Scissors

Clear gel glue

Water

Teaspoon

Small margarine tub

Narrow drinking straws

String or embroidery floss

What To Do:

On the backside of the paper you've chosen, use the ruler and pencil to draw triangles that are 1 inch across the bottom and 7 inches tall. Make as many triangles as you want beads, then cut out the triangles.

Mix 2 teaspoons of clear gel glue with 1 teaspoon of water in the small margarine tub. Dip a triangle in the glue mixture, and let the excess glue drip off.

Wrap the triangle around a straw, pattern side up, starting with the wide end, to make a rolled bead. Wrap all the triangles, and let them dry for a day. Remove the straw, and string your paper magic beads to make a necklace!

With the next craft, smaller beads can be combined into fantastic flowers, and then these flowers link to make jewelry. Get details on the next page.

For more creative craft and jewelry projects, see:

Advertisement

Flower Power Beads

These flower power beads are groovy!

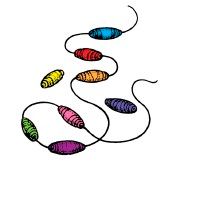
Power to the flowers! The following daisy pattern looks super-cool when beads are made up into bracelets, necklaces, and earrings. Practicing first with a leather cord and wooden beads is pretty easy and makes chunky, funky jewelry. Once you've got it down, try it with nylon thread and

smaller beads for a delicate look.

Advertisement

What You'll Need:

For a bracelet or necklace:

Leather or satin cord (nylon thread)

Wooden or other bigger-size beads in three colors

Scissors

Matching button

Needle (if making the smaller kind of bracelet)

Additionally, for earrings:

Two French wire earrings

What To Do:

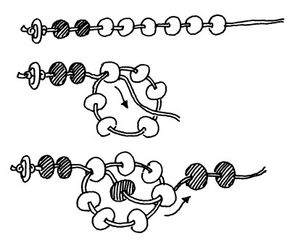
For a daisy bracelet, choose a bead color for flower petals, another color for flower centers, and a third for connecting beads (the connecting beads may be smaller than the others).

Tie a knot at the end of the cord, thread on a matching button, and tie another knot after it. Thread on two connecting beads. Then add six flower petal beads, and thread the cord back up through the first petal bead. Now you have a circle.

Thread on a flower center bead. Going toward the left, skip two beads and thread the loose end of the cord through the third bead. Pull tight. The first "daisy" is made.

Add two connecting beads, make another daisy, and continue until the bracelet is the right length for your wrist. At the end, add connecting beads to make a loop big enough to slip over the button.

Note: If you're making the daintier kind of bracelet, use eight connecting beads between flowers. Also use eight beads to make the daisies, and skip three beads before threading the loose end of the nylon thread through the fourth bead.

For a flower necklace, use a matching button if you're making a choker. If you're making a longer necklace, skip the button and make a knot 3 inches from the end of the cord.

Follow the daisy bracelet instructions above, only make your chain of daisies long enough to fit around your neck. For a choker, finish the necklace like you did the bracelet, but for a longer necklace, tie the ends of the necklace together, and be sure it is long enough to slip over your head.

For daisy earrings, make a knot at the end of the cord, and use a matching color of thread to attach the French wires to the cord between the knot and the connecting beads.

Thread on four or five connecting beads, depending on the length of earrings you want. Make a daisy according to the daisy bracelet instructions above, then tie off the cord.

Note: If you're using small beads, thread on eight to 10 connecting beads. Make three daisies, with two to four connecting beads between flowers. Then thread the needle through the last connecting bead before the first daisy and pull tight, making a mini loop. Tie off.

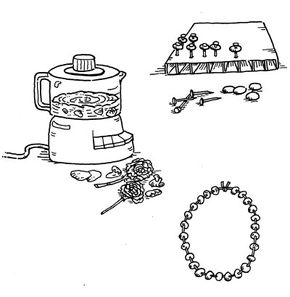
Take your floral appreciation to the next level when you use actual flowers for the next bead project. Learn more about rose beads on the next page.

For more creative craft and jewelry projects, see:

Advertisement

Rose Beads

Rose beads are easy to create and their scent will last for decades.

These lovely beads, which first became popular in Victorian times when they were used for making necklaces and rosaries, will keep their scent for years and years. If someone in your family has some old rose beads, you know how long they stay sweet-smelling! These beads are easier than ever to make thanks to the modern food processor.

What You'll Need:

Rose petals

Advertisement

Food processor or blender

Water or rose oil (optional)

Straight pins

Corrugated cardboard

Light fishing line or dental floss

Needle

What To Do:

Pick the roses early in the morning before the sun drives off some of their scent. Choose roses with similar scents, or blend scents that go well together. Most colors will blend well, as the beads will all darken to a mahogany color.

Ask an adult to put one handful of petals in the food processor at a time and process them until you have a thick paste. You may add a few drops of water if needed, or even a bit of rose oil if you have it. If necessary, you can spoon the paste into a jar and keep it refrigerated while you wait for more roses to bloom.

When you have enough paste, roll it into pea-sized beads. Run a pin through each bead and stick the pin into a piece of cardboard. Let the beads dry thoroughly. When the beads are dry, remove the pins and string them on light fishing line or dental floss. What will you make? That's up to you!

Leave the rest of the flowers in the garden. On the next page, you'll learn to make beautiful beads from something that might otherwise be recycled. Click to learn more.

For more creative craft and jewelry projects, see:

Advertisement

Rolled Paper Beads

Your triangles should look something like this.

These rolled paper beads are colorful and shiny -- perfect for making all kinds of necklaces and bracelets. You can coordinate your jewelry with any outfit just by choosing the right paper. Go for something designed and decorative, or find out what fun colors and patterns you can create just from the pages in a magazine.

What You'll Need:

Old magazines or other decorative paper

Advertisement

Scissors

Ruler

Pencil

Craft glue

Yarn or dental floss

Spray acrylic sealer

What To Do:

Tear out two or three colorful pages from a magazine. Use a ruler to mark an inch along the long edge of a magazine page. Continue making inch marks along the page. Starting at the first 1-inch mark, cut a long triangle from the magazine page. Repeat until you have 20 to 30 triangles.

Starting with the wide end of the triangle, roll it around a pencil. Continue rolling until you reach the point of the triangle. Place a dot of glue at the point of the paper, and smooth the point down.

Roll carefully to keep your bead symmetrical.

Slide the paper bead off the pencil. Repeat until you've made 20 to 30 beads, depending on how long you want your necklace or bracelet to be.

String the beads on yarn or dental floss. Tie the ends of your necklace or bracelet together in a double knot.

You can combine colors in all sorts of ways to give your bead jewelry different looks.

Spread newspaper over your work surface, and place the beads on the newspaper. With an adult's help, spray acrylic sealer to give your beads a shiny finish.

Ever thought of making beads from sand? Women in Africa thought of this long ago. Learn how they do it -- and how you can too -- on the next page.

For more creative craft and jewelry projects, see:

Advertisement

Beaded Beauties

You'll have fun making these traditional sand Beaded Beauties.

These beaded beauties are made simply of sand. This particular way of making beads was created by African women, and if you visit that continent, you're likely to see all kinds of sand-bead jewelry being worn. With these directions, however, you can make your own sand beads right at home.

What You'll Need

Sand

Advertisement

White glue

Spoon

Empty, cleaned plastic butter tub

Nail

Foam tray

Markers

Tiny seeds or glitter

Yarn

Tape

What To Do:

Mix sand and glue together in the butter tub to make sand dough. Make enough dough to roll a number of beads in the size you want. With the nail, poke a hole through the center of each bead. If the dough is too soft to make a hole, add more sand until it is stiff enough support a hole through the bead.

Make lots of beads, then let them dry on a foam tray until they are hard. When the beads have dried, decorate them by coloring them with markers or gluing tiny seeds or bits of glitter to them.

To make a necklace, tape one end of a piece of yarn (long enough for a necklace) to the table, and string the beads onto it. Tie the two ends of the yarn together when you've strung all your beads.

Whichever of the bead-making projects described in this article you decide to tackle, you're bound to make something beautiful. Be careful, or you might just end up with a new hobby!

For more creative craft and jewelry projects, see:

Advertisement

Advertisement

Loading...