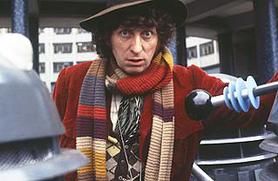
Dr. Who is renown for its campy plots, its horrible (but at the time ground-breaking) special effects, the Who-fro and that famous scarf. The show is the world's longest-running sci-fi series. It has won several awards for excellence in writing, and the use of electronic music in the show is considered innovative to this day. Celebrated author Douglas Adams even penned a few episodes of the Who. What's not to like?
What's what to like? Is a better question. And I'll tell you what is what to like. That scarf. A scarf like that can keep a person warm while traveling through time or just taking a walk in a winter wonderland. To find out how to make the scarf, I went to Drwhoscarf.com. They have a handy yarn calculator so you don't over-purchase your yarn.
Advertisement
Making something yourself is a great way to save money and cut down on the time materials spend in the supply chain. (That's the green bit.) Here's how to make the scarf according the Dr. Who Scarf.com. Check out their website to learn how to make scarves from all the different seasons.
First you'll have to learn how to knit. Here's the instructions for knitting. You'll probably have to practice awhile before you are any good.
Without further ado, I bring you the Dr. Who Scarf from Dr. Who Scarf.com:
There are several techniques you should use that are common to all of the Doctor Who scarves. Since how to knit is not within the scope of this site, I have briefly described the techniques below and you can find more specific info elsewhere on the internet.
Row Amounts: Knitters use the term "row" to describe one pass across the needle. In garter stitch, which is what these scarves are made with, it takes two passes across the needles, or "rows" to create one of the horizontal "ribs." The yellow stripe has four ribs, which would take eight rows to knit. On my patterns, this would be represented with "8 yellow."
Yarn Choice: On this site I've mentioned a couple of different yarn brands that I have found to be the best choices for each scarf. If you want to use a different yarn, just be aware that it should be "sport" or "DK" weight and should be available in the specific colors you need. Wool or a wool blend are the best choices. Be careful about mixing different brands of yarn together; sometimes the differences in the yarn can make the edges appear uneven. If you do mix yarns, make sure they are of the same material! (IE: Don't mix wool with Acrylic, etc.) Also make sure that the stitches-per-inch are the same.
Style: The scarf should be knitted in garterstitch, probably the simplest knitting technique. (It's all knit stitches.) To make the edges smoother, you can "slip" the last stitch "as if to knit." Alternatively, you can knit the scarf in stockinette stitch. (knit and purl alternate rows) Some differences about stockinette stitch: It has a smoother look and looks more "professional" since this is a common stitch used in machine knitting. It curls up, so it has to be folded and stitched up the side. (So, you have to make it twice as wide!)
Color Changing: There are many ways to change colors but this is the best way I know of. (And the way Ms. Pope did on the original.) After you finish with a color, cut the end about 10-12 inches long. Knit 2 or 3 stitches with this strand, then on the fourth stitch, start knitting in the new color leaving about the same length strand. When you have knitted some with the new color, neatly tie the strands together, (a square knot works best.) When the scarf is complete, use a yarn needle to weave the strands into the stitches of the scarf. Clip the ends close to the scarf.
Tassels: Each tassel should consist of a 12 inch strand of each of the seven colors. Fold the strands to make a loop, then with a crochet needle, pull the loop through the inside of the scarf and pull the ends through the loop. (Make sure you pull them tightly.)
Tassels: Each tassel should consist of a 12 inch strand of each of the seven colors. Fold the strands to make a loop, then with a crochet needle, pull the loop through the inside of the scarf and pull the ends through the loop. (Make sure you pull them tightly.)
Blocking: This is the process in which knitted goods are steamed or wetted to loosen up the fabric and sometimes stretch it. For the scarf, you can do this if you want it to be more stretched out or if you want it to fold in a certain way. Some yarn stores and dry cleaners do this, or you can do it yourself. Basically, you pin the scarf in the position you want it to stay, steam or wet it, and let it dry in that position. You can iron the scarf with steam but be very careful, especially with synthetic fibers!"
Advertisement