How to Mend Clothes

sewing instruments
Mending and altering clothes is simpler than you might think.
Dorling Kindersley/Getty Images

If you've tried on new clothes at the store and found they rarely fit perfectly, you're not alone. Manufacturers can't possibly make clothes to fit every shape and size. Fortunately, it isn't that difficult to alter new clothing once you get it home.

This article will show you how to rehem, refit, let out, or take in clothing for a custom fit. And if you have old clothes that need repair -- whether they're from the local thrift shop or the back reaches of your closet -- we'll show you how to fix rips and tears, make patches, repair or replace a zipper, or make a tie slimmer. We'll even cover how to resole a warn pair of shoes.

Advertisement

So buy that too-long dress you fell in love with at the store, and don't give away that shirt with the worn elbows. Just mend them using this article as a guide. We'll start on the next page with common alterations.


How to Alter Clothes

When sleeves are too tight, remove them entirely; open the side seams and cut a facing to finish each arm-hole.

Off-the-rack clothes seldom fit perfectly, but with a little practice, you can usually eliminate the alterations fee. We'll begin with the materials you'll need to get started on your alterations.

Tools: scissors, tape measure, steam iron and ironing board, sleeve board, pressing cloth, sponge, mirror, straight pins, yardstick or skirt marker, sewing needles, sewing machine, pinking shears, seam ripper, pencil.

Advertisement

Materials: white vinegar; ribbon, lace, or bias seam binding, or wide bias seam tape; thread, fabric as necessary, paper.

Time: 1 hour or more, depending on alteration needed.

Rehemming

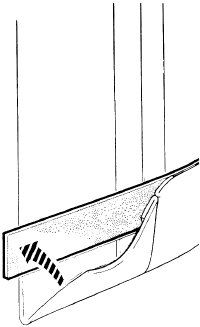
The most common problem with new clothes is the hem -- too short, too long, or uneven. Remove the old hem and press out the crease with a steam iron. If you're lengthening the garment and the old crease shows, sponge the crease with white vinegar and press it with a damp pressing cloth. Then put the garment on.

For the best results, work with a helper to mark the new hem. Stand in front of a mirror, in good light. Have your helper mark the new hem with straight pins at the desired point; keep pins close together. To make sure all pins are placed correctly, measure from the floor up with a yardstick or a skirt marker. Stand straight and turn slowly as your helper marks the new hem.

Take the garment off and set it on an ironing board, wrong side out. Turn the fabric up at the marked hemline and press it firmly to crease the new hem; remove the pins as you go. If you're hemming sleeves or pants legs, use a sleeve board as necessary to press the hem. Make sure the hem is plainly creased all around the garment.

Leaving the hem turned up, adjust the hem allowance as necessary to make an even hem, about the same width as the old one. For most garments, 1 to 2 inches is a good width for hems -- use 1-inch hems for sleeves or pants legs, 2-inch hems for skirts or jackets. Measure up from the crease into the hem allowance and trim the hem to the correct width all around.

Before stitching the hem into place, you must finish the edge of the fabric if it is raw. For fabrics that don't ravel much, straight-stitch along the edge of the hem on a sewing machine, 1/4 inch from the edge; pink the edge with a pinking shears. For lightweight woven fabrics, turn the raw edge under 1/4 inch and straight-stitch it. For fabrics that ravel easily, straight-stitch along the edge of the hem, 1/4 inch from the edge; overcast the edge by hand or with a zigzag machine stitch. For loosely woven fabrics or where you want to avoid bulk, finish the raw hem edge with seam binding; use ribbon or lace binding for straight hems, bias binding for curved or flared hems. Overlap the binding half its width over the raw edge; straight-stitch it into place.

If you're letting the old hem down and there's less than 1 inch of hem allowance for the new hem, finish the raw edge with a facing of wide bias seam tape. Lay the tape along the evenly trimmed edge of the hem allowance, right sides together and outside edges flush. Straight-stitch the tape into place 1/4 inch from the edge; be careful not to stretch the tape. Then turn the tape up so the raw edges are underneath it, and press the seam open.

If the hem has a considerable curve or flare, pull in excess fullness before finishing the raw edge, to make sure the new hem will lie flat. Adjust the sewing machine to loosen upper thread tension and increase stitch length. On the right side of the hem allowance, straight-stitch along the hem edge, 3/8 inch from the raw edge. Then, with the right side of the hem allowance up, pull the bobbin thread with one hand and gather the fabric to the required fullness with the other. Check the gathered hem for proper fit before stitching it.

When the hem is properly trimmed and finished, stitch it into place. Stitch by hand, using matching thread. For most garments, use the hemming stitch; working from right to left, take a stitch in the hem edge and then catch one or two threads in the garment. For a strong hem in children's clothes or knits, use the catchstitch; work from left to right, catching one or two threads in the hem edge and then in the garment. For turned and stitched hems in lightweight woven fabrics, use the slipstitch; working from right to left, stitch along the hem fold, catching a thread of the garment periodically. Fasten the ends of the hem securely with small knots.

Refitting

Almost all other alterations are made to deal with clothes that are either too tight or too loose. Unless the size is drastically wrong, this is usually fairly easy to accomplish.

Letting out: If there is sufficient seam allowance, you can often solve the problem of tightness by opening the seams and restitching them closer to the raw edges. Sometimes it may be feasible to insert panels of extra fabric to provide additional width or length.

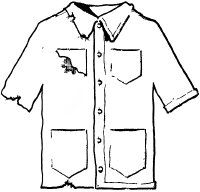
Where the garment is cut to fit closely, tightness is difficult to correct, because there's no extra fabric. If a sleeve is too tight around the shoulder and upper arm, it usually isn't possible to loosen it. The best solution for a shirt or dress may be to remove the sleeve altogether and finish the armhole with a facing.

To remove a sleeve, use a seam ripper to carefully remove all the seams that join the sleeve to the garment body. Open the side seam of the garment to the waist. Open the garment flat. Using the garment's sleeve opening as a pattern, trace the curve of the opening onto facing material; cut a piece of fabric 2 inches wide to follow the entire curve. Use a fabric of the same weight as the garment, in a matching or coordinating color; if the garment had long sleeves, cut the new facing from the sleeve material.

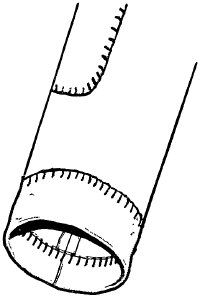
Finish the outside edge of the curved facing by turning the edge under 1/4 inch; straight-stitch along the turned edge on the sewing machine. Place the facing over the outside (right side) of the opened armhole, right sides together, to match the curve exactly, and pin it into place. Straight-stitch the facing to the armhole opening, leaving a 5/8-inch seam allowance.

After stitching the facing onto the armhole, clip into the seam allowance every 1 to 2 inches around the armhole, cutting close to, but not into, the seam. Restitch the side seam of the garment, following the old seam line exactly. Turn the facing to the inside of the garment, press it down, and pin it into place. Sew the facing to the inside of the garment by hand, using a hemming stitch; be careful to catch only one thread of the garment fabric.

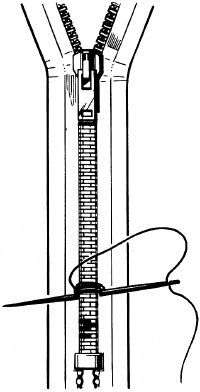
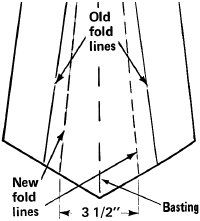
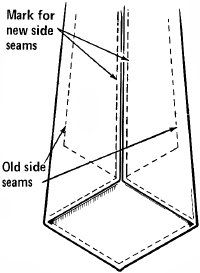
Taking in: Making clothes tighter is easier than letting them out. To get a really good fit, remove the stitching from the seam involved; try the garment on and have a helper pin or baste the seams in the correct position. Cut off excess fabric, if necessary; then restitch the seams as marked, curving them very gradually into the line of the old seams. Don't just take in all existing seams -- if the garment fits unevenly, a poorly made alteration will not correct the problem. Remove all seams affected, try on, and pin or baste; restitch seams in the new position and adjust as necessary.

To take in a shirt or the bodice of a dress, you may have to remove the sleeves and adjust the side seams. In this case, to prevent changing the shape of the sleeves, open the side seam to the waist and make a paper pattern of the armhole, as above; mark the sleeves as you remove them so you'll be able to replace them correctly. After adjusting the garment's seams, use the pattern to cut the armhole to its old shape, as necessary. Then restitch the side seams and replace the sleeves.

On the next page, we'll give step-by-step instructions on how to custom-fit a pair of pants.

How to Custom-Fit Pants

Taking in or letting out a pair of pants can make all the difference in the fit, and you don't need a tailor to do the job. Use this technique on men's pants and some women's pants.

Tools: seam ripper, scissors, fabric marker or pencil, straight pins, needle, sewing machine.

Advertisement

Materials: pants, thread.

Time: 1/2 to 1 hour.

Men's pants -- and sometimes women's -- are designed to be adjusted at the center back seam, and can be taken in or let out 1 inch or more without affecting the fit elsewhere. Have the wearer try the pants on to see how much adjustment is needed, and estimate the work you'll have to do.

If there's a belt loop at the top of the center back seam, carefully remove it with a seam ripper. With the seam ripper, remove the stitching from the waistband facing for 2 or 3 inches on each side of the seam. Then remove the stitching from the seam, being careful not to damage the fabric. Open the seam with the seam ripper, almost down to the crotch.

On the inside of the pants, mark a line on each side of the pants where you estimate the new seam should be, either farther into the pieces of fabric or closer to their cut edges. Mark the lines with a fabric marker or a pencil. Starting at the top of the seam, draw a smooth, gradual curve on each piece of fabric, tapering gradually to blend into the old seam line at the bottom. Don't curve the new seam sharply or the new seam won't fit properly.

Pin the seam together along the new seam lines and then baste it together and remove the pins. Have the wearer try the pants on again to make sure the pants fit correctly. If the seat of the pants is baggy, open the inseams of the pants legs, from the crotch down 10 or 12 inches. Make a new seam line along each inseam to narrow the back of the leg slightly; taper the new seam line into the old one. Pin, baste, and have the wearer try the pants on; readjust as necessary until you get a good fit.

If you opened the inseams of the pants legs, stitch the new inseams, tapering the new seam line into the old one on each leg. Stitch the new seam line at the back of each leg to the old seam line at the front of the leg. Trim away excess fabric.

When no further adjustments are necessary, stitch the crotch seam with a sewing machine. In the seat area, stretch the seam a little as you sew; or, if your machine has a stretch stitch, use it in this area. Make a second row of machine stitching 1/8 inch closer to the cut edges of the seam, to reinforce it. Backstitch at the beginning and the end of each line of stitching. If you're taking the pants in, trim excess fabric after stitching.

Finally, adjust the waistband to match the new back seam. Open the back seam on the waistband and either let out the fabric or take in the same amount you took in from the back pants seam. Stitch the new waistband seam closed. Turn the waistband down and smooth it back over the back of the pants and the adjusted seam; stitch it into place the way it was stitched before. If you removed the back belt loop, replace the loop; sew it on the same way it was attached before.

Next, learn which mending material makes putting in a hem a breeze.

How to Put in a Hem

Cut a strip of fusible web as long as the hem measures around, and slide it under the hem.

Putting in a hem is no problem with fusible web, a lightweight iron-in mending and interfacing material.

Tools: steam iron, pressing cloth or handkerchief, scissors, straight pins.

Advertisement

Materials: fusible web (available in precut strips in sewing stores or sewing departments), in the width desired.

Time: about 1 hour.

Before you start, make sure the fabric can stand up to the heat needed to set the fusible web. Set the iron to the temperature specified on the fusible web package. Turn the garment inside out and fold a seam edge out flat from the body of the garment so that the iron will touch only the seam allowance, not the garment itself. Using a pressing cloth or clean handkerchief, press as directed on the package. If the fabric puckers, the new hem cannot be put in with fusible web; otherwise, go ahead.

Rip out the old hem, cutting the thread at short intervals and being careful not to pull the threads of the fabric. Remove the bits of cut thread left from the old hem. Turn the fabric up to the proper length, keeping the hem width even, and pin the hem into place with straight pins. Press, using steam, to remove the old hem crease and keep the new hem evenly turned up and in place. Remove the straight pins. If you're letting the old hem down, you may have to dampen the old hem fold with white vinegar to remove the crease, since this part of the fabric win now be visible on the right side of the garment.

Trim any excess fabric, leaving a hem about 1 to 2 inches wide for skirts or jackets, about 1/2 to 1 inch for sleeves or pants. Press the hem again all around, making sure it is smooth and even.

Cut a length of fusible web strip as long as the hem measures around the garment. Place the web between the hem and the garment fabric, sliding it under the turned-in edge.

Following the directions on the package, fuse the web in place, pressing firmly with the steam iron to melt the web's adhesive and bond it completely to both fabric surfaces. Use a pressing cloth between the garment and the iron, and do not touch the web directly with the iron. If you do get glue from the web on the sole plate of the iron, it can be removed after the iron cools completely, with a dry plastic dish scrubber.

Want to know how to makes patches, fix worn sleeves, or hide tears in your clothes? The next page will tell you how.

How to Repair Clothes

Cover worn edges and hems with tape or ribbon edging; cover extensive damage with patch pockets or appliques.

Stains and tears in clothes don't have to mean the end of their utility as school or work clothes -- cover the damage with embroidery, pockets, or appliqués for clothes that look and feel like new.

Tools: sewing scissors, embroidery needle, sewing needles and/or sewing machine, steam iron and ironing board, straight pins, pencil, seam ripper, patterns as needed.

Advertisement

Materials: embroidery thread, matching or contrasting thread; embroidered ribbon, tape, or braid; iron-on patches, embroidered appliqué motifs, matching or coordinating fabrics, paper, suede-cloth.

Time: 15 minutes to 2 hours, depending on effect desired.

For small tears and not-too-bad stains, the simplest solution is embroidery -- a flower, a sun, a star, or any bright design will cover the damage. An equally simple coverup is an edging of embroidered ribbon or tape; you can use braid or ribbon to face a torn pocket, reinforce a raveled-out seam, or disguise a stained hem. For more extensive damage, use appliqués or pockets for patches that are not just fill-ins but imaginative decorating tools.

Before you can decorate to hide the damage, make the necessary structural repairs. If the fabric is torn, stitch back and forth across the tear on a sewing machine or with a running stitch by hand, to hold the torn edges together. Steam-press the mended spot so that it lies flat.

Sewing stores, department store notions departments and even grocery stores sell iron-on patches and small embroidered appliqué motifs. The iron-ons are a good fast answer for children's play clothes -- cut the patch to the shape you want and press it on as directed. For a more finished look on school or work clothes, use individual appliqués; arrange several appliqués to create a new design instead of using one or two for an obvious spot coverup.

Sew edging strips and appliques into place with a buttonhole stitch, locking each stitch through the one before it.

Position the embroidered appliqués as desired and pin them into place. Because the edges are prefinished, you can stitch the appliqués on with a straight or a zigzag machine stitch or a backstitch by hand; make firm, close stitches with matching or contrasting thread. If you have a zigzag sewing machine, use the basic stitch set at about two-thirds of its widest width and 20 stitches to the inch or more for an extra-smooth finish. Stitch all around the edge of each appliqué motif.

If you have fabric scraps on hand, you can make your own appliqués. Stars, geometric shapes, and flowers are easy to draw, or look for other simple designs. Make a paper pattern of the design and draw around it lightly on the surface of the fabric; allow a 1/4-inch seam allowance beyond the line. Turn the seam allowance under and press it down all around the appliqué, clipping curves and corners as necessary so that the entire pattern lies flat.

Pin the appliqué into place over the damaged spot or stain; baste it in place if desired. Stitch the appliqué all around with a close machine zigzag stitch, as above, or work a fine, close buttonhole stitch by hand.

Pockets, Patches, and Edging

Patch pockets in a contrasting fabric add a bright touch and cover a damaged spot or stain at the same time -- gingham on denim, solid color on print, or whatever appeals. If you need a pocket to cover a spot on one side of a garment, make it a very bold color or size; or, for a more formal effect, add a matching pocket to the other side to balance the design.

Refinish a jacket sleeve with suede-cloth cuffs and elbow patches; buttonhole-stitch the suede cloth around the edges.

Use a pocket pattern from any commercial pattern for a similar garment, or copy a pocket from another garment. Cut the pockets, hem the top edges, and press the edges under all around. If you're using two pockets, measure carefully to place them evenly on the garment. Pin and baste them into place; use the pattern directions if you've never made a pocket before. Edge-stitch around the pockets with a straight machine stitch or hand backstitch.

A good jacket or sweater lasts for years, but the elbows always go first. You can spruce up a jacket with worn elbows or cuffs, or cover a cigarette burn at the hip, with 1/4 yard of suede-cloth -- it's worth paying for the better-quality suede-cloth. If the jacket originally had patch pockets, remove them carefully with a seam ripper. Use the old pockets as a pattern and cut new suede-cloth pockets to the finished size; leave a hem allowance for the top of the pocket only. If you're adding patch pockets to a plain hipline or over welted pockets, refer to a pattern of a similar design. Like real suede, suede-cloth needs no seam allowance on the edges, but you should hem the top edge of the pockets.

To make elbow patches, cut rectangles of suede-cloth 5 inches by 6 inches, and round off or right-angle the corners as desired. On each sleeve, carefully undo the stitching to detach the sleeve lining at the lower edge of the cuff. Slip one hand between the sleeve and the lining, pull the lining up out of the way, and pin the patch into place on the sleeve, attaching it only to the outer fabric. Make sure you don't catch the lining. With a backstitch or a buttonhole stitch, sew around the patch, securing it only to the outer fabric. When the patch is securely attached, replace the lining and hand-stitch it back around the inside of the sleeve.

To refinish the worn edge of a jacket sleeve, measure the distance around the cuff and cut a strip of suede-cloth about 2 inches wide and slightly longer than the measured distance. Turn the sleeve inside out and pin one edge of the strip to the turned-up sleeve hem, ¾ inch up from the bottom of the sleeve, starting and finishing at the underarm seam. The remaining width of the strip should be hanging down over the edge of the sleeve. Turn the ends of the strip to the outside of the sleeve and stitch a seam that matches the sleeve seam line to hold the ends of the strip together, making a suede-cloth ring around the inside of the sleeve.

Attach the pinned edge of the strip to the inside hem of the sleeve with a backstitch or a buttonhole stitch. Turn the sleeve right side out and fold the other edge of the strip up over the worn edge onto the outside of the sleeve; attach it with the same stitch used on the other edge. If the sleeve hem is very shallow, you may find it easier to release the lining first and pull it back out of the way, then restitch it over the sewn-in cuff edging.

Nobody wants to wear clothes that have a broken zipper. One the next page, we'll cover how to easily repair or replace a malfunctioning zipper.

How to Repair a Broken Zipper

If teeth are missing near the zipper bottom, pull the slider above the hole and stitch a new stop over the track.

A garment with a broken zipper is unwearable -- new or old, shabby or not. Instead of abandoning it, repair the zipper, or replace it with a new one.

Tools: needle, sewing scissors needle-nosed pliers, seam ripper, straight pins, sewing machine.

Advertisement

Materials: thread, small safety pin or paper clip, old zipper of similar size; replacement zipper, if required.

Time: 5 to 15 minutes for repair; 1/2 to 1 hour for replacement.

Before you decide to replace a zipper, examine it carefully to see if you can repair it. If a tooth is missing in the upper two-thirds of the zipper's tracks, the zipper should be replaced. If a tooth is missing near the bottom of one of the tracks, zip up the zipper so that the slider is above the damage. Thread a needle and make several stitches around both rows of teeth, just above the missing tooth, to make a new stop for the slider. Stitch over the new stop several times to make sure it's firm.

If the problem is a missing pull tab, check to see whether the slider has a hole where the pull tab was attached. If so, slip a tiny safety pin or paper clip through the hole to serve as a substitute. If there is no hole, try to salvage a clamp-on pull tab from an old zipper of a similar size; put the tab onto the slider with a needle-nosed pliers.

If the slider is off the track on a metal zipper, carefully rip out the stitching around the lower ends of the zipper tapes. Pry off the metal stop at the bottom of the zipper, being careful not to tear the tapes. Remove the zipper foot entirely.

Guide the track tapes into the grooves of the slider, inserting them into the top and pushing them through the slider to the bottom; use a pin if necessary to work the track tapes through. Pull the tapes carefully so that the slider is evenly seated on the tracks.

When both tapes have been threaded through the slider, carefully pull the slider up until the locked track teeth appear at the bottom. Make sure the slider is evenly seated on the tracks, or the zipper won't close evenly at the top. Sew a new stop at the bottom of the tracks with needle and thread, and repair the stitching that holds the zipper in the garment.

If the zipper is beyond repair, replace it with a new one of the same length. Buy a zipper in a matching color, and be sure it's the right weight and kind for the garment.

With a seam ripper, carefully remove the stitching holding the old zipper in place. As you work, note how the old zipper was put in, and in what order the various lines of stitching were made; pants zippers especially may be put in with several lines of stitching. If a waistband is involved, remove no more stitching than necessary to free the upper ends of the zipper. Remove the old zipper and pull out all loose thread ends.

Following the directions on the zipper package, pin the new zipper into place and stitch it the same way the old zipper was stitched; use a sewing machine with a zipper foot. Make the final topstitching on the outside of the garment, by hand or by machine.

A trip to the tailor or to the trash aren't your only options for ripped or torn clothing. With a few minutes of work, you can give your damaged clothes a new lease on life. Read on to learn more.

How to Mend Rips and Tears

Often a towel, a sheet, or a garment can be saved from discard by a skillful mending job, and usually the job requires only a few minutes' work.

Tools: steam iron and ironing board, sharp scissors, sewing needles in a variety of sizes, sewing machine, tailors' chalk or pencil, sponge.

Advertisement

Materials: iron-on mending tape, thread in appropriate colors, patching materials, heavy brown paper, tissue paper.

Time: 15 minutes or more, depending on damage.

The mending technique you use should depend on whether it matters how much the mend shows, and whether the piece is worth spending much time on. For mending denim pants, children's play clothes, everyday sheets, and so on, the easiest and most effective method is making the repair with iron-on mending tape, or with the sewing machine's straight or zigzag stitch.

Most tears are either straight or L-shaped, because they tend to follow the grain of the fabric. If the fabric is medium-weight or slightly heavier, use mending tape. Cut a piece of tape about 1 inch wider and 1 inch longer than the tear, and round off the corners.

Lay the piece to be mended on an ironing board so that the torn portion faces up, wrong side up. If it's hard to lay out the item so that the edges of the tear stay together, make a large temporary patch of either fabric or heavy brown paper, and baste it lightly to the side of the fabric opposite the side where the mending tape will be attached. Be sure the basting threads are far enough from the tear so they won't be caught by the mending tape.

Lay the mending tape, adhesive side down, over the tear. Position it carefully; then use tailors' chalk or a pencil to mark around it at several points. Take it off temporarily and preheat the torn area by ironing it briefly.

Replace the mending tape over the tear inside your markings. Iron it down according to the directions on the mending tape package; make sure the tape is completely bonded to the fabric. Let the patch cool completely before moving the mended item. If you used a basted fabric or paper holding patch, remove it when the item is completely cool.

Sometimes the edges of a tear can't be brought together neatly because some of the fabric is missing or is so badly damaged it has to be cut away. When this happens, use iron-on or fabric patches, or hide the damage with decorative appliqués or patch pockets. Zigzag machine stitching is ideal for either patching or appliqué.

When a lightweight fabric needs mending -- a torn curtain, for example -- iron-on tape is sometimes too stiff or heavy. For such light fabrics, hand or machine stitching makes a more flexible mend.

To repair a straight or L-shaped tear by machine, set the machine for a straight stitch, with about 10 to 12 stitches to the inch. Lay the piece under the presser foot so that the tear runs crosswise in front of you and the left-hand end of it is 1/2 inch to the right of the presser foot. Put the needle and the presser foot down on the fabric and sew in a zigzag pattern back and forth across the tear, switching the machine from forward to reverse and back again, pull the fabric gently with your left hand to keep it moving slowly from right to left under the presser foot. The mended tear should be held together by even zigzag rows of straight stitching, making a very strong but usually conspicuous mend.

Where the mend can't be obvious, hand stitching can be made much less visible. Use a fine sewing needle (size 8 or 9) and fine thread; make tiny stitches back and forth across the tear. If the tear is very long or the fabric difficult to hold, you may need to keep the edges in place while you work by basting the fabric to a piece of white tissue paper. Work back-and-forth rows of stitching through both fabric and tissue; sponge the tissue lightly to soften it, if necessary. Then carefully tear the paper away and remove the basting thread.

Repairing a sweater is a bit different from mending other types of clothing. For the lowdown on sweater repairs, read on.

How to Mend a Sweater

To mend a horizontal ravel, weave the edges together; loop the yarn through each knitted stitch.

Hand-knit sweaters and most sweaters made to look hand-knit can be mended quite smoothly when they've been badly frayed or snagged. Many good sweaters are even sold with a bobbin of yarn attached. Test for needle sizes by slipping needles into the existing stitches -- the body is usually knitted on a needle that is a size or two larger than the cuffs.

Tools: yarn needle, straight knitting needles sized for the sweater cuffs or body, sharp scissors, crochet hook sized for the yarn.

Advertisement

Materials: matching yarn of the same color, weight, and type as that used for the sweater (acrylic, wool, etc.).

Time: 1 to 2 hours.

When one thread in a sweater is snagged and broken, a horizontal tear opens between two rows of stitches. The tear can be rewoven in a stitch that looks almost like the original. Work with the right side of the sweater toward you, from the right end of the tear. With the point of a yarn needle, pick the two loose ends of broken yarn out far enough back to give you a length that can be tied to a new piece of yarn. Cut a piece of matching yarn about 1 foot long and tie one end of it to the loose end of the old yarn at the right end of the tear. Tie a small knot on the wrong side of the sweater, leaving 1 1/2 inches of yarn on the end to be woven in on the wrong side after the repair is made. Thread the end of the new piece of yarn into the yarn needle.

Starting from the knot, bring the needle up through the first loop or stitch on the bottom edge of the tear, from the wrong side to the right side. Carry the needle across the opening and up through the opposite stitch on the top edge of the tear, from right side to wrong side. Bring the needle from the wrong side to the right side through the next stitch on the top of the tear, then down across to the first stitch on the bottom edge of the tear, from right side to wrong side, so there's one up and one down strand in each loop. Continue, forming a row of loops like the knitted stitches between the two rows of stitches that form the edges of the tear. After the last stitch at the left of the tear is woven, tie the end of the mending yarn to the loose end of the sweater yarn, on the wrong side of the sweater. With a crochet hook, weave the loose ends into stitches on the wrong side of the sweater.

If the neckband or the cuffs are frayed or torn -- sometimes caused by binding off too tightly -- clip the stitching that holds the cuff or band seam, from the outside edge well past the cuff or band. Be careful not to cut into the knitting. Smooth the ribbed part flat and clip the yarn in the bind-off or cast-on row at its edge; pull the edge of the yarn to ravel the ribbing. Ravel the entire ribbed band, rolling the yarn as you go; tie broken ends of yarn together as you go.

With the raveled edge and the right side of the ribbing toward you, pull the yarn to ravel it exactly to the right-hand end of the last row. With a straight knitting needle sized for the sweater cuffs, pick up the loose stitches from the left end, slipping the point of the needle into the right side of each stitch so that all stitches lie evenly in the same direction.

Reknit the cuff or neckband with the raveled yarn, using the same ribbing pattern as the old cuff or band; when you come to a place where the broken ends of yarn were tied together, bring the knot to the wrong side of the sweater as you reknit. Leave enough yarn to bind off loosely so the edge of the ribbing doesn't break again; rebind carefully. The band will probably be two or three rows shorter than it originally was.

If the old yarn is too badly damaged to use, or if matching yarn of the same color, weight, and type (acrylic, wool, etc.) is readily available, reknit the cuff or neckband with new yarn, following the procedure above.

M­ending Sweater Cuffs

The cuffs of hand-knit sweaters and most sweaters made to look like hand-knits can be raveled and reknitted to the proper length. Test for needle sizes by slipping needles into the existing stitches -- the body is usually knitted on a needle that is a size or two larger than the cuffs.

Tools: sharp scissors, straight knitting needles sized for the sweater cuffs and body, yarn needle, steam iron and ironing board, pressing cloth.

Materials: matching or coordinating yarn for lengthening, of the same weight and type as that used for the sweater (acrylic, wool, etc.).

Time: about 2 to 3 hours.

With a sharp scissors, clip the stitching that holds the sleeve’s underarm seam together, from the bottom of the cuff well up into the sleeve. Be careful not to cut into the knitting. Smooth the cuff out to lie flat. Clip the yarn in the bind-off or cast-on row at the lower edge of the cuff and pull the end of the yarn to ravel the cuff, rolling the yarn into a ball as you go.

To shorten the sleeve, ravel the desired length into the sleeve above the cuff -- ravel 1 inch into the sleeve for every 1 inch you want to shorten it. With the raveled edge upward and the right side of the sleeve toward you, pull the yarn to ravel it exactly to the right-hand end of the last row. With a straight knitting needle sized for the sweater cuffs, pick up the loose stitches from the left end. Slip the point of the needle into the right side of each stitch so that all stitches lie evenly in the same direction on the needle, and no stitches are twisted.

Use the raveled yarn to reknit the cuff in the original ribbing pattern. When the cuff is the same length that it was at first, bind it off in a ribbing pattern. Resew the underarm seam, using the leftover raveled yarn and a yarn needle. After reknitting with raveled yarn, steam the area with a steam iron and a pressing cloth to blend the reknitted part into the rest of the sweater.

Lengthening poses more of a problem unless you knitted the sweater yourself and you still have leftover yarn. If not, try to get the same weight and type of yarn (acrylic, wool, etc.) in a matching or nicely coordinating or contrasting color. Clip the sleeve seam and ravel the cuff from the bottom as above. At the end of the cuff, pick up the sleeve stitches on a straight knitting needle sized for the sweater body, and reknit the sleeve as long as you want it with the yarn raveled from the cuff. Use the new yarn for the ribbed cuff so that if the match isn’t exact, it won’t be as obvious.

If you’re using yarn that’s a coordinating or contrasting color, make it work for you decoratively. Ravel the sleeve back a little further than necessary and knit several bands or horizontal stripes of the new color; or knit in any decorative pattern you like. You may want to lengthen the body of the sweater the same way; if you do this, knit in matching stripes on the body. Bind the new cuff off in a ribbing pattern and resew the underarm seam; press with a steam iron and a pressing cloth.

Whether it's your old sweater or an old suit you just bought from a secondhand store, you can breathe new life into old clothes using the practical tips on the next page.

How to Fix Thrift-Store Clothing

It's always fun to get a bargain, whether it's a designer suit from a rummage sale or something from the "final marked down" rack. Make it live up to its name with a little basic rehabilitation.

Tools: sharp scissors, sewing needle, seam ripper, steam iron and ironing board, straight pins, sewing machine.

Advertisement

Materials: thread, buttons, seam binding, bias tape, grosgrain ribbon; accessory belt, scarf or collar; trimmings as desired.

Time: 15 minutes to a few hours, depending on project.

The first step is to make the garment fit properly. Shorten or lengthen hems to fit; take in or let out the waist; make any repairs necessary. Use a basic sewing book for specific instructions.

If long sleeves are too short or the cuffs are damaged, convert them to short sleeves, either the roll-up type or plain short hemmed sleeves. Cut the sleeves off just above the cuff opening, hem them narrowly, and roll them up if desired. Wear shortened-sleeve garments layered over a shirt or over a light sweater if the fabric is more suited to cool weather.

Major surgery usually isn't worthwhile, especially on tailored pants or jackets. But it may be worth your time to remake the skirt of a very good suit. Skirts usually get harder wear than jackets: if the skirt fabric looks more worn or shabby than the jacket, take a good look at the wrong side -- many woolens are completely reversible. If the fabric is reversible pick out all the seams and darts with a seam ripper and steam-press the fabric, especially along the seams and hems. Remake the skirt inside out, with the less worn side of the fabric showing; fit it exactly to your size.

If the waistband of a good skirt is very worn or it's too small to let out to fit, take the band off completely, and adjust the darts or gathers that control the waist size. Make a new band of a double layer of 1-inch-wide grosgrain ribbon. Slip the skirt fabric between the layers of the ribbon to form a new waistband.

Even clothes that don't need altering can usually use some help. The usual problem with bargain clothes is the buttons or the belt -- they're missing, they've worn out or changed color, or they were a bad choice originally. Buttons can rarely be matched; if even one is missing, cut them all off and replace them. Take the garment with you when you buy new buttons so you can see the finished effect. If the belt is lost or worn out, you'll probably have to get a coordinating or contrasting one rather than a perfect match. Make it work with another accessory of the same color -- a scarf, a pin, whatever you like. Take the garment with you when you shop.

If a collar is wilted-looking or a neckline unbecoming, add a scarf, a white or neutral embroidered or lace collar, a ruffle; or cut the collar off. Bind the neckline with grosgrain ribbon, seam binding, bias tape, or any trim you like, or use the old collar as a pattern to cut a new one, with any fabric or trim you like.

The trimmings and decorations on bargain clothes may not suit your taste. Look at them carefully in a good light to see whether they can be removed completely without leaving a mark. If a braid or edge trimming doesn't seem up to the quality of the rest of the garment, examine it well to see if it can be removed; if so, remove it carefully and replace it with a better braid or edging, or one in a color more to your liking. Sew the new trimmings on by hand.

The width of men's ties has changed drastically throughout the years. Fortunately, you can easily update an old, wide tie by following the steps in the next section.

How to Slim a Tie

Open the tie and baste the layers of fabric together. Then measure the desired width and baste to mark the new fold lines.

Old super-wide ties are decidedly outdated, but they can be saved. To give an old tie new style, remodel it to the standard width.

Tools: scissors, seam ripper, sewing needle, tailors' chalk or pencil, straightedge, steam iron and ironing board.

Advertisement

Materials: thread.

Time: about 1 hour.

The standard width for neckties is currently 3 1/2 inches at the wide end; to be in style, a tie shouldn't vary from this standard more than 1/2 inch either way. To narrow a super-wide tie, recut it to the standard width.

First remove the label on the back of the tie. Carefully open the seam at the wide end of the tie to about half the length of the tie. Spread the tie open on a flat surface.

Inside the tie, a piece of lining is attached to each end; the wide end is lined for about 6 to 8 inches and the short end for about 4 inches. Inside the lining is a separate interlining that runs almost the entire length of the tie. All three layers of the tie must be adjusted.

Thread a needle with a contrasting thread and make large basting stitches down the center of the tie to hold the interlining in place temporarily. Turn the tie over. On the outside of the wide end of the tie, measure the width you want the tie to be. Mark this width on each side of the tie with a short length of basting thread; stitch only through the tie fabric, not into the lining.

Press the new fold lines and fold the sides of the tie together; where they meet, mark the new side seams.

Turn the wide end of the tie inside out, so that the lining and the end of the tie form a bag with the side seams on the outside. Lay the tie out flat again, with the interlining up and the inside-out lining underneath. With a long straightedge and tailors' chalk or a pencil, mark a straight line along the length of the tie from each basted edge line, to mark the new width of the tie. Taper the line on each side of the tie to run from the basted edge line at the end to blend into the original fold line toward the middle of the tie. Most of this line will fall on the interlining.

Carefully cut the interlining along the marked lines to remove excess width; do not cut the tie fabric. Turn the end of the tie right side out, so that the lining is on the inside again.

To narrow the tie fabric, fold the long edges of the tie carefully over the narrowed interlining; fold from the basted mark on each side all along the edge of the interlining to the center of the tie. Be careful not to stretch the bias edges of the fabric. Press the edges carefully to crease the tie into its new width.

With the sides of the tie fabric folded over each other, mark both sides of the lining where the fabric sides meet at the middle of the tie. From these points, mark lines upward on the lining along the tie, about 1/8 inch out from the center of the tie, to indicate where the lining will be sewn to the narrowed tie fabric. Unfold the tie and hand-stitch the lining directly to the tie fabric along the marked lines, for the entire 6- to 8-inch length of the lining.

Lay the tie out flat. With a long straightedge, draw a line on each side of the tie fabric to mark the new edge, from 3/8 inch outside the new lining-fabric seam to meet the old fabric edge at the center of the tie. Carefully cut off the excess tie fabric along the marked lines.

To finish the tie, fold the sides over each other along the new edge creases. Leave the edge of the bottom side raw. On the overlapping side, turn the raw edge under about 1/2 inch, folding both fabric and lining from the end of the tie to the center. Taper the fold to match the old fold at the center of the tie. Carefully press the folded edge flat; make sure you don't stretch the raw edge of the fabric.

Finally, fold the tie together again, with the pressed-under side folded over the raw edge of the other side. Blind-stitch the sides of the tie together along the middle of the tie, using fairly loose stitches; be careful not to stitch through to the front of the tie. Remove the basting threads and replace the label.

So far, we've looked at breathing new life into old or damaged clothing. But what about old or damaged shoes? Next, learn how to revitalize worn shoes by giving them a new sole.

How to Resole Shoes

­

Get more mileage out of your shoes by resoling and reheeling them -- with a little practice, you'll do as well as a shoemaker.

Advertisement

Tools: utility knife, rasp or file, pliers, hammer, screwdriver, vise.

Materials: composition half-soles and heels, flexible shoe-repair contact cement, panel nails.

Time: about 1/2 hour.

­Buy composition half-soles and heels from a shoemaker or at a variety store. New half-soles and heels are available in different sizes; make sure you buy soles or heels roughly the right size for the shoes to be repaired. The old soles on the shoes should be in fair shape, with no large holes or torn sides.

First, clean the soles of the shoes; remove mud, grease, and other debris. If you use water, let the soles dry thoroughly before repairing the shoes.

When the shoes are thoroughly dry, prepare the soles. If the old soles have pulled away from the insoles, cut off the old soles near the heels with a razor knife. The new half-soles will butt against the cut surface. With a file or a rasp, scuff the leather, rubber, or composition soles on the shoes. This provides a little tooth on the sole, ensuring a better bond.

Some shoe soles are self-adhering. If the new half-soles are not self-adhering, coat the old soles and half-soles with flexible shoe-repair contact cement. Let the adhesive set as directed by the manufacturer until it has a dry-looking shine. Then carefully press each new half-sole onto the old sole, making full contact. Be sure to position the half-soles correctly; they can't be moved once adhesive contact has been made.

Put on the shoes and walk around in them for several minutes. This clamps the new half-soles to the old soles.

When the new soles are tightly cemented to the old ones, trim off any overlapping composition material around the soles with a utility knife. Follow the edge of the old soles to guide the knife. Then smooth the cut edges with a file or a rasp, being careful not to scuff the leather of the uppers.

To install new heels on the shoes, pry off the old heels with the tip of a screwdriver. Pull out any protruding nails with pliers. Apply flexible shoe-repair contact cement to the new heels and to the heel surface on the shoes; let it dry as directed and then carefully press the new heel into place. Secure the new heel with 3 to 5 panel nails. Put the heels of the shoes over a closed metal-working vise and drive in the nails with a hammer; space the nails around the perimeter of the heel, about 3/8 inch in. The vise will bend the nails if the nails stick up through the soles of the shoes. Trim and smooth the heels with a utility knife and a rasp or file.

There's no need to discard your old shoes or old clothing. And there's no need to pay for expensive alterations. Just follow the mending tips in this article to give your wardrobe a longer, and better-fitting, life.