School's out, and these summer holiday activities for kids are in! Summer is an exciting time for kids: All of a sudden they've got nothing but free time. The down side, of course, is that quite often kids will run out of things to do pretty quickly.
But don't fret: There's plenty to do, and here are just a few summer holiday activities that kids will love!
Advertisement
So turn off the television and get your kids moving with these summer holiday activities.
This sculptures of ice activity is a fun way for kids to get creative and cool off at the same time!
What You'll Need:
Empty plastic containers or milk cartons
Water
Food coloring
Garbage bags
Fill empty plastic containers or milk cartons with water and add a few drops of food coloring. Freeze overnight. The next day, spread large garbage bags on a picnic table (in the shade!), and put a frozen container on each.
Advertisement
Cut away the containers for your kids, or have them peel the containers off. Now they can sculpt away! Hands and mouths are all it takes to make wild and crazy shapes.
Even the family dog might enjoy cooling off while licking one of these ice sculptures!
No need to wait for the ice cream truck to drive by: The next page shows how to make a cool and tasty treat.
The if it rains game activity is so much fun, kids may not want to wait for the next downpour to play it again!
Don't worry if the sun is hiding on summer solstice -- you can still invite your friends over for a great time. If it rains, that just means there will be lots of umbrellas around to play this fun game.
Advertisement
What You'll Need:
Rubber-tipped child's umbrella
Ping-Pong balls
All kids will need is an open umbrella, set upside down on a bare floor. (A carpeted area will not work for this game.) Each player is given a Ping-Pong ball and must stand 5 feet from the umbrella.
One at a time, players try to bounce their ball once before it lands in the umbrella. A player scores 1 point for each ball that stays without bouncing out again.
Be sure to use an umbrella with rubber-tipped spines so no one gets poked!
Uncle Sam's Hat is red, white, blue, and fun to make! Show your patriotic spirit with a boldly striped and star-spangled Uncle Sam's hat.
What You'll Need:
2 white paper plates, 9 inches wide
Card stock, 12 by 12 inches each of white, red, and blue
White plastic lid, approximately 6-1/2 inches
Scissors
Ruler
Pencil
Craft glue
Cellophane tape and double-stick tape
How to Make an Uncle Sam's Hat:
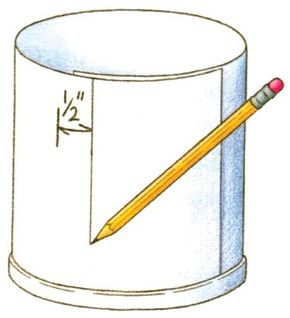
Step 1: Cut the white card stock into two 6 by 12-inch pieces. Glue these pieces together to form one long strip. Bend the strip into a tube shape, and set it inside the rim of the plastic lid (with the lid upside down). Mark the overlap with a pencil, and trim away the excess paper from the end so the paper overlaps itself by about a 1/2 inch. Lay the white paper flat.
Advertisement
Step 2: From the red paper, cut seven 1-1/2 by 6-inch strips and one 1- by 6-inch strip. Glue the 1-1/2-inch strips onto the white piece, creating stripes. (Tip: As you place the red stripes, use another strip as a guide to keep the space between them consistent.) Glue the 1-inch strip on last, at the edge.
Step 3: Place a piece of red card stock on top of the lid; run your finger around the inside rim to make an impression of the circle, and cut this circle out. Glue the red circle onto the top of the lid; let dry. Turn the lid upside down.
Step 4: Re-roll the striped paper into a tube, overlapping the ends; set inside the lid, and glue the overlap closed. Tape it together on the inside as well. Tape the tube to the lid in several places, and run a bead of glue all around the edge. Let dry.
Step 5: Cut a 2-1/2-inch strip of blue card stock to fit around the tube. (If needed, splice two pieces of paper together to make it long enough.) Trace the star pattern onto white card stock six times; cut out. Glue the stars evenly spaced along the blue strip.
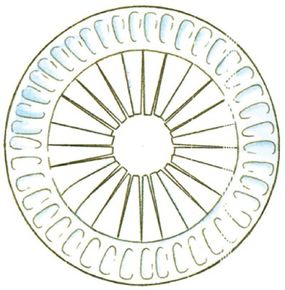
Step 6: Glue two plates together facing the same direction; let dry. With the plates right side up, set the tube in the center, and trace around it. Poke a hole in the center of the plates, and cut a small circle (about 2-inch diameter). Make about 25 cuts around the plate starting at this hole and radiating out to the pencil line.
Step 7: Turn the plate upside down, and center the tube over the inner rim. Fold back the tabs formed in step 6 to the inside of the tube, and glue them in place. Let dry.
Step 8: Wrap the star hat band around the hat; glue in place.
Make a goddess of liberty crown with your kids to celebrate the fourth of July or Juneteeth, the day the Emancipation Proclamation was signed. Be the goddess of liberty at the Juneteenth parade!
How to Make a Goddess of Liberty Crown
What You'll Need:
Construction Paper
Scissors
Glue
Stapler
Markers
Step One: A typical Juneteenth parade often has a queen called the Goddess of Liberty. What does she look like? You decide!
Advertisement
Step Two: Make a crown that shows how wonderful it is to be free. Cut out a 10-inch-high piece of construction paper that will be long enough to fit around your head plus a few inches to staple it closed.
Step Three: Cut long, pointed triangle shapes in the long end of the paper to make a crown shape. Cut 2 different-colored pieces of construction paper the same length and with the same pointed triangle shapes at the top. One piece should be 8 inches high, and the other should be 6 inches high.
Step Four: Glue each piece onto the next largest piece, and staple all the ends together. Now you have a beautiful layered crown.
Step Five: Use markers to write Goddess of Liberty on your crown. Decorate it with pretty designs. Put it on your head, and march proudly in the next Fourth of July or Juneteenth parade!
The statue on top of the Capitol Dome in Texas is called the Goddess of Liberty. She holds a sword in her right hand and a gilded star in her left, which she holds up to the sky. The Goddess stands 15 feet, 7 inches tall, which makes the Texas Capitol taller than the U.S. Capitol.
Advertisement
Cite This!
Please copy/paste the following text to properly cite this HowStuffWorks.com article: