Science Experiments for Kids

Testing look-alike liquids
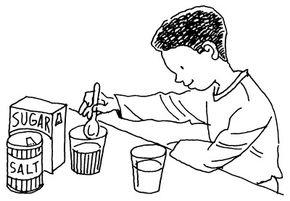
See how look-alikes salt and sugar act differently.
©2007, Publications International, Ltd.

Science experiments for kids explain everyday mysteries like what causes rain, answer questions about form and function, and simplify concepts like symmetry and capillary action. They're fun, they're fascinating, and they're a great way to spend time indoors on a cold or rainy day.

Forget beakers and Bunsen burners, exploding chemicals and complex instructions. These science experiments are safe and simple, relying on materials that you have at home. Follow the step-by-step instructions with your junior scientists, and you'll learn together. Who knows? Maybe it will be the start of a lifetime fascination with how stuff works and why.

Advertisement

Follow the links below to learn how to conduct simple science experiments:

Capturing Leaf Vapor

Measure water vapor from a leaf to see if leaves breathe.

Look-Alike Tests for Salt and Sugar

Try some tests to see how these two compounds act differently.

Reverse Garden

Plant garbage instead of seeds, and find out what biodegradable means.

Make Crystal Creations

Add a sparkling crystal coat to decorations and paper sculptures.

Liquid Density Test

Try this test to see if all objects of the same size have the same density.

Water on the Move

Construct an experiment that will demonstrate how water moves through tiny spaces in fiber.

Mirrors and Reflections

Learn more about mirrors and the reflections they cast.

Magnet Making

Magnetize an ordinary nail by rubbing it with a magnet.

Balance and Gravity Test

Turn science into magic and art with this balancing clown.

Ocean in a Bottle

Combine oil and water for an experiment and a decorative display.

Expanding Hot Air

Heat the air in a balloon, and watch it expand.

Indoor Rain

Create a little rain in a jar to understand how rain works outdoors.

Stalactites and Stalagmites

Forget waiting thousands of years -- grow your own in a few days.

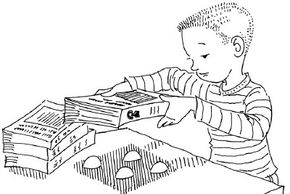
Super-Strong Eggshell Arcs

See how many phone books these little shells can support.

Do leaves really "breathe?" Look on the next page to see how you can capture leaf vapor and find out.

For more science experiments and other fun activities and crafts, check out:

Advertisement
Capturing Leaf Vapor

Capturing leaf vapor can help answer kids the question, "Do leaves actually breathe?" This science experiment for kids focuses on measuring the amount of water vapor that a leaf releases into the air in a week.

Trees drink water through their roots and send it up to all parts of the tree. Leaves use the water they need and "breathe" out the excess in the form of water vapor. This experiment uses a plastic bag to catch and measure the vapor from a leaf.

Advertisement

What You'll Need:
  • Plastic sandwich bag
  • Twist tie
  • Small pebble
  • Measuring spoon

Step 1: On a warm, sunny summer day, put a pebble in a plastic bag and place the bag over a tree leaf that gets a lot of sun.

Step 2: Secure the bag over the leaf with a twist tie.

Step 3: After a few hours, return to observe the leaf. You will begin to see moisture collecting inside the bag.

Step 4: Leave the bag on the leaf for a week.

Step 5: After a week, take the bag off and carefully measure the water inside with a measuring spoon. This will tell you how much water vapor your leaf has produced in a week's time. (A small leaf will produce approximately 1/4 teaspoon of water in a sunny week.)

Salt and sugar look alike, but they are different in a lot of ways. Go to the next page for look-alike tests for salt and sugar that you can do to identify how their molecules act differently.

For more science experiments and other fun activities and crafts, check out:

Advertisement
Look-Alike Tests for Salt and Sugar

Testing look-alike liquids
Tests show how salt and sugar act differently.
©2007, Publications International, Ltd.

Salt and sugar look alike, but they sure don't taste the same. Besides taste, how are they different? You can find out by performing several look-alike tests for salt and sugar. These science experiments for kids will show how the molecules in these two substances act differently under different conditions.

With adult supervision, kids can perform a melting test. On their own, they can do a dissolving test and a freezing test. Be sure the work surface is covered when you're doing these experiments.

Advertisement

What You'll Need:
  • Table covering
  • Smocks
  • Salt
  • Frying pan
  • Measuring cups and spoons
  • Sugar
  • Clear plastic cups
  • Water
  • Food coloring
  • Ice cube tray

Melting Test (requires adult help)

Step 1: Place 1/2 teaspoon of salt on one side in a frying pan and 1/2 teaspoon of sugar on the other side. Tap down each pile so it is flattened.

Step 2: Heat the pan slowly for three minutes. Then remove the pan from the heat.

Step 3: Watch and see what happens to the different piles.

Dissolving Test

Step 1: Fill two glasses with 1/2 cup of water each.

Step 2: Add 2 teaspoons of salt to one glass and 2 teaspoons of sugar to the other glass.

Step 3: Add a different color of food coloring (1 drop) to each glass to distinguish the solutions from each other.

Step 4: Let the solutions stand for an hour, and then check for crystal formations. Crystals will form differently in each solution.

Freezing Test

Step 1: Fill two glasses with 1/2 cup of water each.

Step 2: Add 2 teaspoons of salt to the first and 2 teaspoons of sugar to the other.

Step 3: Color each solution a different color with a drop of food coloring.

Step 4: Pour one solution into the cups at one end of an ice cube tray and the other solution into the cups at the other end.

Step 5: Place the tray in the freezer for two hours.

Step 6: After two hours, check to see if the substances have reacted differently to the cold.

Go to the next page to find out how you can plant a reverse garden and learn what biodegradable means.

For more science experiments and other fun activities and crafts, check out:

Advertisement
Reverse Garden

Plant a reverse garden, starting with garbage, and investigate what "biodegradable" means. Instead of planting seeds and bulbs and watching plants and flowers sprout blossoms, bury different kinds of garbage for this science experiment and observe them as they decompose.

What You'll Need:
  • Deep pan
  • Trowel
  • Soil
  • Variety of garbage (apple core, dried leaves, newspaper, plastic foam, old sock, empty can)
  • Watering can or pitcher

Step 1: Fill a deep pan with soil, and bury several kinds of garbage under the soil. For example, plant an apple core, some dried leaves, a crumpled piece of newspaper, a piece of plastic foam, an old sock, and an empty can.

Advertisement

Step 2: Water your garden every couple of days.

Step 3: Dig up the garden after a week, and see what is happening to the items.

Step 4: Rebury your decomposing plantings, and continue to water every couple days.

Step 5: Dig up the garden again, and observe it after two or three more weeks.

Step 6: Replant it one more time, and check it in several more weeks. Note what changes -- and how -- and what does not.

You may want to keep a journal and make sketches each time you unearth your garden for observation. (Be sure to wash your hands or wear disposable gloves each time you work in your reverse garden.)

Look on the next page to find out how you can make crystal creations by adding a sparkling crystal coat to decorations and paper sculptures.

For more science experiments and other fun activities and crafts, check out:

Advertisement
Make Crystal Creations

Create Crystal Creatures
Use a crystal solution to add sparkle to decorations.
©2007, Publications International, Ltd.

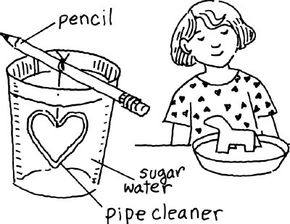
You can make crystal creations as an easy science experiment for kids. Dip decorations and paper sculptures in a crystal solution, and watch them crystallize overnight!

What You'll Need:
  • Waterproof table covering
  • water
  • Saucepan
  • Sugar
  • Plastic cups
  • Chenille stems (pipe cleaners)
  • String
  • Scissors
  • Pencils
  • Food coloring
  • Index cards
  • Epsom salts
  • Alum
  • Permanent markers
  • Pie pan

Step 1: Cover your work surface. Note that an adult needs to help kids throughout this activity.

Advertisement

Step 2: Heat a cup of water until it begins to steam.

Step 3: Remove the cup from heat, and stir in 2 cups of sugar. Then pour the solution into plastic cups.

Step 4: Mold chenille stems into decorative shapes (star, heart, cat, initials).

Step 5: Tie one end of a piece of string to a chenille stem shape and the other end around a pencil. Let the shape sit in the solution by balancing the pencil on the rim of the cup.

Step 6: Leave the shape overnight, and then remove it from the solution and let dry on a paper towel.

Step 7: When dry, the decorations will be covered with shiny crystals. They can be hung in a window, from a shelf, or anywhere!

For larger crystals, allow the chenille stem to soak longer in the solution. For colorful crystals, add food coloring to the crystal solution.

Create crystals of a different texture by using different materials. Follow the same recipe, replacing the sugar with Epsom salts. (Wash your hands after touching Epsom salts.)

Or try adding alum (available at the drugstore) to hot water for a different crystal solution: Ask an adult to heat a cup of water until it steams, pour it into a cup, and stir in alum spoonful by spoonful until no more will dissolve. Then suspend the chenille stem shape in the solution.

To make a crystal sculpture, fold an index card in half. Draw an animal, person, creature, or shape on the card using the edges of the card as the bottom. Cut out the shape.

Pour one of the crystal solutions into a pie pan. Stand the paper shape in the solution, leave it for several days, and watch the crystals grow to cover it!

Do all objects of the same size have the same density? Look on the next page for a liquid density test that can provide the answer.

For more science experiments and other fun activities and crafts, check out:

Advertisement
Liquid Density Test

Liquid Density Test
Compare the densities of liquids and objects.
©2007, Publications International, Ltd.

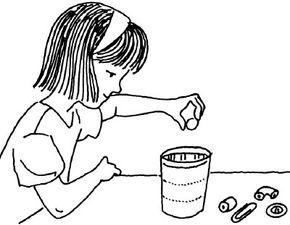
Try a liquid density test to find out whether all objects of the same size have the same density. This science experiment for kids tests the density of small objects by using the density of liquids.

What You'll Need:
  • Clear plastic cup or glass jar
  • Corn syrup
  • Salad oil
  • Water
  • Small objects (paper clips, buttons, macaroni, etc.)

Step 1: Fill a clear cup or jar 1/3 full with corn syrup.

Advertisement

Step 2: Fill the next third of the jar with salad oil.

Step 3: Add water to fill the top third.

Step 4: Drop small objects into the jar, and observe the level where they stop and float.

Objects will float at different levels depending upon their density in relation to the density of the different liquids. If the density of an object is greater than a liquid's density, it will sink through that liquid. If an object's density is less than a liquid's density, it will float on that liquid.

After experimenting a little, choose some new objects to test. Before dropping them in the jar, try predicting the level on which they will float or sink.

Go to the next page to learn about capillary action, or how water moves through the tiny spaces in fiber.

For more science experiments and other fun activities and crafts, check out:

Advertisement
Water on the Move

Water on the Move Experiment
See how water moves through tiny spaces in fiber.
©2007, Publications International, Ltd.

Explore water on the move through the tiny spaces in fiber with this set of science experiments for kids. You'll learn a lot more about the capillary action of water, the name for that type of movement.

What You'll Need:
  • Celery
  • Glasses
  • Water
  • Food coloring
  • Scissors
  • White carnation
  • String
  • Small bowls
  • Paper towel
Experiment 1: Celery

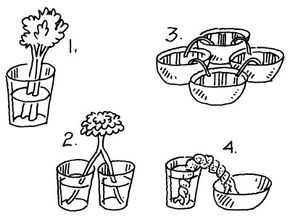
Step 1: To watch water move through plant material, stand a stalk of celery in a glass of water that has been colored with food coloring. (See Illustration 1.)

Advertisement

Step 2: Watch the celery stalk change color as the water travels up the stalk.

Experiment 2: Carnation

If you can get a white carnation, you can create a more dramatic demonstration of capillary action. (See Illustration 2.)

Step 1: Snip the stem of the white carnation to divide it in two.

Step 2: Set each stem section in a separate glass of water colored with a different color of food coloring.

Step 3: Watch the colored water travel up the halves of the carnation stem and mix at the top in the flower.

Experiment 3: String

Step 1: To watch water make its way through a piece of string (see Illustration 3), fill for bowls with water and add a different color of food coloring to each bowl.

Step 2: Cut a piece of string, and dip the end of the string into one of the bowls.

Step 3: Drape the string over the edge of that bowl and over the edge of the next bowl so that it dips slightly into the water in that bowl.

Step 4: Continue until the string touches the water in each bowl.

Step 5: Watch the colored water creep along the string out of the bowls.

Experiment 4: Wick and Bowl

Step 1: For another experiment to give you more experience with capillary action (Illustration 4), fill a glass with water and set it beside an empty bowl.

Step 2: Twist a paper towel around and around to form a wick.

Step 3: Set one end of the towel in the full glass of water and the other end in the empty bowl.

Step 4: Watch the water travel up the towel wick and then drip into the bowl.

Check the science experiment on the next page to learn more about mirrors and how they reflect light.

For more science experiments and other fun activities and crafts, check out:

Advertisement
Mirrors and Reflections

Experiment on Reflections
Test reflections with these mirror experiments.
©2007, Publications International, Ltd.

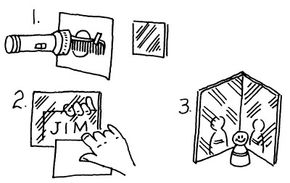
Mirrors and and reflections of light are magical and fascinating. Here are several science experiments for kids that you can perform to discover more about mirrors and the reflections they can produce.

What You'll Need:
  • Cardboard
  • Comb
  • Tape
  • Flashlight
  • Paper
  • Pencil
  • Mirror
  • 2 small rectangular mirrors
  • Small object
Experiment 1: Reflecting Angle

Step 1: Cut a 1-inch hole in a piece of cardboard.

Advertisement

Step 2: Tape a comb over the hole.

Step 3: Hold the cardboard upright in a darkened room, and set the flashlight behind it so it shines through the hole.

Step 4: Hold a mirror in front of the hole to capture the reflection.

Step 5: Turn the mirror to investigate how it reflects light at exactly the same angle as the light hits the mirror.

Experiment 2: Reflected Writing

Step 1: Write something backward on a piece of paper.

Step 2: Hold the paper in front of a mirror. Your backward message will read forward in the mirror!

Experiment 3: Dual Reflections

Step 1: Tape two small mirrors together on one side to form a right angle.

Step 2: Set the mirrors on their sides, and place a small object between them. You will be able to see many sides of the object in the mirrors.

Step 3: Move the mirrors closer together and farther apart and observe what happens to the images.

You can also try placing the mirrors (untaped) facing each other with the object between them to see an endless reflection.

Go to the next page to find out how you can magnetize an ordinary nail by rubbing it with a magnet.

For more science experiments and other fun activities and crafts, check out:

Advertisement
Magnet Making

Magnet making isn't hard at all. As you'll find out in this science experiment for kids, you can magnetize an ordinary nail just by rubbing it with a magnet.

What You'll Need:
  • Steel nail
  • Paper clip
  • Magnet

Step 1: Try picking up a paper clip with an iron or steel nail. What happens?

Advertisement

Step 2: Rub the nail with a magnet 50 to 100 times, always rubbing in the same direction.

Step 3: Try picking up the paper clip again. The atoms in the nail lined up in the same direction when you rubbed it with the magnet. This causes the nail to become magnetized, which means it will act like a magnet.

Step 4: Test your new magnet, and see what small objects it attracts.

Step 5: Try rubbing the nail more with the magnet. Does the nail's magnetism become stronger?

Step 6: Magnetize a paper clip, and test the comparative strength of the two magnets you have made.

Gravity plus symmetry equals balance. That's the equation for the science experiment you'll discover on the next page.

For more science experiments and other fun activities and crafts, check out:

Advertisement
Balance and Gravity Test

Balance and gravity test
Symmetry and gravity create balance for this clown.
©2007, Publications International, Ltd.

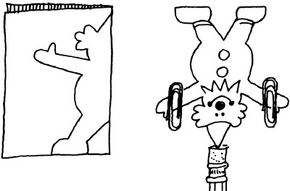
Turn an experiment into a magic trick with this balance and gravity test! Cut out a symmetrical (both sides the same) upside-down clown for this scientific experiment for kids, and watch how symmetry can work with gravity to create balance.

What You'll Need:
  • Large index card
  • Pencil
  • Scissors
  • Markers
  • Paper clips
  • String

Step 1: To make a symmetrical clown, fold an index card in half and draw half of the clown. The fold line in the middle of the card is the middle of the clown.

Advertisement

Step 2: Cut out the clown, and unfold the paper. Decorate.

Step 3: Attach a paper clip to each arm for weight.

Step 4: Try balancing the clown on the eraser tip of a pencil.

Step 5: Then try balancing the clown with just one paper clip on one arm, and see if there is a different effect. Can you figure out the reason for the different results?

To balance your clown on a tightrope, tie a string between two chairs or two legs of a table. Cut a notch in the clown's hat, and set the notch on the taut string.

Keep reading on the next page to find out how you can turn a test of oil and water into an ocean in a bottle.

For more science experiments and other fun activities and crafts, check out:

Advertisement

Ocean in a Bottle

ocean in a bottle experiment
Make an ocean in a bottle with oil and water.
©2007, Publications International, Ltd.

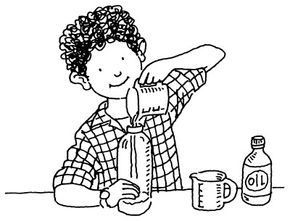
Create an ocean in a bottle by trying a test on oil and water. When you're finished, you can turn this science experiment for kids into a decorative display.

What You'll Need:
  • Funnel
  • Clear soda bottle
  • Water
  • Cooking oil
  • Blue food coloring
  • Glitter

Step 1: Using a funnel, pour 1/2 cup of water and 1/2 cup of oil into a soda bottle.

Step 2: Put the lid on tightly, and shake the bottle vigorously to mix the substances.

Step 3: After shaking, put the bottle down and let it sit for a few minutes. What happens to the oil and water after you mix them?

Step 4: To turn your experiment into an ocean display, remove the top and add enough water to fill the bottle 2/3 full.

Step 5: Add a few drops of food coloring and some glitter, and shake the bottle gently to mix in the color.

Step 6: Fill the rest of the bottle almost to the top with oil.

Step 7: Put the top back on tightly, and gently tilt the bottle back and forth to create an ocean wave effect.

Go to the next page to find out how hot air and an expanding balloon go together.

For more science experiments and other fun activities and crafts, check out:

Expanding Hot Air

See how expanding hot air impacts the size of a balloon. Try this science experiment for kids to learn more about expanding gases, including carbon dioxide.

What You'll Need:
  • Bottle
  • Pan
  • Hot water
  • Balloon
  • Baking soda
  • Vinegar
Experiment 1: Hot Air

Step 1: Stretch the end of a balloon over the top of a bottle.

Step 2: Set the bottle in a pan of hot water.

After a few minutes, the heat will cause the air in the balloon to expand, making the balloon begin to blow up. This happens because the hot water heats up the air inside the bottle. The warmed air expands, filling up more space inside the balloon.

Experiment 2: Carbon Dioxide GasYou can also inflate a balloon slightly by making carbon dioxide gas.

Step 1: Put a cupful of water into an empty soda bottle.

Step 2: Add a spoonful of baking soda.

Step 3: Pour in a little bit of vinegar, and quickly put a balloon over the bottle top. You can tell carbon dioxide has been created when you see the balloon expand slightly.

Have you ever wondered how rain forms in the sky? Go to the next page to make a little rain indoors in a jar and find out more about it.

For more science experiments and other fun activities and crafts, check out:

Indoor Rain

You can create a little indoor rain in a jar with this science experiment for kids. Create indoor rain with warm, moist air that rises up and hits colder air above it.

What You'll Need:
  • Jar with lid
  • Hot water
  • Ice cubes

Step 1: Put a small amount of hot tap water in the jar.

Step 2: Place the lid upside down on top of the jar.

Step 3: Put several ice cubes inside the lid.

You will be able to observe moisture forming on the lid top inside the jar, and soon you'll see the moisture drip down like rain. Warm air can hold more moisture than cold air. When warm air in the sky hits cold air higher up, it condenses, turns into water vapor, and rains!

Why wait thousands of years for stalactites and stalagmites to form? Go to the next page to find out how you can grow them in just a few days.

For more science experiments and other fun activities and crafts, check out:

Stalactites and Stalagmites

Stalactite or stalagmite experiment
Make your own stalactites and stalagmites.
©2007, Publications International, Ltd.

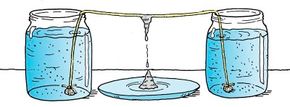
Stalactites and stalagmites grow in caves both above and underneath the ground. That process takes thousands of years, but why wait so long? With this science experiment for kids, you can make your own small 'tites and 'mites within a few days.

What You'll Need:
  • Two jars
  • Water
  • Epsom salts
  • String
  • Small weights
  • Plate

Step 1: Fill two jars with warm water.

Step 2: Mix in Epsom salts until no more will dissolve.

Step 3: Wet a piece of string, and tie a weight to each end.

Step 4: Drop one end of the string into each jar.

Step 5: Put a plate between the two jars, with the string hanging over the plate.

Step 6: Check your "cave" at least once a day to see if stalactites and stalagmites have formed.

By the way, if you're wondering which are which, try this rule: Stalactites have to hold on tight to stay on the ceiling of the cave. Stalagmites have to be mighty to stand up on the floor of the cave. Or looking at it another way, stalactites with a "c" grow down from the ceiling while stalagmites with a "g" grow up from the ground.

Eggshells are stronger than you think. Look on the next page for an experiment that shows how many phone books eggshell arcs can hold up.

For more science experiments and other fun activities and crafts, check out:

Super-Strong Eggshell Arches

Eggshell strength experiment
Eggshells can be super-strong arches.
©2007, Publications International, Ltd.

Super-strong eggshell arches can hold up a lot more than you think. Even made of eggshells, arches are strong because they exert horizontal as well as vertical force to resist the pressure of heavy loads. Hard to believe? Try it for yourself with this science experiment for kids.

What You'll Need:
  • Four eggs
  • Transparent tape
  • Scissors
  • Telephone books

Step 1: Carefully break off the small ends of the four eggs, and pour out the insides.

Step 2: Wind a piece of transparent tape around the center of each eggshell.

Step 3: Cut through the center of the tape to make four dome-shaped shells. Throw away the broken end of each shell.

Step 4: Lay the four domes on a table, cut sides down, arranged in the shape of a square.

Step 5: Guess how many telephone books you can lay on top of the shells before they break -- and then try it. You'll be surprised how many books the shells can hold!

For more science experiments and other fun activities and crafts, check out:

Advertisement

Loading...