Camping Safety Tips for Kids

how to use a compass
Campers who know how to use a compass are less likely to be lost.
2007 Publications International, Ltd.

While out in the wilderness, it's important for everyone to know camping safety tips for kids. It's especially vital in case one of the kids in your party becomes lost -- knowing helpful tips on what to pack in a "get found" kit and how to leave trail markers will come in handy.

But being away from home doesn't mean having to fear the wilderness. It's just that much more important to be extra careful and follow basic safety tips. That way there will definitely be another camping trip in the future.

Advertisement

Follow the links below to learn how to teach camping safety tips for kids:

Know Your Poisons

When camping, be sure to recognize which plants are poisonous.

The Comforts of Home -- Outdoors

Being away from home doesn't have to mean being uncomfortable.

How to Get Found

Utilizing items in a "get found" kit will help lost campers get found sooner.

How to Use a Compass

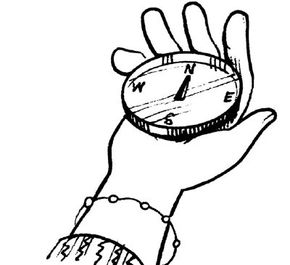
For hiking or the hopelessly lost, knowing how to use a compass will always come in handy.

Leave It Alone

Create leaf rubbings or flower drawings to capture the natural wildlife.

Trail Markers

While out hiking, leave behind natural trail markers for others to follow.

Keep reading to learn how to recognize poisonous plants while camping.

For more super summer crafts and activities for kids, check out:

Advertisement

Know Your Poisons

Know your poisons and learn to recognize plants that will give you a rash if touched.

What You'll Need:

  • Garden gloves
  • Drawings or photos of poisonous plants
  • Poster board or large construction paper
  • Home medical book
  • Construction paper
  • Safe scissors
  • Glue

How to Know Your Poisons:

Step 1: Before hiking in the woods, be sure to know what plants have oils that can cause itchy rashes. Help fellow hikers by knowing how to recognize the following plants:

Advertisement

  • Poison ivy has three pointed, shiny leaflets; in the summer, poison ivy may have white berries. Found over most of the United States, ivy may cross with poison oak where the two plants are found near each other.
  • Poison oak is like poison ivy, but the leaves are more rounded and resemble the leaves of a white oak. The plant may be a shrub or a tree-climbing vine. Found mostly on the West Coast, usually in forests and on sunny, dry slopes. It's also found in disturbed places.
  • Poison sumac has seven to nine pointed leaflets. The leaves are shiny and it, too, may have white berries. Found mostly in the eastern United States.

Step 2: If poisonous plants live in your area, find a specimen in the wild. Always wear garden gloves.

Step 3: Photograph or draw it as accurately as possible. Use a home medical guide to learn proper treatment for contact with poisonous plants.

Step 4: Make a poster with this information using cut-out letters from construction paper.

Keep reading to learn how to bring the necessities of home to the outdoors.

For more super summer crafts and activities for kids, check out:

Advertisement

The Comforts of Home -- Outdoors

Going camping doesn't have to mean completely leaving civilization behind. Bring the comforts of home outdoors while out in the wild -- without harming the environment.

What You'll Need:

  • Shovel
  • Biodegradable toilet paper (from a camping supplier)
  • Plastic garbage bags
  • Biodegradable soap (from a camping supplier)
  • Bandanna

How to Make the Comforts of Home -- Outdoors:

Step 1: To make a one-day LATRINE, scoop a shallow "cat hole" in the dirt with your heel for solid waste and urine. Bury the waste when business is complete. Never use waterways as toilets.

Advertisement

Step 2: For overnight camping, dig a latrine (around ten inches deep) behind some bushes away from camp. Leave dirt and a trowel or shovel by the latrine to cover waste immediately. Keep biodegradable toilet paper in a waterproof container.

Step 3: To make a GARBAGE DISPOSAL, burn fruit peels and plate scrapings in a campfire (if one is available).

Step 4: Put other trash in plastic bags and suspend them from tree limbs. Take them along when the trip is over. Don't bury garbage, or animals will dig it up later.

Step 5: For DISH WASHING, wipe the pot out with a paper towel and burn the towel in your campfire (or put it in your garbage bag to throw out).

Step 6: Fill the pot with water and heat it. Add a drop of biodegradable soap. Let the water boil, then remove the pot. Let it cool, then swish the pot clean with a bandanna.

Step 7: Dig a shallow hole outside of camp to dump the soapy water into. Don't dump soapy or dirty water into streams, lakes, or rivers.

Keep reading to learn how to get found when lost in the wilderness.

For more super summer crafts and activities for kids, check out:

Advertisement

How to Get Found

how to get found
When heading out into the wilderness, make sure to carry a whistle to attract attention.
2007 Publications International, Ltd.

Getting lost in the woods is scary, and is generally a good thing to avoid. But if it happens, make sure to learn how to get found, and to teach kids the same. Create a game plan and stick to it, and carry a "get found" kit at all times.

Common sense can prevent getting lost outdoors, and can get lost campers and hikers found more quickly. Make especially sure that any children in the camping party know the get found techniques outlined here.

Advertisement

What You'll Need:

  • Aluminum foil
  • Map
  • Waterproof carrying bag
  • Large plastic garbage bag
  • Mylar emergency blanket
  • Whistle
  • Extra sweater or jacket
  • Unbreakable mirror
  • Granola bars
  • Water bottle
  • Compass

How to Get Found:

Step 1: Before leaving on an outdoors excursion, press aluminum foil against the soles of everyone's hiking shoes to make impressions of the tread. Search parties use impressions like these to find a missing person's footprints.

Step 2: Study a map of the hiking or camping area and learn the route. Give a copy of the map and a schedule to someone at home.

Step 3: Make a "get found" kit to carry in a waterproof bag. Include a large plastic garbage bag with a ten-inch hole in one corner, a mylar emergency blanket, a whistle, an extra sweater or jacket, an unbreakable mirror, granola bars, and extra water.

Step 4: Keep a map and compass in hand or in a convenient pocket. Check the map frequently, keep the group together at all times, and ALWAYS stay on the trail. When camping, make sure kids don't wander from the campsite.

Step 5: If you get lost, stay calm, stay in one place, and let rescuers find you. Establish a base camp. Choose a tree and stay close to it. Blow the whistle from the get found kit often, and flash the mirror in all directions to attract attention.

Step 6: If it's cold, put on the extra sweater or jacket. Sit by a tree and pull the garbage bag over your head. (Your face should stick out of the ten-inch hole in one corner.) Wrap the blanket around for extra warmth and visibility. Blow that whistle.

Step 7: If campers become cold they should move around, but stay near the tree, which can be a windbreak. If it rains, stay dry in the trash bag.

A compass can help rescuers find lost campers. Keep reading to learn how to use a compass to get found.

For more super summer crafts and activities for kids, check out:

Advertisement

How to Use a Compass

how to use a compass
Campers that know how to use a compass are much less likely to get lost.
2007 Publications International, Ltd.

Learning how to use a compass and a map reduces the chances of getting lost in the wilderness.

What You'll Need:

  • Orienteering-style compass with degree markings (such as a Silva compass)
  • Map of your local area or area of interest

How to Use a Compass:

Step 1: To align a compass, read the directions for the compass and learn which end of the needle points north.

Advertisement

Step 2: Turn the compass until the north arrow on the compass's face is aligned with the north end of the pointer. You are now aligned "north." Observe the letters on the compass: N is north, E is east, S is south, W is west.Northeast, southeast, southwest, and northwest will also be present.

Step 3: Next, look at the numbers. These are degrees, another form of measuring compass direction.

Step 4: Turn and face any direction. Hold one hand out flat and place the compass on your palm. Point the arrow on the baseplate in the direction you're facing.

Step 5: Turn the dial on the compass until the north-facing arrow is aligned with the pointer. Now read the degree mark that the index line crosses. This is your direction in degrees.

Step 6: To find your bearing, place the map on the ground and find where you want to start and end. Place the compass so that it matches both points. Turn the dial until "north" points the same direction as the north indicator on the map. The index on the baseplate should now line up with the correct bearing on the dial. Turn the compass in the correct direction.

Show kids how to take a little bit of nature home without removing anything from the natural world. Learn how on the next page.

For more super summer crafts and activities for kids, check out:

Advertisement

Leave It Alone

The beauty of the natural world draws a constant flow of visitors. While it seems like a nice idea to bring souvenirs home from an outdoors vacation, doing so can be disruptive to the environment -- it's important that kids and adults alike know to leave it alone.

Don't worry, though: There are plenty of ways to keep mementos of your wilderness trip without disrupting a thing.

Advertisement

What You'll Need:

  • Hard surface (book, cardboard, magazine)
  • White paper
  • Crayons (some with the paper peeled away)

How to Leave It Alone:

Step 1: When you see a leaf, gently press it between a hard surface (like a piece of cardboard or a book) and a plain piece of white paper.

Step 2: Take a crayon with the paper peeled away and lay it on its side on the surface of the paper. Rub gently across the paper and leaf. Before you know it, you'll have a "copy" of the ridges and textures of that special leaf.

Step 3: Flowers don't hold up well to rubbings, but you can take the time to sketch a picture of the blossoms you see. Be sure to make notes about where you saw the flower and what made it special to you.

Hiking kids can leave markers along a trail for others to follow. Learn to teach them how on the next page.

For more super summer crafts and activities for kids, check out:

Advertisement

Trail Markers

When going on a hike, kids can lay a trail for others to follow using natural trail markers.

What You'll Need:

  • Available natural materials such as sticks, rocks, and grass

How to Create Trail Markers:

Step 1: Trail markers can come from any natural material -- sticks, bunches of grass, or rocks. If one hiking group heads down the trail before the others, the lead group can leave markers to show which fork in the trail to take.

Advertisement

Step 2: To play a trail marker game, have one person or group lay out a trail for the rest of the group. The trail shouldn't be complex, nor should markers be hidden. The person laying the trail uses different types of markers. The person or group following must walk the trail without using maps or diagrams. Use this game to practice memorizing and spotting skills.

For more super summer crafts and activities for kids, check out:

Advertisement

Advertisement

Loading...