Camera Activities for Kids

Picture Perfect
Photographs in become a record of your life in the Picture-Perfect Progress activity.
©2007 Publications International, Ltd.

Camera activities for kids are a terrific way to introduce kids to the fascinating world of photography. Digital cameras, disposable cameras, camera phones, "old-fashioned" film cameras -- the list of ways to take pictures seems almost endless. Snapping photographs has become a commonplace activity, even for kids.

It may seem as if cameras, in one form or another, have been around forever, but in a larger, historical sense, the camera is a relative newcomer -- it wasn't until the early 1800s that the first photographic pictures were taken.

Advertisement

The original concept of the camera, though, dates back to ancient Greece. This early "camera" was actually a large box that a viewer often stood inside. A small hole in one side of the box allowed light to form the shadow of a scene on one of the camera's walls; an artist then traced the image to make a picture. Haven't we come a long way since then?

The following activities offer a variety of ways to use your "photo sense," whether by taking pictures or studying and talking about them.

Picture Perfect

Make a photographic record of your day-to-day activities and share it with your family. See how to get started.

Picture-Perfect Progress

Want to see how much you've changed over the years? You'll have photographic evidence with this activity. Learn more about it.

Fuzzy Photos

Fuzzy photos aren't always a bad thing -- it's a special look that you can learn to create. Find out how.

Ghost Pictures

Your friends may believe they've really seen a ghost when you show them your ghost pictures. Learn how to create these special shots.

Pinhole Camera

This "camera" doesn't really take pictures, but you'll learn something from it about the human eye. Find out more.

Start having fun with camera activities by taking pictures of your life and your loves. Keep reading to find out more.

For more fun activities and crafts, check out:

Advertisement

Picture Perfect

Photo and Camera Activities
Capture your life and your loves in pictures.
©2007 Publications International, Ltd.

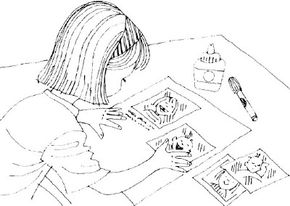
Show friends and family that life is "picture perfect"! Capturing your child's day-to-day activities, special events, and favorite things in pictures is great way to record the things that happen in life.

Your child will need a camera for this activity.

Advertisement

What You'll Need:

  • Camera
  • Poster board
  • Glue
  • Markers
  • Pen
  • Index cards (optional)
  • Photo album (optional)

How to Create an Album that's Picture Perfect:

Step 1: Encourage your child to tell the story of his or her life by using photographs. Are they messy? Take a picture of their room. Do they love animals? Take a picture of a favorite cat. Make every picture count.

Step 2: After the pictures are developed, mount them on poster board with glue.

Step 2: Write a few words under each picture describing the photo and why it was taken. Or write your captions on index cards and arrange the cards and photos in a photo album.

Another "picture perfect" activity can show you how much your child has changed -- or stayed the same. Keep reading to learn more about it.

For more fun activities and crafts, check out:

Advertisement

Picture-Perfect Progress

Picture Perfect
How much has your child changed? Track his or her picture-perfect progress.
©2007 Publications International, Ltd.

The picture-perfect progress camera activity for kids will create a photo journal of your child's life. Most of us wonder what our children will look like as they grow up, grow older, or even grow old. This camera activity for kids records everything.

Find old photographs of your kids or make copies of those photos. Which ones should you use? How about the pictures taken at the hospital on the day they were born? How about a photo showing their smiles after they lost their first teeth? How about one that shows how their dark hair was once much lighter? Select photos that show how they've changed and stayed the same.

Advertisement

What You'll Need:

  • Old photos
  • Copy machine (optional)
  • White glue
  • Blank paper
  • Pen

How to Show Your Picture-Perfect Progress:

Step 1: Arrange the photographs that you've chosen on a blank page of paper.

Step 2: Write a caption under each shot.

Step 3: Now study those photos. Close your eyes, and look to the future. You might get a better idea of just what's to come.

Step 4: Now have your child draw a picture of what they think they'll look like in the coming years. Keep this portrait someplace safe so you can look at it later to check its accuracy.

Were there any fuzzy photographs in the photo journal? "Fuzzy" isn't always bad. Learn more about this special photographic effect on the next page.

For more fun activities and crafts, check out:

Advertisement

Fuzzy Photos

You might think that fuzzy photos happen by mistake, but as you'll see with this activity, it's fun to make them look that way on purpose. In this activity, learn to create fuzzy photos by using a special effect that's similar to the one used by movie-makers. It works by putting something over the camera lens.

What You'll Need:

  • Heavy-duty plastic wrap
  • Camera
  • Petroleum jelly
  • Color or black-and-white film (if your camera is not digital)

How to Make Fuzzy Photos:

Step 1: Stretch a piece of heavy-duty plastic wrap over the lens of your camera. Try to make the plastic wrap as smooth as possible without any wrinkles.

Advertisement

Step 2: Lightly rub a very thin coating of petroleum jelly over the plastic wrap.

Step 3: Take some pictures of different objects and people.

This technique will make your photos look soft and fuzzy. Once the photos are developed (or when you view them, if your camera is digital), you'll notice the special effect.

Another interesting photographic effect may have people thinking they've seen a ghost. Keep reading to learn how to create it.

For more fun activities and crafts, check out:

Advertisement

Ghost Pictures

ghost pictures
Your friends will think they've seen a ghost when they look at your photo!
©2007 Publications International, Ltd.

Make ghost pictures with a little clever trickery! The camera will "see" things that aren't really there, so it will look as if you've actually captured the image of a ghost.

This activity works best if you take the picture with a camera that uses film, but you can try using a digital camera with a black-and-white setting as well.

Advertisement

What You'll Need:

  • White sheet
  • Flashlight
  • Camera
  • Black-and-white film
  • Markers
  • Construction paper

How to Make Ghost Pictures:

Step 1: Have a friend or family member wear a white sheet. (This is your "ghost"!)

Step 2: Shine a flashlight on the "ghost."

Step 3: Set the camera on the table. Look through the lens and adjust the position of the camera so that the ghost is toward the left in the viewfinder.

Step 4: Set the shutter speed for one second. Now turn off all the lights in the room.

Step 5: Push the camera button to take a picture, then move the camera slightly.

Step 6: Take more ghost pictures. This time instead of moving the camera, tell the "ghost" to move very slowly.

For an extra-special touch, draw a picture of a haunted house, then add the ghostly photos to your picture.

Cameras work in much the same way as your eye views images. Learn more on the next page.

For more fun activities and crafts, check out:

Advertisement

Pinhole Camera

Pinhole Camera
Learn how the eye sees pictures with this pinhole "camera."
©2007 Publications International, Ltd.

This pinhole camera is just for fun -- it doesn't really take pictures -- but when you use it, you'll get an idea of how the human eye works. The retina of the eye is often compared to the film in a camera because the retina "takes pictures" of the things you see and sends those images to your brain.

Although you are unaware of the process, the retina actually sees images in reverse. This camera allows you to see a reverse image inside the camera in the same way that the retina views images.

Advertisement

What You'll Need:

  • Coffee can
  • Nail
  • Hammer
  • Waxed paper
  • Scissors
  • ­Towel

How to Make a Pinhole Camera:

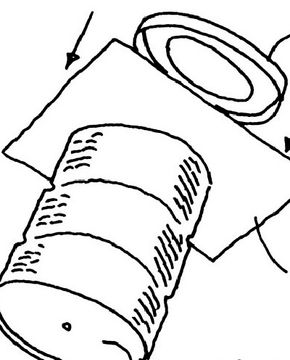
Step 1: Hammer the nail through the middle of the coffee can's bottom. Remove the nail.

Step 2: Cut the center out of the plastic coffee-can lid.

Step 3: Cut a piece of waxed paper, approximately 8x8 inches, and place it over the open end of the can. Secure the waxed paper in place by putting the lid back on top of the can.

Step 4: Drape the towel over your head and the coffee can, making sure the towel covers the end of the can that has the nail hole.

Step 5: Now look through the waxed-paper end of the "camera" at an object. The object will appear upside down.

For more fun activities and crafts, check out:

Advertisement

Advertisement

Loading...