Box Crafts

Kids will enjoy making the crayon caddy box craft.

Turn ordinary boxes into fun and practical items with the box crafts for kids. From a cool crayon caddy to a set of perfect-fit nesting boxes, you and your kids will love making and using these box craft projects.

Have old sandwich bag boxes, detergent boxes, or shoe boxes on hand? Don't throw them out -- you can use them to make some of the box craft projects below. Add personal touches with glitter, embellishments, or anything you can imagine. The sky is the limit.

Advertisement

Explore the links below to get started on these great box crafts:

Bookworm Box Craft

Chalk Box Craft

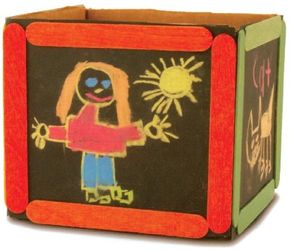
Kids can color all over this box, wipe it off, then color all over it again. Learn how to make this simple -- but fun -- box craft.

Collaged Storage Box Craft

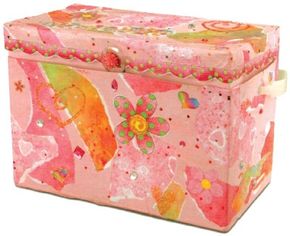
Use a decoupage technique to turn an unlikely item -- a detergent box -- into a colorful, sparkled treasure box.

Crayon Caddy Box Craft

This box craft project is so easy to do, you can make one for every kid in your family. In just a few steps, transform a sandwich storage bag box into the perfect place for crayons.

Mystery Boxes Box Craft

This box craft is also a fun kids' activity. Kids make a game out of figuring out which nature items are inside a decorated mystery box.

Nesting Boxes Box Craft

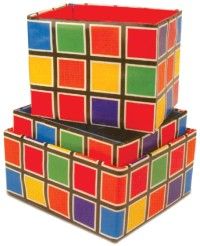
For a perfect fit, check out these nesting boxes. Learn how to make these lovely, practical boxes in just a few simple steps.

Telephone Time Box Craft

This variation on tin can telephones is just as fun as the original. Kids will have fun making and playing with this box craft project.

Tooth Fairy Box Craft

The tooth fairy would be delighted to find this lovely decorated box holding a tooth inside. Learn how to make it in just a few steps.

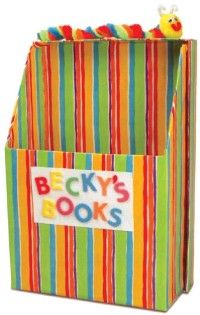
Your favorite book lover will love the box craft project in the next section. Keep reading to learn how to make the bookworm box craft.

Looking for more fun kids' crafts? Try:

Advertisement

Bookworm Box Craft

Store your favorites in this bookworm box craft.

This bookworm box craft is more than just a cool place to store kids' books and magazines. A colorful bookworm perched on top and a personalized nameplate make it truly special.

All you need to start this simple box craft project is a cardboard shoe box.

Advertisement

What You'll Need:

  • Large shoe box with attached lid
  • Wrapping paper
  • Four chenille stems: assorted sizes and thicknesses; plus one white, one red
  • 1-inch pom
  • Two wiggle eyes
  • Adhesive craft foam letters

Tools:

  • Scissors or craft knife
  • Tape
  • Craft glue
  • Low-temperature glue gun and glue sticks
  • Pencil
  • Ruler

How to make the bookworm box craft:

Step 1: Cut off one corner of the bottom of the shoe box to create an opening as shown in the photo.

Step 2: If possible, open the box completely so it lays flat. Wrap the entire box, inside and out, and lid with wrapping paper. Smooth the paper down so there are no bumps, and glue and tape in place.

Fold the box back together, and glue the flaps and lid in place with a glue gun.

Step 3: Make a bookworm by wrapping four chenille stems around a pencil to form a tight spiral; slide it off the pencil. Use craft glue or a glue gun to attach a pom to one end for the worm's head.

Step 4: Cut two 1-inch pieces from the white chenille stem. Curl each around your finger to form antennae, and glue them to the top of the pom.

Cut a 1-inch piece from the red craft stem, and curl it around your finger to form a smile. Glue the smile and wiggle eyes onto the pom. Glue the bookworm to the top of the box.

Step 5: Spell out a message or your name on the front of the box using craft foam letters.

Don't be afraid to draw on the box in the next section -- you can erase it and draw on it again. Move on to the next section to learn about the chalk box craft.

Looking for more fun kids' crafts? Try:

Advertisement

Chalk Box Craft

The chalk box craft acts just like a chalkboard, so it's fun for kids over and over!

Kids will love storing their stuff in this chalk box craft. Covering this box with wet/dry sandpaper means the chalk will wash right off, so kids can decorate it again and again.

What You'll Need:

  • Corrugated box, approximately 7-1/4 x 6-1/2 inches
  • Four sheets black sandpaper, 320 grit
  • 16 colored jumbo craft sticks

Tools:

Advertisement

  • Craft knife
  • Pencil
  • Scissors
  • Craft glue

How to make the chalk box craft:

Step 1: Use a craft knife to cut off the top flaps of the box; discard.

Step 2: Trace each side of the box onto the back of the sandpaper; cut out. Glue a piece to each side of the box. Let dry.

Step 3: Glue four craft sticks around the edges of each side of the box. Let dry.

Store your chalk in this box, and draw right on the sides when it's time to play. Just wash clean with a damp paper towel when you're done.

An empty detergent box is transformed into a lovely decoupaged storage box with the craft in the next section. Keep reading to learn more.

Looking for more fun kids' crafts? Try:

Advertisement

Collaged Storage Box Craft

The collaged storage box craft is colorful, fun,

This collaged storage box craft has got it all -- glitter and embellishments, photos of your kids' favorite things, and their favorite shapes and colors. A plastic handle means kids can carry this box with them wherever they go.

What You'll Need:

  • Powder laundry detergent box with plastic handle
  • Construction paper, wrapping paper, scrapbooking paper, magazines, photos
  • Paper die-cut shapes
  • Water
  • Glitter gel paint or glitter glue
  • Assorted decorative items: faux gems, stickers, sequins, charms
  • 1/2-inch pom
  • 4 inches thin ribbon

Tools:

  • Scissors
  • Craft glue
  • Pie tin
  • Paintbrush

How to make the collages storage box craft:

Step 1: Cut and tear all sorts of paper into pieces of varying sizes and shapes. Cut pictures and words from magazines, and collect favorite photos and die-cut shapes.

Advertisement

Step 2: Pour glue into a pie tin, and add enough water to make it the consistency of heavy cream. (You've just made a decoupage medium.)

Step 3: Using a paintbrush, brush this mixture over a small section of the box. One by one, place the paper scraps onto the glue and use your fingers to gently smooth out wrinkles and air bubbles.

Overlap the different colors and sizes, covering the entire box. (Paint more glue on the surface as needed.) When the surface is completely covered, brush another layer of glue mixture over the whole thing; let dry 30-40 minutes.

Step 4: Paint designs with glitter paint or glitter glue, and glue gems, stickers, sequins, and charms onto the box. Let dry.

Step 5: Glue a pom onto the front of the box lid. Glue both ends of a piece of ribbon to the inside of the front of the box, along the top edge, to create a loop to hook onto the pom to close the box.

The box craft project in the next section is so easy to make, you won't believe your eyes. Keep reading to learn how to make the crayon caddy box craft.

Looking for more fun kids' crafts? Try:

Advertisement

Crayon Caddy Box Craft

Keep your kids' crayons in a row with the crayon caddy box craft.

With the crayon caddy box craft, keeping track of your kids' crayons has never been easier. The opening of a sandwich bag box is just the right size for little hands.

What You'll Need:

  • Sandwich bag storage box
  • Round adhesive label stickers, assorted colors

How to make crayon caddy box craft:

This project is so easy, you won't believe your eyes. Just place stickers all over the empty box until it is completely covered. Store your crayons inside for easy access.

Advertisement

Kids can use the box craft in the next section as a cool activity. Keep reading to learn how to make the mystery boxes box craft.

Looking for more fun kids' crafts? Try:

Advertisement

Mystery Boxes Box Craft

The mystery boxes box craft holds mysterious items.

Dive into the unknown with the mystery boxes box craft. After decorating a shoe box, kids challenge their friends to discover -- by touch only -- what lies inside the mystery box.

What You'll Need:

  • Shoe box
  • Tape
  • Scissors
  • Paper or fabric
  • Markers
  • Nature objects
  • Index cards

How to make the mystery boxes box craft:

Step 1: Tape the lid onto a shoe box and cut a hole in one end large enough to put your hand through.

Advertisement

Step 2: Cover the hole with paper. Cut eight slits in the paper in a star shape, so that you can put your hand through but the hole will still be covered.

Alternately, instead of paper, you can hang a small piece of fabric inside the box to cover the hole by forming a curtain.

Step 3: Decorate the box with markers.

Step 4: Put a mystery object inside the box. Try shells, rocks, driftwood, leaves, twigs, or cones. Make up a riddle or a poem to go with each object. Write it on a card and put it on the box.

Step 5: Let your friends put a hand through the hole and try to guess what the object is. After everyone has made a guess, let some­one take the object out for all to see.

The box craft in the next section is not just fun to make, it's a practical place for kids to store their stuff. Keep reading to learn about the nesting boxes box craft.

Looking for more fun kids' crafts? Try:

Advertisement

Nesting Boxes Box Craft

Make the nesting boxes box craft.

Make a colorful collection of matching storage boxes with the nesting boxes box craft. These nesting boxes are as cute as they are useful.

Wrapping paper is used to cover up and decorate plain boxes. Use matching wrapping paper or get creative with wrapping paper in complementary colors and patterns.

Advertisement

What You'll Need:

  • Three boxes (sized to fit inside each other)
  • Wrapping paper
  • Craft foam to match

Tools:

  • Scissors
  • Tape
  • Craft glue

How to make the nesting boxes box craft:

Step 1: Cut the wrapping paper to fit all the way around each box, adding an extra inch or two at the top and the bottom.

Step 2: Tape the edge of the paper to the box. Wrap it all the way around, smoothing out all bumps and air pockets as you go. Glue the end down. Fold the extra paper at the top and bottom over the edges, and tape in place. Repeat for each of the boxes.

Step 3: Cut pieces of craft foam to cover the insides of the boxes -- the side walls and the bottom -- and glue in place.

For a box craft project kids will love playing with, answer the call to the craft in the next section. Keep reading to learn how to make the telephone time box craft.

Looking for more fun kids' crafts? Try:

­

Advertisement

Telephone Time Box Craft

The telephone time box craft is a unique twist on the classic kids' tin can telephone. This playful box craft can be done in just three simple steps.

What You'll Need:

  • Two small matching boxes
  • Acrylic paint
  • 2 or 3 yards yarn

Tools:

  • Scissors
  • Paintbrush
  • Sharp pencil

How to make the telephone time box craft:

Step 1: Cut the lids off the boxes.

Advertisement

Step 2: Paint the insides and outsides of the boxes. Let dry, then paint words such as "Hi," "Hello," or "Call Me" on the sides.

Step 3: Use a sharp pencil to carefully poke holes in the bottom of each box. String yarn through the holes, and tie the ends to hold the yarn in place.

Losing a tooth becomes an extra-special occasion with the tooth fairy box craft. Move on to the final section to learn about this great box craft project.

Looking for more fun kids' crafts? Try:

Advertisement

Tooth Fairy Box Craft

Welcome the tooth fairy with the tooth fairy box craft.

Surprise the tooth fairy with this whimsical tooth fairy box craft.

When the tooth fairy sees this extraordinary box, she will be bound to leave a special treat.

Advertisement

What You'll Need:

  • Paper or foam egg carton
  • Ribbon trim, 12 inches
  • Chenille stems: one white, one metallic pink
  • One brad
  • Disk-shaped bead
  • One cotton ball

Tools:

  • Scissors
  • Tape
  • Pencil
  • Craft glue
  • Ruler

How to make the tooth fairy box craft:

Step 1: Cut two egg cups from the egg carton. Trim the edges neatly so the two cups can be put together to make an egg shape. Make a "hinge" connecting the cups on the inside with a piece of tape.

Step 2: Trace the open end of an egg cup onto the lid of the egg carton; cut out. Glue trim around the edge of the circle to form a decorative base. Glue the egg shape to the middle of the base.

Step 3: Cut one inch from the end of the pink chenille stem, and bend it to form a hook. Glue the straight end to the edge of the top cup; let dry.

Glue trim all the way around the edge of the top cup. (Keep the trim on the top cup only, or the hinge won't open well.)

Step 4: Push the brad through the bead and then through the bottom cup just below the chenille stem hook. Glue a cotton ball inside the bottom cup. Let dry.

Step 5: To make a tooth fairy, bend the end of a white chenille stem into a small circle (head). Bend the next section into a figure eight (arms). Fold the rest of the stem into three loops, with the center loop a bit longer than the side loops.

Bring the remaining end up; twist around neck or arms to secure. To make the wings, bend the pink stem into four loops. Glue the wings to the back of the body, and glue the fairy to the top of box.

To hold the box shut, close the two halves and wrap the hook around the bead.

Looking for more fun kids' crafts? Try:

Advertisement

Advertisement

Loading...