How to Draw a Woodland Trail in 5 Steps

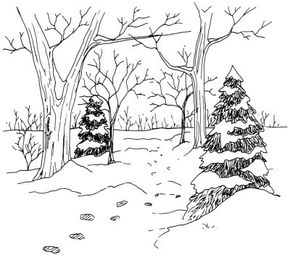
Draw a woodland trail and capture snowy footsteps in this wonderful winter landscape complete with snow-capped pines.
Publications International, Ltd.

­­

This landscape is right out of a holiday story. Pine trees frosted with snow, trees made bare by the winter chill -- even fresh footsteps in the snow.

Advertisement

In this ­article, we'll show you how to draw this woodland trail landscape. You can draw it freehand while looking at your computer monitor, or you can print out this page to get a closer look at each step.

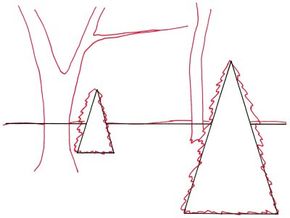
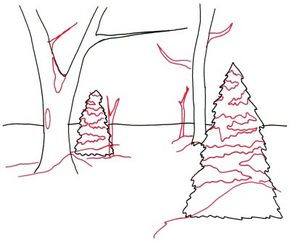
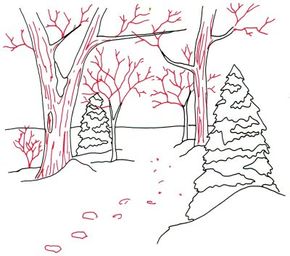
We'll show you an illustration of each step and then give you a description of how to draw it. Follow the red lines in each illustration to learn exactly what to draw in that step. The lines drawn in previous steps are shown in gray.­

On the next page, we'll get started with just a few geometric shapes.­

Advertisement

1. Sketch Triangles For Pines

­

­Draw a single line across the middle of the page as the rough horizon. To show the position of the pine trees, construct two tall triangles, a large triangle on the right and a smaller one on the left.

Advertisement

2. Add Tall Trees

­Sketch the outline of a tall tree trunk to the left of the smaller triangle. Wake it wider at the base and narrow it slightly up to the main fork. Then it tapers much more. Put a second trunk on the right side, narrower than the first one. Alter the horizon slightly by adding a few very gentle curves. Use jagged lines to show the profile of the trees.

Advertisement

3. Add the Snow

­­Outline two more trunks for smaller trees in the middle area, between the existing trees. Add some heavy, pointed branches to the larger tree trunks. Form layers of snow on the pine trees by drawing angular shapes with squiggly lines. On the main fork of the larger tree, draw a patch of snow with a rounded triangle. Then sketch a long, narrow oval on the trunk of the tree. Add curved lines under and beside the trees to look like snow drifts.

Advertisement

4. Draw in Footprints

­

­Extend existing large branches with smaller ones made with single, jagged lines. Off to the left side, draw a bush with angular lines. Add a barklike texture to the trees with a series of long, mostly straight lines. Make footsteps in the snow with a string of very rough oblong shapes that look smaller as they disappear into the distance.

Advertisement

5. Finish With Shading

Draw a number of bare trees on the horizon with sketchy, angular lines. Lightly shade in the footsteps with diagonal lines. Add many scribblelike lines on the sides of the pine trees. These lines should be nearly vertical in the middle area of the pine trees but point toward the outer ends of the branches at the sides. Finally, add a few light, angular lines to show drifts of snow.

­Your landscape drawing is finished! Even if you don't get it right the first time, keep practicing until you're happy with your drawing.

Advertisement

In the next scene, a cool stream is surrounded by lush trees and smooth stones. Learn how to draw the mountain stream landscape.

See all How to Draw articles.

Advertisement

Advertisement

Loading...