How to Draw a Mountain Stream in 5 Steps

A mountain stream meets a cluster of majestic pines. Learn to draw the beautiful mountain stream landscape in five steps.
Publications International, Ltd.

­

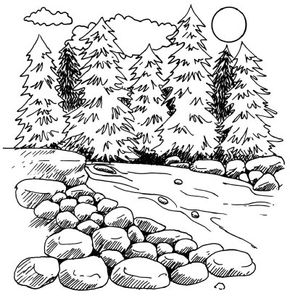
This stream sits high atop a mountain, surrounded by lush trees, boulders, and sunshine. This landscape drawing is a great opportunity to practice attention to detail and perspective.

Advertisement

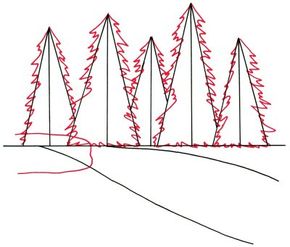
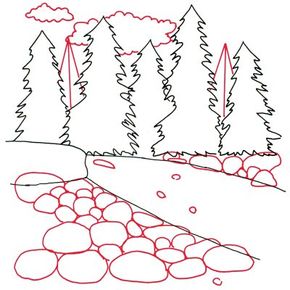
In this section, we'll show you how to draw this mountain stream landscape. You can draw it freehand while looking at your computer monitor, or you can print out this article to get a closer look at each step.

W­e'll show you an illustration of each step and then give you a description of how to draw it. Follow the red lines in each illustration to learn exactly what to draw in that step. The lines drawn in previous steps are shown in gray.

Ready to get started? Sharpen your pencil and click over to the next page.

Advertisement

1. Sketch Pine Trees

About halfway down the page,­ draw a horizontal line. Sketch the edges of the stream bed with curving lines extending upward from right to left. For pine trees, sketch in a series of tall triangles that overlap one another. Lightly add a line from the top of each triangle down to the base horizontal line.

Advertisement

2. Shape the Pine Needles

­

Carefully shape the outline of the pine trees with jagged lines of different lengths. Maintain the sense of depth by showing some trees standing in front of others. Place a large, bumpy, oblong shape to form a boulder along the side of the stream.

Advertisement

3. Add Details to Foreground and Background

­Add more pine trees behind the ones you have already drawn by making triangles as before. Draw scalloped shapes for puffy clouds above the trees. Show rocks on both sides of the stream with irregular ovals. Put more rock shapes on the surface of the stream itself.

Advertisement

4. Add Texture

­

­Draw a circle for the sun. Shape the two trees in the rear with jagged lines. Add details to the pine trees with short jagged lines. Show the contour of the boulders with slightly curving lines. Put in more curving lines to show the surface of the water.

Advertisement

5. Add Shading

Darken the trees in the rear with many jagged lines. Shade the area under the trees with crisscross lines. Add shape to the boulders by shading with diagonal lines.

Your landscape drawing is finished! Even if you don't get it right the first time, keep practicing until you're happy with your drawing.

Advertisement

­The next landscape features a beautiful waterfall surrounded by stone and foliage. Learn how to draw this landscape in only four steps in the next article.

See all How to Draw articles.

Go to the HowStuffWorks home page.

Advertisement

Advertisement

Loading...