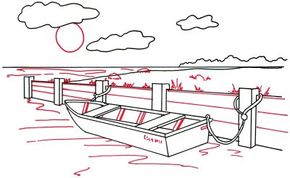
How to Draw a Rowboat at a Seawall in 5 Steps

If you've ever had a relaxing rowboat ride, you'll love this scene. Learn to draw it in five steps.
Publications International, Ltd.

­

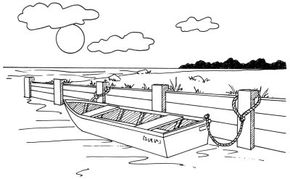
In this landscape scene, the sun shines on a rowboat tied to a seawall. This is a great landscape drawing for people who love the water and the shore.

Advertisement

In this section, we'll show you how to draw this rowboat at a seawall landscape. You can draw it freehand while looking at your computer monitor, or you can print out this page to get a closer look at each step.

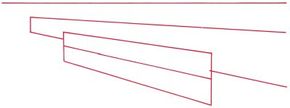
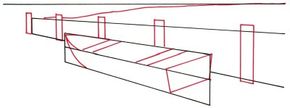
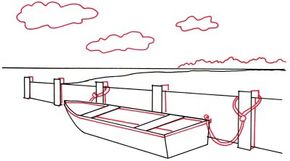
We'll show you an illustration of each step and then give you a description of how to draw it. Follow the red lines in each illustration to learn exactly what to draw in that step. The lines drawn in previous steps are shown in gray.

­

Advertisement

1. Sketch Positioning Lines

­­Sketch a straight line to represent the horizon. Use your ruler to outline a long rectangle that widens and is open at the right end. To show the position of the rowboat, make a second, closed rectangle that overlaps the first. Draw a line through its center.

Advertisement

2. Draw the Rowboat

S­ketch an irregular line that meets the horizon on the right for the shoreline. With a ruler, place five tall, narrow rectangles next to the longer, horizontal rectangle, as shown. Make sure the tops and bottoms are in a straight line (check with a ruler).

­ Continue the rowboat by forming the bow or front end with three curved lines. Then arrange two seats with sets of parallel lines. Use a ruler to help get the lines to match. Draw another line parallel to the seats for the stern or rear end of the boat. Extend lines down from the ends of the last line and connect them to make another four-sided figure.

Advertisement

3. Add Background Details

­

­Make an irregular, jagged line in the background, above the horizon line, to represent a mountain range. Add depth to the posts by using slanted rectangles at the sides and L-shaped lines at the top. Arrange two sets of curving, closely parallel lines for ropes to tie up the boat at both ends. Draw a few straight and curving lines to show the inside of the rowboat. Sketch a few irregular shapes for clouds in the sky.

Advertisement

4. Add the Sun and Water

­

­Place a circular sun in the lower part of the sky. Suggest the surface of the water with curvy lines placed at random, both near the boat and in the distance. Put sets of diagonal lines inside the boat to show its riblike structure. Fill in a name of your choice on the side or back surface. Form the sea wall with parallel horizontal lines between the posts. Make a bunch of jagged or spiky shapes for tufts of grass, then add a few large ovals as rocks.

Advertisement

5. Finish With Shading

­Use heavy shading for the distant tree line. Shade the sides of the posts and the inside of the boat with diagonal lines. Finish the ropes with a series of very short curved lines.

Your landscape drawing is finished! Even if you don't get it right the first time, keep practicing until you're happy with your drawing.

Advertisement

A field of flowers blooms under the sun in a lovely vision of spring. Learn how to draw this landscape in the next article.

See all How to Draw articles.

Advertisement

Advertisement

Loading...