How to Draw a Mountain Vista in 5 Steps

Snow-capped mountains rise above the clouds into the winter sky. This article will show you how to draw this landscape in five easy-to-follow steps.
Publications International, Ltd.

A­ paved road leads to a range of snow-capped mountains, gleaming in the sun, in this landscape. You can almost smell the crisp winter air when gazing at this scene.

In this article, we'll show you how to draw this mountain vista landscape. You can draw it freehand while looking at your computer monitor, or you can print out the article to get a closer look at each step.

Advertisement

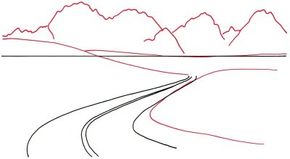
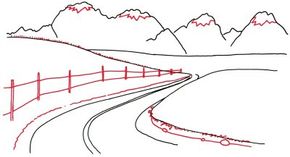
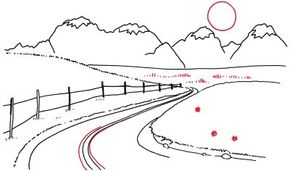
We'll show you an illustration of each step and then give you a description of how to draw it. Follow the red lines in each illustration to learn exactly what to draw in that step. The lines drawn in previous steps are shown in gray.

Ready to head for the mountains? Let's get started...

Advertisement
1. Start With the Horizon

­Lightly draw a line across the page for the horizon. Place it about one-third of the way from the top. Add four curving lines, beginning from the lower center of the page and running first to the left and then sharply to the right. Show that the road goes off into the distance by bringing the lines closer together at the top. This use of lines that come together to show depth is known as perspective.

Advertisement

2. Draw the Mountains

­­Draw inverted V-shapes using jagged lines to show a distant range of mountains. Alter the horizon line with curved lines to look like gently rolling hills. Create another hill with a lazy curve to the right of the center.

Advertisement

3. Add Detail

­

­Draw sharply jagged lines for snow caps on the tops of the highest mountains. Add grass on the hillsides and near the road with many slanted and jagged lines. Make a series of narrow fence posts with double vertical lines, making them smaller as they fade off toward the end of the road. Use nearly straight lines to show fence rails. Sketch the edge of the road with squiggly lines. Draw rocks near the road with irregular ovals.

Advertisement

4. Add Perspective

­Draw a circular sun in the sky, then put in some tall grass in the middle distance with short lines. Use more short lines for clumps of low grass along the fence. Scatter a few daisylike flowers on the hillside. Add two more curved lines in the center of the road.

Advertisement

5. Put in the Finishing Touches

­

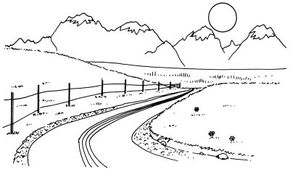
Finish this sketch by adding further details to the shoulder area at the edge of the road. Use plenty of dots and short, squiggly lines to look like rocks and gravel. Place more grass on the hills to the left and right sides using a mixture of short lines, straight and jagged.

Advertisement

Your landscape drawing is finished! Even if you don't get it right the first time, keep practicing until you're happy with your drawing.

A lovely winter forest scene can be found in the woodland trail landscape. Learn how to draw this landscape in the next article­.

See all How to Draw articles.

Advertisement

Advertisement

Loading...