How to Draw a Motorcycle in 5 Steps

Motorcycle Image Gallery This sleek motorcycle heats up the road -- and your sketchbook. Learn how to draw a motorcycle in five easy steps in this article. See more pictures of motorcycles.
Publications International, Ltd.

It ­may only have tw­o wheels, but motorcycles are just as cool as cars and trucks. They're also just as fun to learn to draw.

In this section, we'll show you how to draw this motorcycle. You can draw it freehand while looking at your computer monitor, or you can print out this page to get a closer look at each step.

Advertisement

Here, we'll show you an illustration of each step and then give you a description of how to draw it. Follow the red lines in each illustration to learn exactly what to draw in that step. The lines drawn in previous steps are shown in gray.
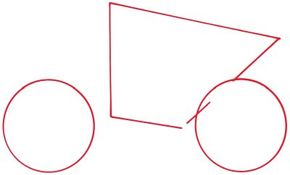
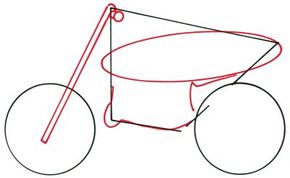
1. Draw the Outline

Draw two circles to form the wheels. Slightly overlapping the circle on your right, sketch the odd-shaped rectangle with a right side that is not complete.

Advertisement

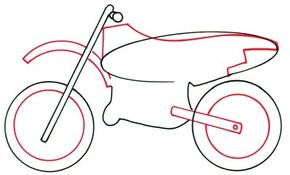
2. Fork and Motor

To form the fork attached to the front wheel, draw a tube with one straight end and one rounded end. The tube should start just below the cente­r of the front wheel and end by the top left tip of the odd-shaped rectangle.

Near the top of the fork, draw one half circle and a full circle to form the handlebars. Place a long oval between the top right-hand side of the odd rectangle and the center of the rectangle's left side. Draw the two odd-shaped lines below this oval to show the motor's position.

Advertisement

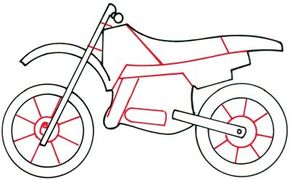
3. Wheels and Fenders

Inside each wheel, sketch a smaller circle to show the tires.­ From the center of the rear wheel to the motor area, draw a thin rectangle with rounded ends and a small circle on the right side.

To form the front fender, draw a curved line between the front tire and the handlebars. Add a small straight line to both ends of this curved line. Then place another curved line above the other one. Make sure that neither line is drawn through the fork and that the upper line goes around the long oval in the center. Draw the seat using the oval as a guide.

Advertisement

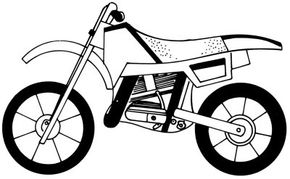
4. Add Spokes, Hubs and Seat

Add the spokes and hubs by drawing circles inside each wheel and attaching straight lines to each circle.

In the front wheel hub, draw a wide U-shaped figure with a tiny circle inside of it. Add a bullet-shaped figure to the motor area. Divide the seat and main body into sections by using straight lines.

Advertisement

5. Finish the Details

­

For the cable on the front fork, s­ketch a line from the wheel hub to the top of the fork. Add a small black square to the top of the cable. Draw a short line between the handlebars and the body. In front of the seat and below the handlebars, sketch a dark L-shaped figure. Inside the rear wheel hub, draw a circle.

Behind the seat, add a darkened curved bar. Under this area, draw a short upright line. To the left of this line, sketch an odd-shaped rectangle with a blackened top edge. In the motor area, draw the odd figures shown here, adding many lines and dark areas for shading. Place dots inside the seat for texture. Darken the tires and part of the handlebars.

Advertisement

Your motorcycle drawing is finished! Even if you don't get it right the first time, keep practicing until you're happy with your drawing.

If you enjoyed drawing this motorcycle, try your hand at a classic car: the '57 Chevy. Learn how to draw a 1957 Chevrolet Chevy in this article.


See all How to Draw articles.

Advertisement

Advertisement

Loading...