How to Draw a Harbor Scene in 5 Steps

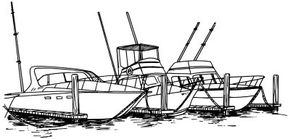
This harbor scene features a trio of boats, docked seaside, on a beautiful day.
Publications International, Ltd.

­If you love life on the water, you'll love this landscape. Learn to draw this landscape scene and you'll also learn how to draw thre­e very different looking boats.

In this article, we'll show you how to draw this harbor scene landscape. You can draw it freehand while looking at your computer monitor, or you can print out this article to get a closer look at each step.

Advertisement

On each page, we'll show you an illustration of each step and then give you a description of how to draw it. Follow the red lines in each illustration to learn exactly what to draw in that step. The lines drawn in previous steps are shown in gray.­

Ready to set sail? Let's get started ...

Advertisement
1. Sketch the Boats

­

Begin this scene in the upper center of the drawing area. For the boats, draw three long, narrow shapes with a pointed end, or bow, on the right side. Make them with nearly straight lines for the tops and curved lines for the bottoms.

Advertisement

­Draw the pointed end of the fourth boat on the left. To place the piers between boats, first draw small but long rectangles near the hulls as shown. These will be the ends of the piers. Draw three straight lines back to the left that come together slightly (it may help to practice drawing these pier shapes on a separate piece of paper).

2. Add the Posts

­

Put in the vertical posts at the ends of the piers with straight lines. Make the post tops and bottoms slightly rounded. Create the top surfaces of the boats, or decks, with long curves running from the tip of the bow. Draw the two cabins on the right with more straight lines. Carefully sketch curved lines on the boat on the left.

Advertisement

3. Draw the Cabins

­

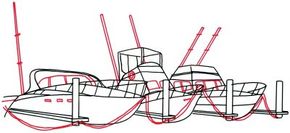
Form the guard rails on the front of the decks with two intersecting curved lines. Draw the vertical rail supports with a series of angled straight lines that are parallel to one another and evenly spaced. Add details to the cabins with straight and slightly curved lines. Place a boxlike shape above the cabin of the boat in the center. Use a wide, upside down, U-shaped line for the upper part of the boat on the left.

Advertisement

4. Add Nautical Details

A­ttach four heavy ropes to the bows of the boats with pairs of curved lines. Draw one or two tall poles or radio antennas on each boat. Use thin lines made with a ruler. Add detail to three antennas with short horizontal lines. Make windows and portholes on the cabins with slanted rectangles. Draw a round life preserver on the side of one of the boat cabins using a circle within a circle.

Advertisement

5. Add Shading

­

Carefully shade around the bottoms of the boats with a back-and-forth movement of your pencil. Outline individual planks on the piers by adding short, straight lines, spaced closely together on the sides. Put straight and curved lines on the posts for texture. Shade the underside of the cabin's roof with diagonal lines. Add texture to the ropes with short, diagonal lines.

Advertisement

Your landscape drawing is finished! Even if you don't get it right the first time, keep practicing until you're happy with your drawing.

On land or in the sea, in the woods or in the city, beautiful landscape scenes are everywhere. Get inspired and put pencil to paper -- drawing landscapes is one of the best ways to appreciate the world around us.

See all How to Draw articles.

Advertisement

Advertisement

Loading...