How to Draw a Country Church in 5 Steps

Draw a country church scene filled with small-town charm in just five easy-to-follow steps.­
Publications International, Ltd.

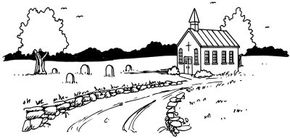
This country church lies at the end of a stone-lined path surrounded by lush trees. You'll have a great time learning to draw all the components of this charming landscape.

In this article, we'll show you how to draw this country church landscape. You can draw it freehand while looking at your computer monitor, or you can print out the article to get a closer look at each step.

Advertisement

On each page, we'll show you an illustration of each step and then give you a description of how to draw it. Follow the red lines in each illustration to learn exactly what to draw in that step. The lines drawn in previous steps are shown in gray.

­

Advertisement

1. Start With a Few Lines

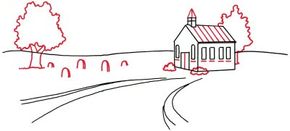
­­Sketch a light horizontal line for the horizon. Place it in about the middle of your drawing area. Make a closed rectangle for the long side of the church building. Add an three-sided rectangle that is open at the top for the front. Make all vertical lines parallel.

Use a slanted rectangle for the visible side of the roof. Connect the top of the roof to the top of the slanted line on the left to complete the outline. Indicate the beginning of a road with two curving lines that come together near the side of the church building. ­

Advertisement

­

2. Add Church Structures

­­

­Add a few gentle curves to the horizon line. Begin the windows, the door, and the steeple on the church with rectangles. Use rectangles with half-circles at the top for the front windows. Add a second set of lines along the roadway as the beginning of a stone wall.­­

Advertisement

3. Add Depth

­­

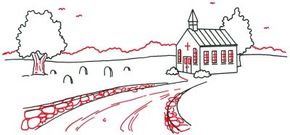
­Place a couple of trees in the landscape for depth. Use a thick trunk that changes to two large main branches for the first tree. Top both trees with an oval of leaves, made with squiggly lines. Add five or six upside down U-shapes as gravestones. Give depth to each of them by adding a curved line on the right side.

Advertisement

Begin adding details to the church. Finish the steeple with two side-by-side, upside-down V shapes. Evenly space six lines on the roof, parallel to the lines already there. Use squiggly lines in the shape of flattened ovals for shrubs in front. Put short horizontal lines under each window and a vertical line down the center of the doorway.

­

Advertisement

4. Add Details

­­

­Outline individual stones in the walls along the road with irregular ovals of different sizes. Use mostly vertical lines on the sides of the trees to give them the look of bark. Add a tree line in the distance to provide depth.

Advertisement

Draw some birds in the sky with pairs of short rounded lines. Put in a series of long curving lines for ruts in the road. Complete the church with small rectangles on the door, short vertical lines for handles, and straight intersecting lines for the windows. Make a cross above the door.­

5. Draw the Finishing Touches

­

Use dark shading for the trees in the background. Create a shadow at the side of the church with a series of crooked horizontal lines. Add clumps of grass around the gravestones and tree with short, straight lines, spaced closely together.

Advertisement

Scatter spiked, jagged shapes as tufts of grass on the sides of the road and in random spots in the surrounding fields. Form sills beneath each window by adding short vertical lines to finish the long rectangles which are slightly wider than the windows themselves. With diagonal lines, lightly shade part of the surface of the stones in the wall.

Your landscape drawing is finished! Even if you don't get it right the first time, keep practicing until you're happy with your drawing. The village scene in the next article includes it all -- a small church, house, and even a barn. Skip on over to learn how to draw this landscape in just five steps.­ ­

See all How to Draw articles.

Go to the HowStuffWorks home page.

Advertisement

Advertisement

Loading...