How to Draw a Classic Car in 5 Steps

Classic Car Image Gallery With its curvy lines and smooth styling, this car is the height of class. Learn how to draw this classic car -- in just five steps -- in this article. See more pictures of classic cars.
Publications International, Ltd.

With their m­ix of smoo­th lines and sharp angles, this classic car is not only unique and cool-looking, it's great practice for your drawing skills.

In this section, we'll show you how to draw this classic car. You can draw it freehand while looking at your computer monitor, or you can print out this page to get a closer look at each step.

Advertisement

Here, we'll show you an illustration of each step and then give you a description of how to draw it. Follow the red lines in each illustration to learn exactly what to draw in that step. The lines drawn in previous steps are shown in gray.

1. Draw Lines and Circles

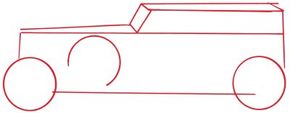
For the main part of the body, draw a large rectangle that is not quite finished. On top of its right half, form a rectangle with a slanted left end to form the driver's-side windows. Above it, add a long thin rectangle that is slanted for the roof.

Use a small slanted box to form the windshield. Place a straight line from the left end of the windshield to the front of the car in order to form the triangular front hood. Sketch two circles for the wheels. Put an incomplete circle inside the large rectangle for the spare tire.

Advertisement

2. Draw Wheels and Fenders

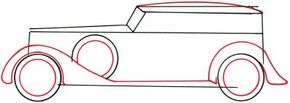
Add a curved line to the roof of the car. To form the tires, draw a circle inside the front and rear wheels and an unfinished circle inside the spare tire. Add curved lines around the wheels and along the bottom of the car to form the running board and fenders.

Advertisement

3. Add Hubcaps

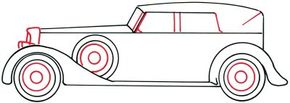
Add hubcaps to each of the three tires by drawing a small circle within a larger circle. Use straight and curved lines to form the front grille and the roof support columns as shown here.

Advertisement

4. Add Doors

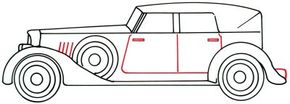
Place four short upright lines in front of the spare tire. Use a few straight and curved lines to form the doors. Draw tiny thin rectangles for the door handles. Add an upside-down L-shaped figure for the rear bumper.

Advertisement

5. Add Shading

Sketch the upper side moldings using four straight lines and one tiny curved line along the top part of the body. Finish the trunk area and rear bumper by using straight and curved lines.

Darken the tires, running board, top of the side windows, and part of the trunk area. Draw a straight line below the dark areas in the side windows.

Advertisement

Your car drawing is finished! Even if you don't get it right the first time, keep practicing until you're happy with your drawing. If you love cars, you love the Corvette. Learn how to draw a Corvette in the next article.


See all How to Draw articles.

Advertisement

Advertisement

Loading...