Learning how to make beaded purses can be a challenging, but once you've mastered the technique, you'll have hours of fun creating unique little pouches and bags to carry everything from a tube of lip gloss to school books!
In the pages below, we'll provide step-by-step instructions on how to make several of our favorite beaded purses. We're sure they'll become your favorites too!
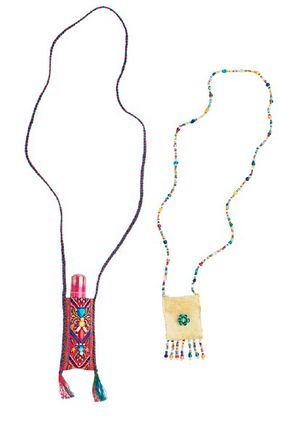
In this section, kids will learn how to make a dainty little lip gloss pouch that can be carried the traditional way or worn around the neck. No matter how you wear it, this beaded purse will sparkle either way! Go to this page to get started.
You can fill this beaded bag with everything from your favorite book or magazine to a wallet and make-up. The choice is yours! Check out this page to learn how to make a versatile funky foam purse.
Choose your favorite beaded purse from the list above or simply continue to the next page to get started on the first project on our list -- a fashionable lip gloss pouch!
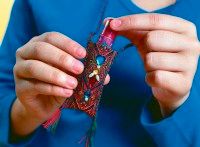
This beaded purse isperfect for your strawberryflavored lip gloss!
Your smile will be picture-perfect all day long thanks to this lip-smacking sweet beaded purse. This handy-dandy pouch is so bejeweling, you'll want to take it with you wherever you go! Continue reading to learn how to make this beaded purse.
What You'll Need:
Advertisement
Comb
Jewel glue
Scissors
Tacky glue
Toothpick
6-1/2x1-1/2 - inch piece of tapestry ribbon
1 blue heart faux jewel, 10mm
1 red navette faux jewel, 17x15mm
1 gold round faux jewel, 7mm
1 blue round faux jewel, 7mm
2 faux round pearls, 3mm each
2 faux rice pearls, 3x6mm each
Embroidery floss in red, green, and blue (7 feet each)
Step 1: Fold over 1/4 inch at each end of the ribbon, and press firmly to crease. Unfold, and use the paintbrush to cover each of the 1/4 -inch folds with tacky glue. Fold and pinch the ends with your fingers to form a rolled finished edge. (You may want to set each edge under a soup can or other weighted object until the glue dries.)
Step 2: When the rolled edges are dry, fold the length of ribbon in half, and crease it with your fingers. Unfold, and, using a toothpick, spread a thin line of tacky glue on the inside of the ribbon half along each long edge. Fold the ribbon again at the crease, and press the dry half into the glue to form a pouch.
Step 3: Place the faux jewels and pearls along the center of the ribbon. Once you're happy with how they look, secure each jewel and pearl with small drops of jewel glue. Let dry for at least 2 hours.
Step 4: To make the pouch's cord necklace, take each 7-foot length of embroidery floss and cut them in half. Align the ends of the 6 cuts, and tie a firm knot, leaving about 1-1/2 inches at the end. Divide the pieces into the 3 colors, and braid snugly until there is only 3 inches of unbraided floss. (Use your soup can again to hold the floss while you braid.)
Step 5: Tie a final knot, and trim each end of the braided cord to a 1-inch length. Comb to separate the ends into slender tassels.
Step 6: Using a toothpick, spread a thin line of tacky glue along the front side edges of the ribbon to attach each end of the braided cord to the pouch, setting a knotted end below each lower corner. Before you set the second end into the glue, be sure to smooth out the braid so it isn't twisted. Let dry completely.
Step 7: Slip your favorite lip gloss into the pouch, and wear with a sweet
smile!
Your lip gloss will fitperfectly inside your newbeaded pouch.
You can also Try this!
For an even more bead-dazzling look, add beaded fringe and a beaded chain to your pouch. You'll need seed beads in a variety of colors, a needle, and gold embroidery floss.
Step 1: Cut an 8-inch piece of gold floss, and separate it into individual threads. Thread 1 piece through a needle, and tie a knot at the end.
Step 2: String on 10 seed beads, and sew the beaded thread onto the center fold of the ribbon; cut and tie securely. Repeat with 7 or 8 more strings of beads to make the pouch's fringe.
Step 3: To make the beaded chain, cut a 25-inch piece of gold floss, and sew it to the top corner of the pouch. String on beads until the chain is long enough to fit over your head and hang around your neck. Sew the end securely to the other corner of the pouch.
It's time to get funky! In the next and final section of this article, learn how to make a super fun funky foam purse.
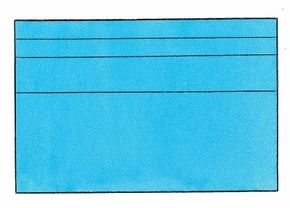
Make sure your blue craft foam is sized correctly.
In this last section of our how to make beaded purses project, we will provide you with step-by-step instructions on how to create a funky foam purse. Just gather the materials on the list below to get started. Once your creation is complete, you'll see just how versatile this funky bag can be!
What You'll Need:
Advertisement
12X18 inches blue craft foam
Ruler
Pencil
Scissors
Tracing paper
1/8-inch hole punch
5 feet blue plastic lacing
32 matching pony beads
9x6 inches multicolor adhesive craft foam
Adhesive-back hook and loop dots
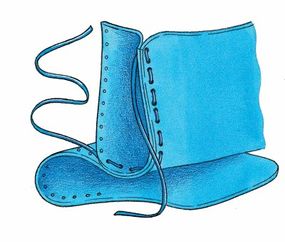
Step 1: Along the shorter edge of the blue foam, measure and mark 2 strips 1-1/4-inches wide (for the strap) and 1 strip 2-1/2 inches wide. Cut out the strips. Using the pattern on page 30, trace and cut out 2 side panels from the 2-1/2-inch-wide strip (copy the pattern markings).
It takes a steady handto punch perfect holes,so take it slow.
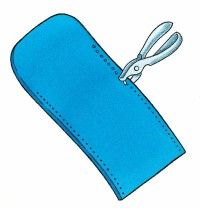
The remaining foam piece should measure about 7 inches wide. This will be for the pouch of the purse. Round the corners of the pouch piece on one side.
Step 2: Starting 1/4-inch from the squared edge of the pouch piece, measure and mark 26 points 1/2-inch apart and 1/4-inch in from the side edge. Repeat on the other side. Punch holes at all points on all the pieces, including the side panels.
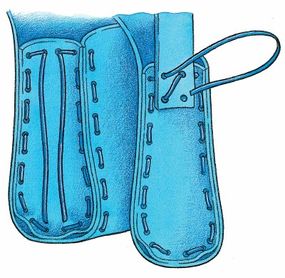
Step 3: Cut a 36-inch length of plastic lacing. Line up the square edge of one side panel with one edge of the pouch piece. Thread the lacing through the first holes of each section, and leave a 10-inch tail on the side panel side.
Continue lacing through the matching holes, using a basic sewing stitch, until all the holes are used. Be sure to keep the edges even and leave a 10-inch tail. Repeat on the other side.
Test your stitching skills as you lace through theholes on your funky foam purse.
Step 4: Thread each tail through the top 2 holes on the side panel (the lace ends should end up on the outside of the side panel). Position one end of a strap piece over the holes at the top of a side panel.
Use a pencil to mark points through the punched holes of the side panel to help you punch holes on the strap. Thread one lace end through the top hole on the strap, then thread the same lace diagonally to the bottom hole on the strap. Repeat with the other lace end (lace should have formed an X).
Thread the lace ends through the opposite bottom strap holes. Tie the ends in a knot. Thread 3 pony beads on the remaining lacing, and tie a double knot on each end to hold the beads in place. Trim excess lacing. Repeat on the other side.
Step 5: Overlap the straps to desired length to fit over your shoulder. Holding the strap pieces in place, punch 4 holes in a square about 1/2 inch apart and about 1/4 inch from the edges of the straps.
Cut a 12-inch length of lacing, then thread the lacing down through one bottom hole and up through the other bottom hole. Bring the ends together evenly, cross the lace ends to form an X, then thread them down through the top holes.
This lacing technique creates a cool pattern.
Lace each end back up through the bottom holes, then tie a knot to hold in place. Thread 2 pony beads on each end of the lacing, and tie a double knot on each end to hold the beads in place. Trim excess lacing. Repeat on the other overlapped section of the strap.
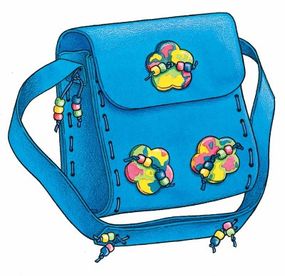
Step 6: Trace and cut out 3 flowers from the multicolor craft foam using the pattern on this page. Copy all markings, and punch holes at the points. Using 4 inches of lacing for each flower, thread the length of lacing through the holes, then tie a knot.
Thread 2 pony beads on each end of the lacing, and tie a double knot at each end to hold the beads in place. Remove paper backing and stick the flowers to desired locations on the purse. Remove the paper backing from the loop dots and place them under the purse flap.
Your funky foam purse is ready to rock and roll!
Press the hook dots on the loop dots, then remove the backing from the hook dots and attach them to the front of the purse.