Shoes aren't just for walking. There are many wearable craft ideas to decorate your shoes so that they show off your personal style.
Whether you wear flip-flops, sneakers or just want to transform your shoelaces, these kids' activities are simple and easy to do. Check out the following pages to find ways to decorate your shoes.
Snowshoes allow people to walk on top of deep snow, instead of sinking into it. Here's a wearable craft that'll help you make your own shoe box snowshoes.
How to Make Snowshoes
What You'll Need:
Two shoe boxes or a few fallen evergreen boughs
Large rubber bands or old shoelaces
Snowshoes work by spreading a person's weight over a larger area of snow, so the snow can support the weight. Here are a couple of quick and easy ways to make snowshoes:
Advertisement
Use big rubber bands or shoelaces to strap shoe boxes or evergreen boughs to the bottoms of your boots. Now try walking in the snow. You'll find that walking in snowshoes is like walking in swim fins: It's important to lift the front of your foot high with each step.
On the next page, you'll find out how change your shoelaces into curly ties.
For more fun activities and jewelry crafts, check out:
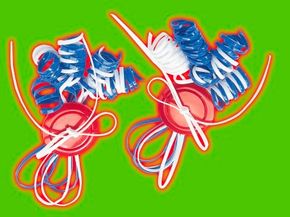
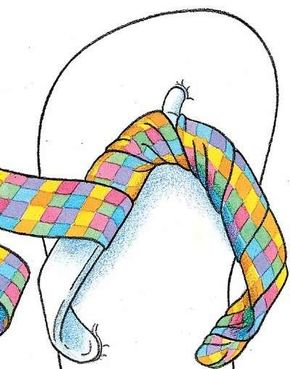
You can make wearable crafts to decorate you from head to toe. Here's a way to add pizazz to your tennis shoes by making lanyard curly shoelace ties. All it takes is some looping and curling, and you've got it made!
How to Make Curly Shoelace Ties
What You'll Need:
Two lanyard laces (for each shoelace tie): 2 yards blue, 1-3/4 yards white
Ruler
Scissors
Masking tape
Round pencil or 1/4-inch wooden dowel
Boiling water and ice water in containers (adult help needed)
Towel
Red button, 1-1/4-inch diameter (for each shoelace tie)
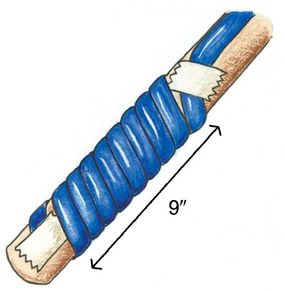
Step 1: Cut the blue lanyard lace into three 24-inch pieces. Cut the white lanyard lace into two 24-inch pieces and one 15-inch piece.
Advertisement
After you've cut your laces, tapethem to the end of a dowel.
Step 2: Tape 1 end of a 24-inch blue lace near the end of a pencil (or a dowel). Measure 9 inches of lace, and tightly wind lace around the pencil, leaving 15 inches unwrapped. Tape the lace to hold.
Step 3: Ask an adult to place the wrapped pencil in the boiling water for approximately 30 seconds. Remove and place the wrapped pencil in the ice water for approximately 30 seconds.
Step 4: Remove the pencil from the ice water and dry with a towel. Remove the tape, and slide the lace off the pencil.
Step 5: Repeat steps 2 through 4 on each end of the remaining 24-inch blue and white laces.
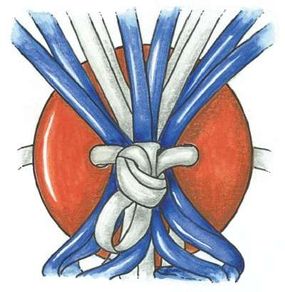
Step 6: Fold the 15-inch white lace in half. Tie a knot 1/4 inch from the folded end to form a small loop. (Your shoelaces will be threaded through this loop.)
Step 7: Fold each curled lace in half, forming a loop at 1 end. Group all the curled laces together with the loops at the top.
Wrap the ends around the other laces.
Step 8: Wrap the ends of the 15-inch white lace around the middle of the curled laces, and thread them through the back holes of the red button. Tie the white laces into a bow on the front of the button.
Step 9: Repeat steps 1 through 8 to make the second shoelace tie.
On the next page, find out how to jazz up your sneakers.
For more fun activities and jewelry crafts, check out:
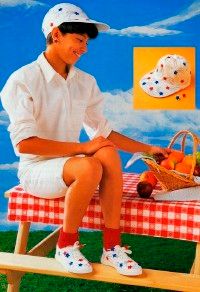
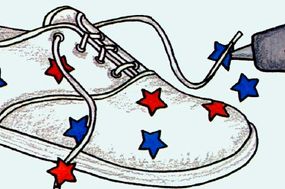
Stars shine when you add them to your favorite pair of sneakers. In this wearable craft, learn how to add make a snazzy sneaker set.
How to Make a Snazzy Sneaker Set
What You Need:
White sneakers
26 red puffy stars, 3/4-inch each
27 blue puffy stars, 3/4-inch each
White painter’s cap
Glittering silver dimensional paint
2 (size H) wood circles, 3/4-inch each
White acrylic paint
2 earring backs
Step 1: Plan how to arrange five red and six blue stars on one shoe according to the finished photos. Apply glue (use low temperature) to back of each star, and place on shoe. Align and glue together two red puffy stars back to back just above the end of one shoelace, sandwiching shoelace between the stars.
Advertisement
Repeat with two blue puffy stars for the other end of the shoelace. Repeat for second shoe. Similarly position and glue ten blue and eleven red stars on painter’s cap.
Step 2: Squeeze-paint three glittering silver rays shooting out from each star on shoes and painter’s cap. Let paint dry.
Let paint dry completely before wearing.
Step 3: For earring, paint wood circle with two coats of white paint. Let paint dry between coats. Apply glue to back of blue puffy star and place on wood circle. Apply glue to center back of wood circle and place earring back into glue. Repeat to make second earring with red puffy star.
On the next page, make shoes that'll have you dancing on the sand without getting burned.
For more fun activities and jewelry crafts, check out:
Use the steps in this wearable craft to make these Sahara Sand Shoes like ones the Tuaregs, a wandering desert tribe, made so they could travel on the hot sand and not burn their feet.
How to Make Sahara Sand Shoes
What You'll Need:
Advertisement
Pencil
Several large pieces of cardboard (thin and heavy pieces)
Scissors
Ruler
Glue
Two shoelaces
Four 2-holed buttons (with large holes)
Paint
Paintbrush
Nail
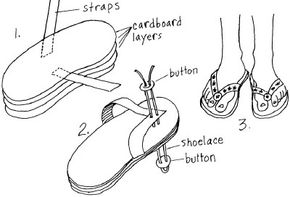
Step 1: Trace the shape of your foot onto a piece of heavy cardboard. Draw a paddle shape around the foot pattern -- the shape should bulge out at the heel and toes and come in closer at the sides of your foot. Trace your other foot the same way, and make another paddle shape around it.
Step 2: Have an adult help you cut 4 of these cardboard paddle shapes for each foot. Also cut 4 strips (about 2 inches wide and 4 inches long) from thinner cardboard for shoe straps.
Step 3: Glue 4 paddle shapes together, 1 on top of the other (using lots of glue), for each shoe. Glue the ends of the 2 cardboard strips (1 on each side of the shoe) between the top 2 layers of the paddle shapes. The strips should be angled toward the toes of the shoes. Put something heavy on top of each shoe until the glue dries completely.
Step 4: Paint designs on the shoes and straps. Place your feet on the shoes. On the top of each sole, make a line between your big toe and second toe. Ask an adult to use a nail to punch 2 holes close together on each line. The holes should go through all the layers of cardboard.
Step 5: For each shoe and going from the top to the bottom, thread a shoelace through 1 hole, in and out of a button on the bottom, and back through the other hole. Fold the thin cardboard strips inward so they cross over the holes in the sole. Punch 2 holes through the crossed strips.
Step 6: Thread the shoelace through the holes in the strips and through a second button. Try the shoe on. The shoelace goes between your big toe and second toe. Slide the button down until the shoe fits securely on your feet. Tie the shoelace.
Check out the next page to learn how to make moccasins like the ones worn by Native Americans.
For more fun activities and jewelry crafts, check out:
In pioneer days, shoes were very expensive and not always easy to obtain. Pioneer families copied the moccasins they saw worn by Native Americans. In this wearable craft, you can learn how to make your own Native American Moccasins.
How to Make Native American Moccasins
Adult Help Needed
Advertisement
What You'll Need:
Newspaper
Pencil
Ruler
Scissors
Sewing pins
Fabric (such as felt or canvas)
Markers
Embroidery floss
Beads
Heavy-duty sewing needle
Strong thread
Step 1: Stand barefoot on a piece of newspaper, and trace around 1 foot with a pencil. Then, draw a pattern around the traced foot. Find the distance from 1 to 2 and from 3 to 4 by measuring across your instep and dividing that number in half. (Ask an adult if you need help with this calculation.)
Step 2: Pin the pattern on the fabric, trace around it, and cut it out. (If the fabric you are using is very thick, you may need to have an adult cut it for you.) Trace and cut another pattern for your other foot. Decorate the flaps (tops) of the moccasins with markers, embroidered designs, or sewn-on beads.
Step 3: Fold 1 moccasin in half, with right sides facing in. Use running stitches to sew the front. Gather the stitches a little to fit the shape of your foot. End with several overlapping stitches. Turn the moccasin right side out, and try it on. Use pins to fit the heel seam, then take the moccasin off. Sew the back seam with running stitches to 3/4 inch from the bottom. Trim the seam.
Step 4: Cut out a small square from the heel. Flatten the heel, and sew it closed with overcast stitches. For ties, cut 2 strips of fabric, each 1/2 inch wide and 15 inches long. Then wrap the ties around your ankles just under the top flaps, and tie them in back of the moccasins.
Check out the next page to find out how to dress up your flip-flops.
For more fun activities and jewelry crafts, check out:
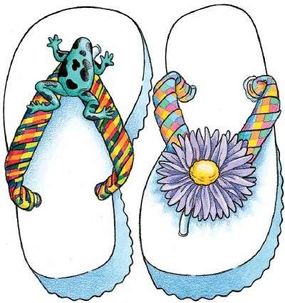
If you're walking on the beach, Fun Time flip-flops are a must. Here's a wearable craft that'll help you transform your flip-flops into your own personal style statement.
How to Make Fun Time Flip-Flops
Adult help needed
Advertisement
What You'll Need:
Foam Flip-flops
2-yard-length grosgrain or woven ribbon, 2 inches wide
Scissors
Low-temperature glue gun and glue sticks
2 plastic or silk flowers (about 1 to 2 inches diameter) or 2 small plastic frogs
Step 1: Cut the ribbon into two equal lengths. Loosen one side of a flip-flop thong by pushing it down through the bottom of the shoe. Ask an adult to help you use the tip of the scissors to poke the end of one length of ribbon through the hole on one side.
Pull the ribbon so about 1 inch hangs underneath the flip-flop. Using the glue gun, fill the hole with glue, then pull the thong up so it fits back into the hole on the bottom. Make sure the end of the ribbon is still visible from the bottom of the shoe.
Step 2: Working on the top of the flip-flop, wrap the ribbon around the thong so the plastic is completely covered. Overlap the edges of the ribbon each time you wrap it around to make sure it's secure. When you reach the other side of the thong, secure the end of the ribbon through the hole in the bottom of the flip-flop as you did in step 1.
Step 3: If you are making flower flip-flops, trim the stems from the plastic flowers. Using the glue gun, attach the flower or frog in the center of the thong. Repeat all steps for the other flip-flop.
Try This!
Don't stop with frogs or flowers! You can make all kinds of fun flip-flops using plastic bugs, cute erasers, or whatever else you dream up!