Top 10 Christmas Decorations Made with Recycled Materials

Quilting background for christmas with red, green and gold fabrics.
iStockphoto/Emilia Kun

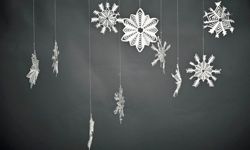
Christmas trees have been a part of the Christmas tradition for centuries. The first trees were decorated with candles, berries, candies, nuts and fruits. It wasn't until 1882 that Edward Johnson (Thomas Edison's handy assistant) invented the first electric lights for Christmas tree decoration. Since then, Christmas revelers everywhere have upped the ante and Christmas decorations are an important part of the holiday tradition.

If you want to deck the halls with store bought Christmas decorations, it's going to cost you some money. Not to mention delicate items, like glass ornaments, require careful storage with lots of padding, which takes up more storage space. While store-bought decorations can be quite beautiful, they also pretty much look like what everyone else has.

Advertisement

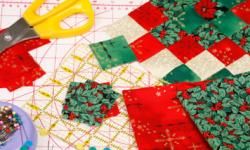
If you want a unique look for a fraction of the cost, how about making your own Christmas decorations out of materials you probably have lying around your house? Not only will you be helping the environment, you'll have an opportunity to show your creativity and individuality through your creations. All you need is some time, a little effort and a lot of glue. Read on for our favorite Christmas decorations made from recycled materials.

10: Felted Wool Christmas Wreaths

felt wool bracelets
You can use the same idea to make yourself a festive bracelet!
Hemera/Thinkstock

Felted wool is all the rage in today's crafting community. Why? Because you can make a lot of really cute stuff with discarded wool sweaters and a little elbow grease. And the best part is felting is pretty easy. Even if you don't have any spare sweaters lying around, a quick trip to your local thrift store will yield an inexpensive bag full. Don't worry about the style of the sweater. You're just looking for ones with colors that you like.

To get started felting, take your sweater or whatever wool garment you're using, and cut it apart at the seams. Cut the seams off and you'll also want to remove any pockets and things like buttons and snaps, possibly saving them for other crafty projects. Then, stick your pile of wool in the washing machine on high heat with a heavy soil setting for maximum agitation and add a little detergent. If you like the level of feltedness when it comes out of the washer, you can just line dry it. If not, dry it on high heat in the dryer. If it's still not quite how you want it, stick it back in the washer and repeat the cycle.

Advertisement

Once you have your wool felted, you're ready to work on your wreath. First, you'll need to cut out a bunch of same-sized squares from your larger pieces of felted wool. You can choose a holiday color palette or work with neutrals, a monochromatic blue color scheme, or go for the full rainbow spectrum.

To make the wreath, take a piece of yarn and knot the end. Then thread the other end through a needle that has a large enough eye to accommodate the size of yarn you use. This part of the project is simple enough for younger children to do with supervision. Simply start threading the yarn through the center of the felt and keep going until you have the size wreath you want. Then just tie the ends together and hang it up.

9: Recycled Christmas Card Banner

hanging cards
Insert your favorite cards here.
iStockphoto/Thinkstock

How many of you have a drawer full of Christmas cards from Christmases past? Don't feel sheepish -- it's hard to just throw away season's greetings from friends and loved ones. But leaving them sitting in a drawer just means they're taking up space. And honestly, how often do you actually look through them?

Why not turn them into a Christmas decoration that you can use every year? This is a super easy craft project that's great for the whole family to participate in. First, select your favorite card designs. Or would you rather display your favorite messages that were written inside the cards? You could even make it a combination of the two. Prefer a theme? Pick out all the snowman or Christmas tree cards. Or if you'd rather design by color, pluck out all the ones that are mostly red and green.

Advertisement

Next, decide how big you want your triangle to be (triangles will make up the banner) and make a pattern out of cardboard so that the pieces will match. Cut each triangle until you have enough to complete the size banner you're looking to make. Then choose a coordinating ribbon to string the cards together. Next, glue the card to a piece of cardstock and cut the cardstock slightly larger than the card so you have room to decorate. Before the glue dries, peel back the top of the cardstock and sandwich the ribbon in between the two pieces. Keep adding triangles, making sure to leave the same amount of space in between each one. Decorate with ribbons, buttons or any other fun crafty supplies you have hanging around. And then hang your banner on the wall, in a doorway or around your Christmas tree.

8: Magazine Christmas Tree

If your household is anything like ours, the number of magazines you subscribe to exceeds your time to actually read them. Rather than letting these stacks of guilt gather dust, or even worse, end up in the recycling bin without having ever been read, how about using them for a fun a little crafty project? You can make a colorful little Christmas tree decoration from magazine pages.

The first step is to open your magazine and bend the spine to break it. Then turn to the first page. Take the top right corner and fold down inward until it meets the inside crease where the pages join. It will make a 45 degree angle. Then, take hold of the right side of the folded page and fold it again into the crease where the pages join. The result is a page that is folded into the shape of a man's tie. Take the bottom piece that sticks out over the edge of the magazine and fold it up so the edge is flush with the bottom of the magazine. Keep repeating this until you've gone through the entire magazine. Then remove the front cover and put it on display. Decorations and a tree topper are optional.

Advertisement

7: Hand Cut Paper Snowflakes

paper snowflakes
The design choices are endless with this craft.
iStockphoto/Thinkstock

Paper snowflakes have been a holiday staple since sometime around the Victorian Era, when the production of paper was mechanized and therefore, more readily available. In more recent times, paper snowflakes have become the consummate childhood Christmas holiday craft. But who says that they're just for kids? These seemingly simplistic creations can make elegant and beautiful decorations. And the best part is all you really need is some white paper and a pair of scissors.

As you probably recall, all you need to do is cut your paper into a square and then fold it into layers of smaller squares. The typical paper snowflake is usually either four-sided or six-sided, depending on the maker's preference. To achieve a four-sided snowflake you fold the paper twice, and to make a six-sided snowflake, you fold it three times. Natural snowflakes have six sides, so choose this option for the most authentic creation. And of course you can make a few more folds if you want to create your own unique versions.

Advertisement

Once you have your paper folded, use your scissors to start trimming out areas of the paper. If you want to make more intricate cuts, we recommend using an Exact-o knife and fewer layers. You can also round corners to change the overall shape of your snowflake. Like real snowflakes, each snowflake you make will differ slightly, becoming its own unique work of art. Using thicker paper will create a sturdier flake but thinner paper is easier to work with more layers.

Create a stack of snowflakes, and the sky is the limit as to what you can do to them. You can tie a string onto the top and use it as an ornament on your Christmas tree. Or, string them together and make a beautiful garland for your mantel or stair banister. For a simple decorative touch with much visual interest, you can hang them at different heights in doorways. You can even attach them to the fronts of card stock or beautiful paper for a custom Christmas card.

6: Wine Cork Reindeer

Cork is an abundant, sustainable resource that is used for so many applications in today's consumer products. It's also a great material for making crafty stuff. There are so many fun craft projects that can be made with old wine corks, and Christmas ornaments are no exception. For a particularly memorable ornament, use a cork that you've been saving from a special occasion.

Making a reindeer out of wine cork is so simple, even a young child could do it. For your wine cork reindeer project, you'll need a red bead, a hot glue gun, a 12-inch-brown pipe cleaner (better known as a chenille stem in craft speak), and a couple of googly eyes with sticky backs.

Advertisement

To start, add the nose, which of course, is the red bead. Put a dot of glue on the back of the bead with the glue gun and attach it to the cork. Faceted, round beads provide a nice sparkle, which is always a plus. Next, take your pipe cleaner and wrap it snugly around the other end of the cork, twisting the pieces together where they meet at the base. And of course, since reindeer don't have stick straight antlers, you'll want to add a few bends for authenticity. Then add googly eyes and attach a regular ornament hook to the base of the antlers.

If you want to take your project to the next level and make a freestanding reindeer, you'll need three more wine corks to make the torso and two legs. Using your hot glue gun, take the reindeer body and add a wine cork leg to each end. Then just glue the head toward the front of the body. Tilt the head into a slight angle to mimic a reindeer's natural stance.

5: Coffee Can Lid Wreath

Coffee beans in tin can isolated on white. Christmas wreath
iStockphoto/Melker Wickman/Kevin Russ/Ā© 2009 HowStuffWorks

Coffee cans are made from aluminum or plastic, both of which can be easily recycled. The problem is the lids. Many recycling companies don't allow plastic lids or plastic bottle caps to be recycled because they're too small and can jam equipment during the recycling process. Instead of throwing them away, you can make them into tiny wreaths to hang around the house or on your Christmas tree.

Start by gathering some decorative materials, such as ribbons, yarn, cotton balls, sewing materials, buttons or stickers. You can also use pipe cleaners or any other small trinkets you have around the house.

Advertisement

Begin by cutting out the center of the coffee can lid. You'll want to think of the final product as a skinny donut. Once you have the base of the wreath ready, there are many decorating options:

  • Take cotton balls, pom-poms or buttons and glue them to the base.
  • Tie one end of the ribbon, yarn or chenille stem to the base and twist it around the wreath until you get back to the beginning.
  • Take extra sewing material and cut it into thin strips. Glue the end to the coffee can lid, and allow it to dry. Then continue to wrap the material around the lid, gluing as you go.

When you've finished the base of the wreath, you can tie a ribbon or string to the top to hang it, or you can place it directly on your tree.

4: Miniature Sock Monkey

sock monkey
sock monkey
iStockphoto/kreicher

Regular-sized sock monkeys and animals make great gifts, but you can also make miniaturized versions to use as Christmas decorations. For miniature sock monkeys, you're going to need tiny socks. Specifically, you'll need toddler or baby socks.

Look for baby or toddler socks that are similar to traditional sock monkeys, but they don't need to have the red heel. You'll also need to find brown and red embroidery floss, stuffing and small, black buttons. For flair, look for small, red pom-poms.

Advertisement

Starting on the opening of the first sock, cut up the middle of the sock until you're roughly 1 inch from the heel. Round the edges of the "fee," or the area at the original sock opening that you just cut. Fill the head and body (the area from the toe to the heel) with stuffing. Then sew the edges of the legs halfway up from the toes and fill with stuffing. Keep sewing and stuffing until the monkey is full and stitch closed. Tie or stitch floss around the neck and ankle areas and pull tight to add shape.

Now, cut off the heel of the second sock leaving roughly a quarter inch (.635 cm) of the sock's main coloring intact -- this will be the puppet's mouth. Turn the sock on its side and find the middle. Then cut down the middle to the bottom of the toe to form the tail. The rest of the ankle portion can be cut into two pieces with rounded ends to create arms.

Sew together the edges of the arms and tail and then begin to stuff. After you finishing stuffing the limbs, sew them to the body. Sew the mouth to the face and stuff it as well. For finishing touches, use red floss to sew lips onto the mouth. You can also use the black buttons as eyes, and you can make eyelashes, eyebrows or other facial features using the brown floss.

3: Craft-stick Stars

Wooden colored craft sticks, in rainbow colors, arranged in a sweeping spiral pattern.
iStockphoto/McKevin Shaughnessy

Stars are a classic, celebrated symbol of Christmas. You can make easy, homemade stars to display as Christmas decorations using craft sticks. These are the wooden sticks from frozen fruit or ice cream bars. You can also buy them at craft stores, but it's easier and cheaper to save and wash used ones at home. Stars can be made out of a few sticks glued together, or you can use string, yarn, beads, buttons, glitter and other decorative items. Here are a few different options for creating ornamental stars:

Two-triangle Star

Advertisement

  • Use three sticks to make one triangle and glue them together. Use three more sticks to make another triangle and glue them together.
  • Place the triangles on top of one another with the points going in opposite directions to form a six-sided star. Glue them in place.

Star Outline

  • Gather 10 craft sticks.
  • Use two sticks to make a very wide "V" shape with the sticks overlapping in the center. Do not glue them together.
  • Place the remaining sticks in wide "V" shapes to see how wide all of the "V" shapes need to be. Be sure to overlap the ends of the sticks.
  • Once you feel good about the shape and everything looks symmetrical, glue the sticks together where they overlap.

Multi-pointed Star

  • Place one craft stick on top of another to form an "X." Glue the sticks into place.
  • Place another craft stick on top of the "X" but angle it slightly to the left or right. Then glue that stick into place.
  • Repeat the step above as many times as desired and continue moving the craft sticks over a bit until the star looks full.

Once your star is complete, you can go wild with the decorations. Finish it up by attaching a piece of string or yarn to the back of the star for hanging.

2: Decorated CDs

A big, red and shiny heart on a CD/DVD.
iStockphoto/gbrundin

These days, buying an actual CD seems a little archaic. With the world going digital, it was only a matter of time before we started looking at the teetering CD tower in the living room with a little regret. Between iTunes, Wal-Mart and Amazon, there are almost 20 million digital songs to choose from for your MP3 player of choice. So, what should you do with all of those old CDs? Go ahead and make some Christmas ornaments.

Making ornaments out of old CDs is very easy. You just need to think about what kind of decorations you want. You can select a theme and make them all the same color. Or you can add a photograph of a loved one to the center of the CD. Then, you can decorate the CD itself with stickers, glitter, paint, cutouts or any other material you'd like. Another option is to loop yarn around the CD multiple times by going through its center. To hang your ornament, you can glue a hanger to the back of the CD, or you can simply loop another piece of yarn through the center hole.

Advertisement

In the last few years, people have been embracing high-tech decorations. It just takes a little elbow grease and creativity to make them look nice. If you're feeling really fancy (and you have some metal cutters lying around), you can even try to make a shape from the CD. Be careful through -- CDs can be very sharp when broken.

1: Used Light Bulb Snowman

christmas toy
christmas toy
iStockphoto/igor kisselev

Soon, standard incandescent light bulbs will be a thing of the past. In March 2009, the European Union adopted regulations that will require all household, commercial and public lighting to use halogen bulbs. What's more, energy standards in the United States mean that most incandescent bulbs will be banned by 2014. So, before they go away forever, let's craft with them.

You can make two kinds of snowmen, depending on your personal preference. Here are the materials you will need to create either style:

  • an incandescent light bulb
  • acrylic paints: white for the body; your color choice for the rest
  • swatches of material for a hat or scarf
  • crafting glue
  • small piece of wire or yarn to use as a hanger
  • decorative items, such as buttons
  • something to hold the bulb steady while you're painting, such as a toilet paper roll cut in half

To create a whole snowman complete with body, you'll first need to clean off the old bulb and paint it white. Paint the eyes, nose and mouth onto the neck of the bulb. Then, paint or glue small buttons on the large part of the bulb. You can paint the threading at the top of the bulb for a hat, or you can make a hat out of your materials. Then add a scarf and a hanger to put it on the tree.

If you'd like to create only the face of a snowman, clean off the bulb and paint it white. Paint the eyes, nose and mouth on the large portion of the light bulb. Make a small hat out of your materials and place it over the threaded top and neck of the bulb. Add a hanger to the top of the bulb and hang it on the tree.

Now that you're in the spirit of recycling, you're sure to find additional crafting gems hidden around your house. Think twice about how you could use something to decorate before you throw it away.

Lots More Information

Related Articles

  • Bella Dia. "Advent Day 3: Petunia's Christmas and chenille wreaths." 12/03/07. (Accessed 04/19/09) http://belladia.typepad.com/bella_dia/2007/12/advent-day-3-pe.html
  • Blick Art Materials. "Craft Sticks and Craft Stems." (Accessed 04/10/09) http://www.dickblick.com/categories/craftsticks/
  • Borrelli, Christopher. "Downloading music: Beyond iTunes." Chicago Tribune. 04/19/09. (Accessed 04/20/09) http://www.chicagotribune.com/features/lifestyle/chi-tc-fam-music-sites-0430-0419apr19,0,7853928.story
  • Crafting a Green World. "Felt Your Sweater!: A Felted Wool Tutorial." Feb. 17. 2009. http://craftingagreenworld.com/2009/02/17/felt-your-sweater-a-felted-wool-tutorial/
  • FoxRiver. "Back in Blue! The Blue Rockford Red HeelĀ®." (Accessed 04/10/09) http://www.foxsox.com/Events/newsItem.aspx?id=23
  • FoxRiver. "Instructions for Making the Red Heel Sock Monkey Toy." (Accessed 04/19/09) http://www.foxsox.com/Categories/resources/RedHeelInstructions.pdf
  • FoxRiver. "Original Red Heel Socks." (Accessed 04/19/09) http://www.foxsox.com/Catalog/search.aspx?type=subcategory&code=SOCKS
  • Jacobs, Aminda and Poinski, Megal. "Light bulb Snowmen." Parents Magazine. 12/2000. (Accessed 04/20/09) http://www.parents.com/holiday/christmas/crafts/lightbulb-snowmen/
  • Make-It-Do. "How to Make Handcut Snowflakes." Dec. 2, 2009. http://www.make-it-do.com/make-it/how-to-make-hand-cut-snowflakes/
  • Martha Stewart. "Magazine Christmas Trees." Jan. 13, 2012. http://www.marthastewart.com/269354/magazine-christmas-trees
  • Martha Stewart. "Snowball Wreath." (Accessed 04/19/09) http://www.marthastewart.com/article/snowball-wreath
  • Mooney, Ann and Reynolds, Virginia. "Sock Monkey and Friends." Design Originals. 1999.
  • Nigel's Eco Store. "Recycled and Eco Friendly Christmas Tree Decorations." (Accessed 04/20/09) http://www.nigelsecostore.com/acatalog/Christmas_Decorations.html
  • Myers, Melinda. "CD Scare Tactic." MelindaMyers.com. (Accessed 04/20/09) http://www.melindamyers.com/index.php?option=com_content&task=view&id=501&Itemid=218
  • "Paper Snowflakes." Math2033.uark.edu. January 13, 2012. http://math2033.uark.edu/wiki/index.php/Paper_Snowflakes#History
  • "Recycled Christmas Card Banner." Outsidethemargins.com. January 13, 2012. http://www.outsidethemargins.com/photos.php?gallery=69
  • "Reindeer cork ornaments." Chicaandjo.com. December 18, 2009. http://www.chicaandjo.com/2009/12/18/reindeer-cork-ornaments/
  • Resweater. "Christmas gifts I made - wreath ornaments." Dec. 31, 2009. http://resweater.blogspot.com/2009/12/christmas-gifts-i-made-wreath-ornaments.html
  • Scientific American. "Tops Off?: Why Some Towns Won't Recycle Bottle Caps." 08/2008. (Accessed 04/19/09) http://www.sciam.com/article.cfm?id=recycling-plastic-bottle-caps
  • Terry, Kayte. "Make It: Crafty Mini-Wreaths." craftstylish.com. 11/20/08. (Accessed 04/19/09) http://www.craftstylish.com/item/23710/make-it-crafty-mini-wreaths
  • The Franklin Institute. "The Wizard of Menlo Park." (Accessed 04/20/09) http://sln.fi.edu/franklin/inventor/edison.html
  • UIE. "Christmas Tree Facts." (Accessed 04/19/09) http://urbanext.illinois.edu/trees/facts.cfm
  • UIE. "Christmas Tree Traditions." (Accessed 04/19/09) http://urbanext.illinois.edu/trees/traditions.cfm
  • Unilever. "Frequently Asked Questions." (Accessed 04/19/09) http://www.icecreamusa.com/contact_us/faqs.cfm
  • Zeller Jr., Tom. "Light Bulbs Poised for a Big Change." New York Times. 03/30/09. (Accessed 04/20/09) http://www.nytimes.com/2009/03/30/business/energy-environment/30iht-green30.html

Advertisement

Loading...