Wood Crafts

Marionette Puppet
imagination running at full speed!
none

Wood crafts may be challenging, but the results are impressive. Both you and your kids will enjoy long hours of concentrated activity as you make these art crafts. The idea is to learn basic skills, learn to respect and handle tools, and to have some fun in the process.

With carpentry projects, it's important that adults preread and review the instructions. Ask kids to help mom or dad cut and drill all the wood pieces, but keep a watchful eye.

Advertisement

As kids try more wood crafts, they'll learn how to use various tools and become more comfortable experimenting with different ideas. Eventually they'll come up with their own wood craft projects to create!

Follow the links below to learn some fun and challenging wood crafts that encourage family sharing and the building of skills.

Toothpick Shark Sculpture

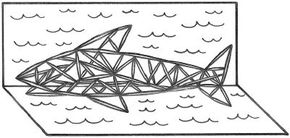
Try your hand at constructing a shark sculpture made entirely of toothpicks.

Toothpick Architecture

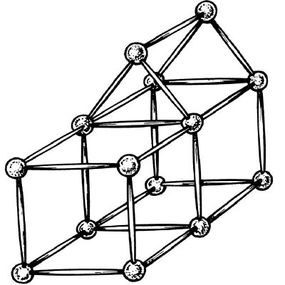
Build a toothpick person, building, or whatever your child's imagination dreams up.

Toothpick Dolls

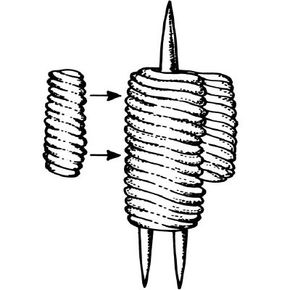
Use toothpicks, floss, and glue to create your own pocket-sized pals.

Marionette Puppet

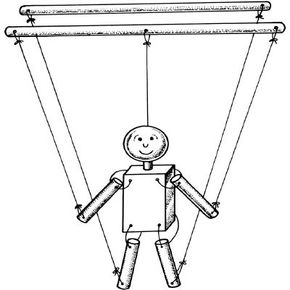
Become marionette makers with this more challenging carpentry craft.

Block Buildings

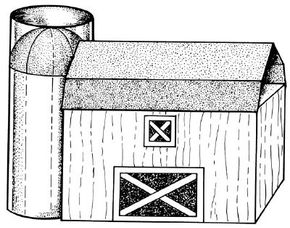
Construct stores, homes, and your own miniature city with wood blocks.

Play Furniture

Furnish your doll house with a new couch, chair, TV, table, and more.

Measure Me Strip

Make a special measurement board to keep track of your child's growth.

Traffic Signs

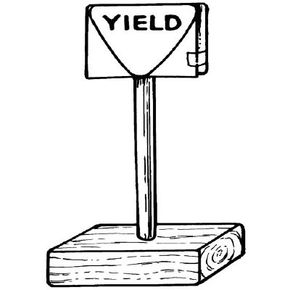
Teach kids the rules of the road by crafting your own stop, yield, and railroad crossing signs.

Keep reading to learn how your kids can construct their very own shark pal -- from toothpicks!

For more fun art crafts and kids' crafts, check out:

Advertisement

Toothpick Shark Sculpture

Toothpick Shark Sculpture
Everybody out of the water! It's the Toothpick Shark Sculpture!
none

You need patience and a steady hand to create this toothpick shark sculpture, but your kids' amazement is well worth the effort.

What You'll Need:

  • Waxed paper
  • Flat, round, or colored toothpicks
  • Craft glue
  • Blunt scissors
  • Blue construction paper
  • Crayons or markers

How to Make a Toothpick Shark Sculpture:

Step 1: Cover your work surface with a sheet of waxed paper. Glue toothpicks together to make a skeleton shape of a shark. Dip the toothpick ends in glue; then glue each toothpick together piece by piece.

Advertisement

Step 2: After you've created the base of the shark, fill in the body with long and broken toothpicks until the shape is rounded.

Step 3: Add fins and a tail. Let the glue dry.

Step 4: Now make a display stand for your sculpture. Fold a piece of blue construction paper in half lengthwise. Draw on some waves. Glue the shark to the paper.

What else can you make from toothpicks? Learn how to make a toothpick person, triangle, and building in the next section.

For more fun art crafts and kids' crafts, check out:

Advertisement

Toothpick Architecture

Toothpick Person
Say hi to this Toothpick Person!
none

With toothpick architecture, you and your kids can create a tiny city, geometric shapes, or a circus tent with clowns. This art craft lets you build whatever your imagination dreams up!

What You'll Need:

  • Waxed paper
  • Toothpicks
  • Plastic-based clay
  • Poster board

How to Make Toothpick Architecture:

Step 1: Place a sheet of waxed paper over your work surface. Roll the plastic-based clay into several 1/4- to 1/2-inch balls. (The amount will depend on what you're making, since the clay balls are the anchor joints of your toothpick creation.)

Advertisement

Toothpick Architecture Triangle
The Toothpick Triangle
none

To make a person, you will need 7 balls of clay; to make a building, you will need 14 balls of clay; and to make a triangle shape, you will need 4 balls of clay.

Step 2: Insert a toothpick into a ball of clay. Connect the toothpick to another ball of clay. Continue connecting toothpicks with the clay until you have completed your structure.

Toothpick Architecture Building
Your Toothpick Person can live and work in this Toothpick Building.
none

Step 3: Place the finished projects on a piece of poster board to display your architecture.

Keep reading to learn how to make some pocket-sized toothpick pals.

For more fun art crafts and kids' crafts, check out:

Advertisement

Toothpick Dolls

Toothpick Doll
Wrap the floss around the toothpicks.
none

These tiny toothpick dolls can keep your kids company wherever they go. Slip them into your kids' pockets, notebooks, or schoolbags for a friendly hello during the day.

What You'll Need:

  • 5 toothpicks
  • Ruler
  • Blunt scissors
  • Embroidery floss
  • Craft glue

How to Make Toothpick Dolls:

Step 1: Help kids cut off 1-1/4 inches from one end of 1 toothpick. This is the body. For the legs, cut off 5/8 inch from one end of 2 toothpicks.

Advertisement

To make the arms, cut off 1-3/4 inches from one end of the remaining two toothpicks. Throw away toothpick scraps.

Step 2: Glue one leg to each side of the toothpick body. Let the glue set. Apply a dot of glue to the side of one leg near the top, and place one end of the embroidery floss on the glue.

Wrap the floss around the toothpicks, working your way down. Continue wrapping until you reach 1/2 inch from the end of the legs. Trim the floss, and glue the end in back.

Step 3: Wrap each toothpick arm with floss. Glue the arms to the wrapped body. To make the shoulders, add a dot of glue to the toothpick body just above the floss.

Place the end of the floss on the glue, and wrap it down around the body and the tops of the arms about 6 or 7 times. Trim the floss. Glue the end in back.

Toothpick doll hair
Glue the floss strands to the top of the doll's head to make the hair.
none

Step 4: Make the head by wrapping floss into a ball around the top of the toothpick body. Trim the floss, and glue the end in back. To make the hair, cut several strands of floss.

Hold the strands together, and glue them to the top of the doll's head. Trim excess floss.

Are your kids ready for a more challenging wood craft project? Make your own marionette puppet in the next section.

For more fun art crafts and kids' crafts, check out:

Advertisement

Marionette Puppet

Marionette Puppet
Showtime's coming for this Marionette Puppet!
none

With a little practice, your kids can perform their very own puppet show with these marionette puppets.

What You'll Need:

  • One 1x2-inch board about 5 inches long (for the body)
  • Four 4-1/2-inch wood dowels with 1/2-inch diameters (for the arms and legs)
  • Two 12-inch wood dowels with 1/2-inch diameters (for the control bars)
  • One 2-inch wood dowel with 1/2-inch diameters (for the neck)
  • Saw
  • Sandpaper
  • Power drill with 1/2-inch and 1/8-inch drill bits
  • Fishing line or string
  • Blunt scissors
  • Wood glue
  • One 2-inch wood bead (for the head)
  • Markers

How to Make a Marionette Puppet:

Since this wood craft project involves drilling and sawing, an adult must assist kids.

Advertisement

Step 1: Prepare the wood pieces by cutting and sanding each one.

Step 2: Drill all the holes in the wood pieces. To make the marionette body, drill a 1/8-inch hole all the way through the wood in each corner of the 1x2-inch board.

Step 3: Drill 1/8-inch holes in each end of the arm and leg dowels. Then drill 1/8-inch holes in each end of the control bars. Drill another hole in the middle of one bar.

Step 4: Switch drill bits and drill a 1/2-inch hole in the short end of the body board.

Step 5: To attach the parts, cut four short pieces of fishing line or string. Tie the arms and legs to the body, following the illustration.

Step 6: Cut four long pieces of string. Thread one end of each string through the end holes of each arm and leg and tie it in a knot. Thread the other ends through corresponding holes on the control bars and tie in a knot.

Step 7: Glue the 2-inch dowel in the 1/2-inch hole on the body board for the neck. Let the glue set.

Step 8: Cut another piece of string. Tie one end around the end of the neck. Thread the bead through the string, and glue the bead to the neck. Thread the other end of the string through the middle hole on the control bar and tie it in a knot.

Step 9: Draw a face on the wood bead.

Keep reading to see how your kids can construct a whole miniature city of wood block buildings.

For more fun art crafts and kids' crafts, check out:

Advertisement

Block Buildings

Wood Block Buildings
Build a city from these Block Buildings.
none

Help your kids create their own miniature city with block buildings that look just like the ones in your town.

What You'll Need:

  • 2x2-inch and 2x3-inch wood boards
  • Saw
  • Sandpaper
  • Ruler
  • Markers
  • Cardboard
  • Blunt scissors
  • Wood glue
  • Paper towel tubes

How to Make Block Buildings:

Step 1: Help kids saw all the wood pieces. Make sure you sand the wood smooth. To make a house or store, saw a 2-inch piece from a 2x2-inch board.

Advertisement

Step 2: Draw windows, doors, and shingles on the wood.

Step 3: Cut a roof piece from cardboard and glue it to the wood.

To make a tall building, saw a 6-inch piece from a 2x2-inch board and an 8-inch piece from a 2x3-inch board. Stand them up and draw on the windows of a bank or the balconies of an apartment.

To make a barn, cut a 5-inch piece from a 2x3-inch board. Decorate it with markers. Place the wood piece on its side and add a cardboard roof and a paper towel tube silo.

Time to move on to an interior carpentry project. Show your kids how to make wood craft play furniture in the next section.

For more fun art crafts and kids' crafts, check out:

Advertisement

Play Furniture

Your kids can create their very own home with play furniture made from blocks of wood. Work with them to craft a couch, chair, table, television, and clock.

Then put their interior design skills to work. Kids might put a television in the bathroom, a fridge in their bedroom -- encourage them to use their imagination!

Advertisement

What You'll Need:

  • Colored or natural blocks of wood
  • Wood glue
  • Permanent markers
  • Fabric scraps

How to Make Play Furniture:

Step 1: To make a couch, glue 3 blocks of wood together, side by side. Then glue 3 blocks of wood upright behind the first 3 blocks. Add a block of wood to each end for the arms of the couch.

Step 2: To make a chair, glue 2 blocks together in an L-shape. Draw a fabric pattern on the couch and chair.

Step 3: Make a table with 2 blocks of wood glued together in a T-shape.

Step 4: For the clock and television, draw the clock face and the television screen and dials on the wood blocks. Use fabric scraps for a rug and a tablecloth.

Are your kids growing up before your very eyes? Keep track of their height with a Measure Me Strip in the next section.

For more fun art crafts and kids' crafts, check out:

Advertisement

Measure Me Strip

A Measure Me Strip takes only a short time to make, but it gives your kids years and years of measuring fun.

What You'll Need:

  • 1x4-inch pine board, about 6 feet long
  • Permanent markers
  • Yardstick
  • Camera
  • Color film
  • Blunt scissors
  • Craft glue

How to Make a Measure Me Strip:

Step 1: Draw a scale of inch and foot marks on one side of the pine board, using the yardstick as a guide.

Advertisement

Step 2: Stand the board up in a corner of your child's room. Each time you measure your child, write the date at the measurement mark.

Add baby measurements on the board, too. You can get the measurements from your pediatrician.

Step 3: Have a family member take a picture of your child each time you measure. Once the film is developed, cut the picture out and glue the photo to the board next to your measurement mark.

Keep reading to see a wood craft that will help teach your kids the rules of the road.

For more fun art crafts and kids' crafts, check out:

Advertisement

Traffic Signs

Traffic Signs
These thorough instructions will yield several different Traffic Signs.
none

These traffic signs are fun art crafts to make for toy cars. They're also a great way to teach kids all their road signs.

What You'll Need:

  • Five 1x2-inch boards
  • Five 1/4-inch wood dowels
  • Saw
  • Sandpaper
  • Power drill
  • 1/4-inch drill bit
  • Tape measure
  • Wood glue
  • Cardboard
  • Blunt scissors
  • Markers
  • Transparent tape

How to Make Traffic Signs:

An adult should help kids saw and drill all the wood pieces. Make sure you sand the wood smooth.

Advertisement

Step 1: Saw the 1x2-inch boards into 2-inch pieces for the base of the signs. Drill a 1/4-inch hole in the center of each wood base.

Step 2: Saw the dowels into 4-inch pieces for the sign posts. Glue each dowel into a base.

Step 3: To make a sign, cut a 4x1-1/2-inch piece from the cardboard. Fold it in half and draw a traffic sign on both sides. Tape the sides closed to make a pocket. Slip it over a dowel sign post.

Step 4: Repeat to make 4 more signs. For instance, you could make a stop sign, yield sign, traffic signal, railroad crossing, or a walk/don't walk sign.

For more fun art crafts and kids' crafts, check out:

Advertisement

Advertisement

Loading...