Easy Halloween Crafts for Kids

Kids doing Halloween crafts
Kids will love decorating for Halloween Fotostorm/Getty Images

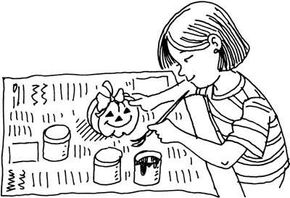
Costumes, candy, spooky decorations -- Halloween has everything a kid could ever want. Celebrated on October 31 every year, it's the perfect holiday for kids to show their creative side. So, get out your broomsticks (or paint brushes) and a cauldron of paint and you'll be ready for these fun and easy Halloween crafts for kids.

Check out the following pages for more information on frighteningly fun activities that you can create using materials you already have at home.

Advertisement

Spiderweb Pictures

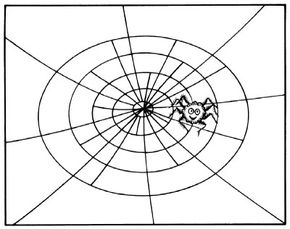
Decorate your windows and doors with detailed spiderweb pictures that will have you and your guests crawling with excitement.

Halloween Mural

Get all your friends and family together to help with a Halloween mural that tells the story of this spooky holiday.

Trick-or-Treat Jug

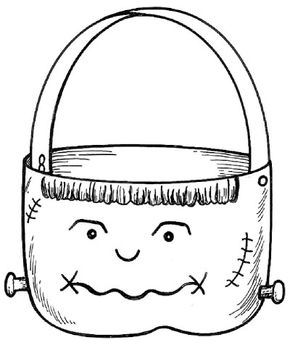
Create your very own trick-or-treat jug to match your costume and fill with lots of candy.

Woven Pumpkin

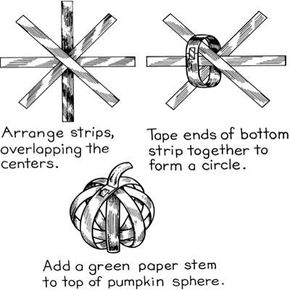
Make your very own pumpkin patch with these simple instructions for beautiful woven pumpkins.

Candy Skeleton

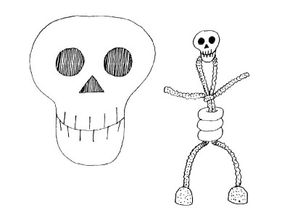
Follow these instructions to make your candy skeleton -- a "bone"-a-fide treat for Halloween.

Halloween Ornaments

Decorate the trees around your house with eerie Halloween ornaments that will look like you're in the witches forest.

Halloween Hello

Say "boo!" with Halloween greeting cards you can make and decorate yourself.

Monster Magnet

Start your very own monster bash with these monster magnets that are perfect for Halloween.

Halloween Mobile

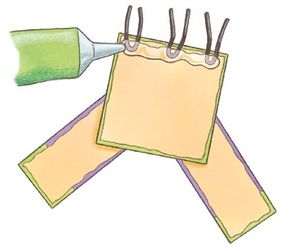
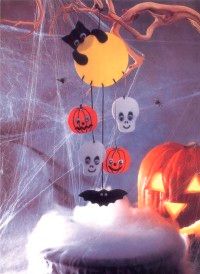
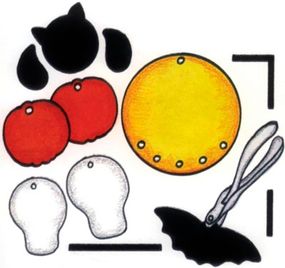
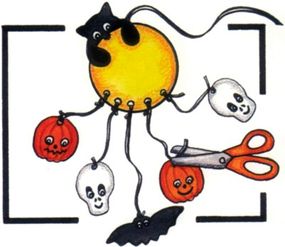
Add an eerie touch to your house this Halloween with this mobile.

Get your easy Halloween crafts for kids crawling with fanciful spiderweb pictures. Learn how easy it is to create this indoor Halloween decoration that you can enjoy all season long.

For more fun holiday activities and crafts, see:

Advertisement

Spiderweb Pictures

Make a spooktacular spiderweb for Halloween

Spiders can be scary, but don't be afraid of these creepy friends on Halloween. Wherever you put these spiderweb pictures, that's where they'll stay.

What You'll Need:

Construction paper

Advertisement

Markers or colored pencils

Craft glue

Black pom-pom

Two sequins

Draw a small circle in the middle of a sheet of construction paper. Draw another circle around it. Keep adding bigger circles until you have drawn four or five circles total.

Draw lines from the center circle to the edges of the paper. Draw some lines from the center circle to the edges of the other inner circles.

To make the spider, glue a black pom-pom to the web. Glue two sequins to the pom-pom for the eyes. Draw in the spider's eight long legs.

If you want, color in all the spaces in the web with bright colors to make it look like a stained glass web.

Make even more beautiful Halloween decorations with a Halloween mural. Learn how you can get your family and friends involved for a frighteningly fun time.

For more fun holiday activities and crafts, see:

Advertisement

Halloween Mural

This Halloween mural is a fun way to tell picture stories. Ask friends to help out -- there's space for everyone!

What You'll Need:

Butcher paper or heavy wrapping paper

Advertisement

Masking tape

Newspaper

Poster paints

Paintbrushes

A mural is a large-size wall painting that tells a story or creates a scene.

To make your holiday mural, tape a long piece of paper on the wall. Spread newspaper out along the floor.

Starting at one end of the paper, paint a Halloween scene. Make a picket fence with jack-o'-lanterns, black cats, goblins, and a harvest moon.

Add more items to "tell" a spooky or fun Halloween story. Follow your ideas right across the mural. Let the paint dry.

This is a great project for a Halloween party. Have your friends each paint an area of the mural.

Find even more treats for Halloween with a special trick-or-treat jug. Learn how you can make an ordinary milk jug to match your costume with a little decoration.

For more fun holiday activities and crafts, see:

Advertisement

Trick-or-Treat Jug

Create a Frankenstein trick-or-treat jug to

Design a rain-proof candy trick-or-treat jug to match your Halloween costume: a black cat jug for a witch or a treasure chest for a pirate.

What You'll Need:

Plastic milk jug

Advertisement

Scissors

Permanent markers

Black felt

Craft glue

Fabric markers

Two screws

Brass paper fasteners

With an adult's help, cut off the top half of a plastic milk jug. Set it aside.

Decorate the bottom half of the milk jug to make a trick-or-treat basket. Use markers to draw on a Frankenstein face.

Cut a strip of black felt for his hair. Glue it to the basket.

Have an adult poke two holes near the bottom of the basket. Insert a screw in each hole for Frankenstein's bolts.

Cut two small pieces of felt. Glue them over the ends of the screws on the inside of the basket.

Cut a 1-inch-wide strip from the top half of the jug. Punch holes in the handle ends and the sides of the basket. Use brass paper fasteners to attach the handle to the basket.

Keep reading for more great Halloween craft ideas, including woven pumpkins that allow you to create your very own pumpkin patch.

For more fun holiday activities and crafts, see:

Advertisement

Woven Pumpkin

Woven pumpkin Halloween craft instructions.

Make something different for Halloween this year. Weave a three-dimensional woven pumpkin from construction paper.

What You'll Need:

Orange and green construction paper

Advertisement

Blunt scissors

Transparent tape

Pencil

Cut four 1×24-inch strips from orange construction paper. Arrange the strips to create a circle, overlapping them in the center. Secure the strips with tape.

To make a pumpkin sphere, start with the bottom strip and bring the ends together to form a circle. Hold the ends in place with tape.

Repeat with the remaining strips. Work from the bottom strip up and attach the ends together at the top of the sphere.

Draw a pumpkin stem shape on a piece of green construction paper. Cut out the stem, and tape it to the top of the pumpkin.

Next, you're in for a real treat. See how you can create a candy skeleton that tastes as good as it looks.

For more fun holiday activities and crafts, see:

Advertisement

Candy Skeleton

Make a real Halloween treat with this

This minty candy skeleton ghoul will be a Halloween favorite -- until you gobble him up.

What You'll Need:

White chenille stems

Advertisement

White paper

Scissors

Black marker

Wintergreen or peppermint candy with holes in the middle

White gumdrops

Craft glue

This cute little bag of bones is not only fun, he's almost edible -- but you might not want to eat him after handling his "bones." So dig in for some graveyard delights.

Bend a chenille stem in half. Cut a skull out of white paper, and use a black marker to give him features.

Slip three candies down the chenille stem to the center of the skeleton's body. These will be his ribs. Below the candies, pull the legs out so the candies stay on the body.

Wrap a second chenille stem just above the candies to form bony arms. Put a white gumdrop on the end of each leg for feet.

Glue the paper skull to the top of the chenille stem (where it is bent in half), and the magic is complete. This ghoul is sure to make your holiday decorations more festive!

Next, discover how easy it is to make Halloween ornaments that you can use to make scary trees around your house.

For more fun holiday activities and crafts, see:

Advertisement

Halloween Ornaments

Scare up a few of these recycled Halloween ornaments and start a new family tradition -- Halloween trees!

What You'll Need:

White plastic bags

Advertisement

Scissors

Newspaper

Black yarn

Black permanent marker

Orange fabric

Old tennis ball

Here are some ideas for rainproof ornaments made with recyclables.

To make a ghost, cut a 10- to 12-inch circle from a white plastic bag. Poke a tiny hole in the center.

Crumple up a piece of newspaper into a tight ball. Tie black yarn around the ball, and pull the yarn through the hole in the plastic circle for the ornament hanger.

Tie another piece of yarn around the plastic under the newspaper ball. Draw a ghost's face on the bag.

To make a pumpkin, cut a circle from orange fabric. Wrap it around an old tennis ball, and tie it closed with yarn. Draw a face on the fabric.

Create as many ornaments as you can dream up, and hang them on a Halloween tree.

Start the Halloween season with festive greeting cards for all your family and friends. Find out how you can create your own 'boo'-tiful designs for these Halloween hellos.

For more fun holiday activities and crafts, see:

Advertisement

Halloween Hello

This Halloween Hello craft will get everyone who receives one in the trick or treat spirit.

Cheerful holiday greetings can make all seasons bright, starting with these Halloween hellos.

What You'll Need:

Tiny pumpkins

Advertisement

Permanent markers

Ribbon

Holidays can be lonely occasions for some people. Special decorated pumpkins can add a cheerful little "boo!" to a lonely person's Halloween.

Buy tiny pumpkins from your local grocery store or produce stand. Decorate each of them with cheerful, smiling faces and curls of brightly colored ribbon on the stems.

Pass them out to less fortunate families and senior citizens in your neighborhood. Your local police department or YMCA can help distribute them, making sure they land in households that really need some holiday cheer.

For holiday cheer throughout the year, make decorated evergreen branches, colored eggs, paper shamrocks, and other seasonal symbols.

Now you can create cheerful Halloween mementos with monster magnets for your refrigerator or anywhere you want a Halloween surprise. Learn how easy they are to make with materials you have at home.

For more fun holiday activities and crafts, see:

Advertisement

Monster Magnet

Make your monster magnet extra colorful.

Say "boo!" with these Halloween surprises -- monster magnets you can put anywhere in your house.

What You'll Need:

Wood cutouts: one large square, two large rectangles, one small rectangle (adult help needed)

Advertisement

Acrylic paint: green, purple, orange

Paintbrushes

Permanent markers: black, white

Super strength glue

Wire cutters

Ruler

18-gauge black plastic-coated wire

Adhesive-back magnetic strip

Paint the wood cutouts the following colors: large square green, large rectangles purple, small rectangle orange. Let dry.

Paint about 1/2-inch of one end of the purple rectangles green (don't worry about making this perfect -- the paint edge can be jagged). Add small polka dots to the purple rectangles with orange paint.

Outline the green square and the purple rectangles with black permanent marker. Glue the orange rectangle to the center of the green square for the nose. Draw eyes with black marker; add pupils with white marker. Add eyebrows and a mouth with black.

Your monster magnet comes to life with

Glue the two purple rectangles to the bottom two corners of the square for arms. Ask an adult to cut three 1-inch lengths of wire. Bend each piece in half, and glue them to the top back of the head.

Make your monster magnet a hair-raising

Add a strip of adhesive-back magnet to the back, and hang on your fridge for a monster of a good time!

On the next page you'll learn to make a fun Halloween mobile.

For more fun holiday activities and crafts, see:

Advertisement

Halloween Mobile

Halloween Mobile

This Halloween mobile will haunt whatever room you hang it in.

What You'll Need:

Foam sheet: 5×5 inches yellow; 3×6 inches orange; 3×7 inches white; 5×5 inches black

Advertisement

Fine-point opaque paint markers: black, brown

Wiggle eyes: eighteen 12mm; four 5mm

58-inch length of black satin ribbon, 1/8-inch wide

1/4-inch black pom

Download and print this pattern, then trace and cut the following shapes from foam: one moon in yellow; two pumpkins in orange; two skulls in white; one bat, one cat head, and one set of cat paws in black. Use the paper punch to make holes in the foam shapes in the places indicated on the patterns.

Trace foam shapes from the pattern you downloaded.

Decorate both sides of the pumpkins by drawing lines with the brown marker and faces with the black marker; let dry. Draw faces on both sides of the skulls with the black marker; let dry. Glue two 5mm eyes on both sides of the bat. Glue two 12mm eyes on both sides of the pumpkins and skulls.

Cut a 12-inch length of ribbon. Insert one end of the ribbon 1-1/2 inches into the single hole at the top of the moon. Tie a double knot in the ribbon to securely attach it to the moon. Trim the short end of the ribbon close to the knot.

Position and glue the cat head on the back upper side of the moon. Position and glue the cat paws on the front of the moon, with the right paw covering the ribbon hanger. Glue the black pom nose on the cat head so that it slightly overlaps the edge of the moon, and glue two 12mm eyes to the cat head.

Attach the cat to the moon.

Cut the remaining ribbon into the following lengths, and use double knots to tie one end of each length to a foam shape and the other end to a hole at the bottom of the moon: a six-inch length for one pumpkin; a 9-inch length for one skull; a 13-inch length for the bat; an 11-inch length for one pumpkin; a seven-inch length for one skull. Trim the ends of each length of ribbon close to the knots.

Attach the shapes to the moon.

For more fun holiday activities and crafts, see:

Advertisement

Advertisement

Loading...