Butterfly Crafts

Your kids are interesting, fun, wonderful people. Butterfly crafts for kids let them know it! By expressing themselves, kids not only learn more about themselves, but also more about the world around them.

Before beginning these butterfly crafts, consider researching butterfly books or exploring the outdoors for inspiration. You and your kids will soon discover there's much to learn and appreciate about nature's most beautiful insect.

Advertisement

Explore the links below to find fun, educational butterfly crafts that will have your whole family abuzz with activity:

Butterfly Autograph Book

Make a gorgeous notebook for family members and friends to share signatures, notes, and ideas.

Butterfly House

Build a home for migrating and hibernating butterflies right in your own backyard.

Clothespin Butterfly

Pin up report cards, photos, and reminders with these fun, fluttery clips.

Crazy Caterpillar

Celebrate a butterfly's beginnings with these crafty, wiggly-eyed creatures.

Patterned Butterfly

Use paper and paint to create stained glass butterflies that shine in the sunlight.

Totally Buggy Clips

Turn butterflies, ladybugs and dragonflies into great gifts for everyone on your list.

Butterfly Magnet

Bring a scene from your garden to life by making this lovely and useful magnet.

Cutest Caterpillar

Not only is this craft fun to look at, but it makes a lovely jingle, too.

Dotty Butterfly

This beautiful butterfly craft is quite quick to make -- either with our pattern, or with one of your own.

Keep reading to learn how to make a special butterfly autograph book for the whole family to share.

For more fun activities and crafts for kids, see:

Advertisement
Butterfly Autograph Book

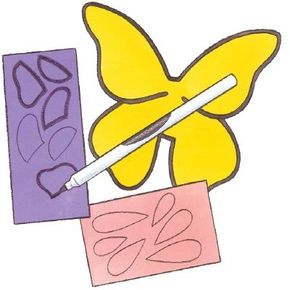
Trace the butterfly body and wing details with black marker, then cut out.

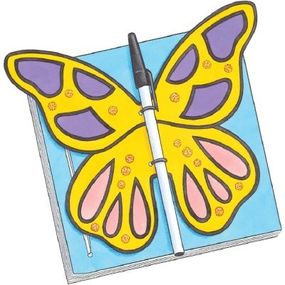
This butterfly craft gives your kids a very special place to collect signatures, poems, favorite sayings, and memories. Everyone in the family can invent their own unique butterfly design to grace the front of the butterfly autograph book. Let your creativity soar!

What You'll Need:
  • Card stock: 1 sheet each yellow, blue
  • Colored paper scraps: pink, purple
  • Black permanent felt-tip marker
  • Scissors
  • Craft glue
  • Gold glitter paint
  • 1/8-inch hole punch
  • 8-inch length black elastic cord
  • Ballpoint pen
  • Ruler
  • Pencil
  • 10 sheets white copy paper, 8-1/2x11 inches each
  • Large-eyed needle
  • 36-inch length embroidery floss or string
  • Glue stick
How to Make a Butterfly Autograph Book:

Step 1: Download this PDF butterfly pattern and print it out. Use it to trace the butterfly body on the sheet of yellow card stock. Trace the wing details on the colored paper. Outline all the pieces with the black felt marker, and cut out.

Advertisement

Step 2: Glue the colored details on the wings. Add dots of gold glitter paint to the wings. Let dry. Fold the wings up on the dotted line. Punch holes where shown on the pattern.

Step 3: Cut the elastic cord in half. Thread one length of cord through each set of holes with the loop on top. Slip the ballpoint pen under the loops. Turn the butterfly over, and tie the elastic ends in a knot on the back. Set the butterfly aside.

Step 4: Cut the blue sheet of card stock into two 5-1/2-inch squares for the book cover. Measure 1/2 inch in from one edge of one of the squares and draw a line. Beginning 1/2 inch in from one edge, mark 5 hole positions 1-1/8 inches apart along this line. Punch a hole on each mark. Repeat for the second square.

Step 5: Fold each piece of copy paper in half widthwise. Trim excess paper along one side so the pieces measure 5-1/2 inches wide. Use one of the cover squares to mark holes on the folded edge of each piece of paper. Punch holes.

Step 6: Stack the white pages between the book covers, lining up the holes. Thread the needle with a doubled length of floss. Stitch all of the pages and covers together using a running stitch.

Start by pushing the needle up through the first hole, leaving a 1-1/2-inch tail of floss in the back. Pull the floss down through the second hole, up through the third, down through the fourth, and up through the fifth. Return the row of running stitches in the opposite direction.

Glue the butterfly body to the cover and leave the wings free to fly.

Cut off the needle, and tie the ends of the floss together at the back of the book. Trim any excess floss. Glue the butterfly to the top of the book along the body section, leaving the wings free to flutter!

The next butterfly craft will teach kids how live butterflies migrate and hibernate. Learn how to build a butterfly house in the next section.

For more fun activities and crafts for kids, see:

Advertisement
Butterfly House

The Butterfly House Butterfly Craft gives migrating

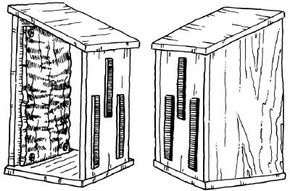
This butterfly craft gives migrating and hibernating butterflies a helping hand by building them a place to live. When butterflies migrate they need to find shelter from bad weather. Usually they seek shelter in cracks of trees or buildings.

Some butterflies will hibernate in the winter and need shelter to protect them from winter cold. You can build a butterfly house to help migrating and hibernating butterflies. An adult should assist kids with this project.

Advertisement

What You'll Need:
  • Hand saw
  • Pine lumber (6"x1/2"x7')
  • Scrap of pine (8" wide)
  • Hammer
  • Nails
  • Pieces of tree bark or floral moss
How to Make a Butterfly House:

Step 1: Cut pine boards to the following dimensions:

Two sides: 6"x18" (Cut the top at an angle so that one side is 18 inches long and the other side is 17 inches long.)

One back: 4-1/2"x18"

One front: 4-1/2"x17"

One bottom: 4-1/2"x6"

One top: 7"x7"

Step 2: Cut three 12-inch long slits in the front. Make the slits one inch wide, with one several inches higher than the other two. (See illustration above.) Nail the bark or moss to the back piece to give the butterflies something to cling to.

Step 3: Lay the back down, bark side up, and stand one of the side pieces up against it with the longer sides in back. Hold and nail in place. Do the same with the other side.

Step 4: Put the front in between the two side pieces and nail in place. Nail on the bottom and the top. Mount the house on a post in the shade.

The next butterfly craft will have kids making their very own butterflies with colorful paper and glue. Learn how to make clothespin butterflies in the next section.

For more fun activities and crafts for kids, see:

Advertisement
Clothespin Butterfly

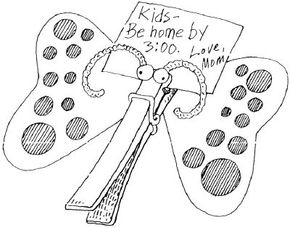
This Clothespin Butterfly Craft is fun and useful.

Butterflies flutter in the wind like real-life fairies, colorfully floating on air. It's easy to pin one down in this creative butterfly craft. Your kids will make their own butterflies with paper, glue, and clothespins -- and a little imagination.

What You'll Need:
  • White paper
  • Pencil
  • Ruler
  • Scissors
  • Colored paper
  • Sequins
  • Craft glue
  • Clothespin
  • Wiggle eyes
  • Chenille stems
  • Magnetic strip (optional)
How to Make a Clothespin Butterfly:

Step 1: Draw a 5x5-inch bow-tie shape on a piece of white paper, making sure the shape narrows to about 1 inch at the center. Cut out the shape; this is your butterfly.

Advertisement

Step 2: Decorate the wings with bits of paper, sequins -- anything colorful. Glue the butterfly to the bottom of a clothespin. Add wiggle eyes and chenille-stem antennae to your butterfly.

Now you've got a magical butterfly you need never set free! Add a magnetic strip to the bottom of the clothespin, and your butterfly becomes a refrigerator magnet. It can hold notes, report cards, pictures, and coupons!

The next butterfly craft will really make your kids bug out! Learn how to make crazy caterpillars in the next section.

For more fun activities and crafts for kids, see:

Advertisement
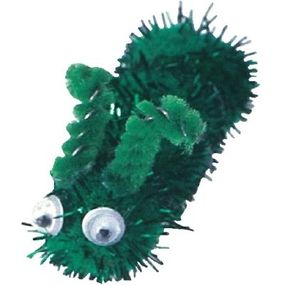
Crazy Caterpillar

Make crazy caterpillars in

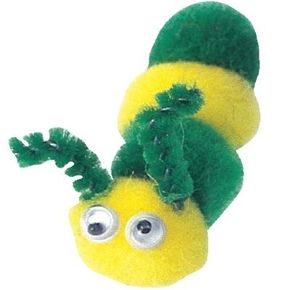
Crazy caterpillar is a butterfly craft that will have your kids bugging out with excitement! Encourage them to get creative -- experiment with different colors and sizes of poms and stems, and make each caterpillar as long or as short as they like.

What You'll Need:
  • 4 or more poms, any color or size
  • 1 chenille stem, 3mm, any color
  • 2 wiggle eyes, 3mm each
  • Glue

How to Make a Crazy Caterpillar: Step 1: Glue wiggle eyes and chenille-stem antennae to the first pom.

Advertisement

Glue on the wiggle eyes and antennae.
Step 2: Experiment with different colors and sizes of poms and stems, and make each caterpillar as long or as short as you'd like.Make as many critters as you want!In the next butterfly craft, your butterfly-loving kids will see the light. Learn how to make stained-glass patterned butterflies in the next section. For more fun activities and crafts for kids, see:

Step 2: Experiment with different colors and sizes of poms and stems, and make each caterpillar as long or as short as you'd like.Make as many critters as you want!In the next butterfly craft, your butterfly-loving kids will see the light. Learn how to make stained-glass patterned butterflies in the next section. For more fun activities and crafts for kids, see:

Advertisement
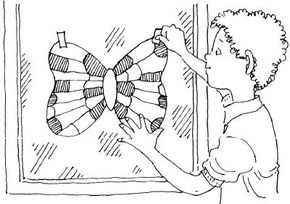
Patterned Butterflies

Use the Patterned Butterflies Butterfly Craft to re-create the patterns of butterflies you see in your back yard!

These beautiful butterfly crafts look like they're made from stained glass! Study the patterns on real butterflies (from books or by looking at butterflies in your yard or garden), and see if you can re-create some of those patterns.

What You'll Need:
  • Butterfly reference books (optional)
  • Large sheet of paper
  • Marker
  • Tissue paper in many colors
  • Waxed paper
  • Liquid starch
  • Paintbrushes
  • Scissors
How to Make Patterned Butterflies:

Step 1: Study some reference books about butterflies to decide which butterfly you want to create. Draw a butterfly outline on the large sheet of paper.

Advertisement

Step 2: Tear the colored tissue into 3-inch shapes. Place a sheet of waxed paper over the butterfly outline. Use the liquid starch to paint tissue pieces onto the wax paper, filling in the outline of the butterfly with a mosaic of different colors.

Step 3: Add 1 or 2 more layers of tissue, and allow your butterfly to dry overnight.

Step 4: Cut out the butterfly, following the outline on the underlying paper. Slowly peel the tissue-paper butterfly off the waxed paper.

Tape your butterfly to the window, and let the sun shine through!

The next butterfly craft is great for creative gift-giving. Learn how to make totally buggy clips in the next section.

For more fun activities and crafts for kids, see:

Advertisement
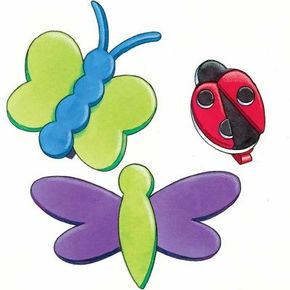
Totally Buggy Clips

These Totally Buggy Butterfly Craft Clips are a cinch to put together, so they shouldn't bug you too much.

Butterflies and bugs are amazing things -- and this butterfly craft really shows them off. Use mini clothespins or glue the buggy foam shapes onto adhesive-back magnet strips. Then hang your kids' best artwork or top-notch tests on the refrigerator for all to see!

What You'll Need:
  • Pencil
  • Craft foam scraps
  • Scissors
  • Craft glue
  • Hole punch
  • 1-inch colored clothespins
  • Clear fishing line
  • 2 thumbtacks
How to Make Totally Buggy Clips:
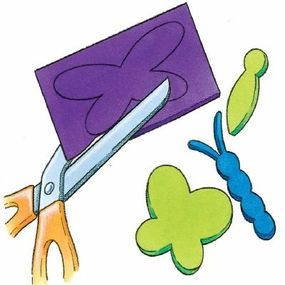
Trace and cut out bug shapes.

Step 1: Using stencils or drawing freehand, trace and cut out bug shapes in various colors of craft foam.

Advertisement

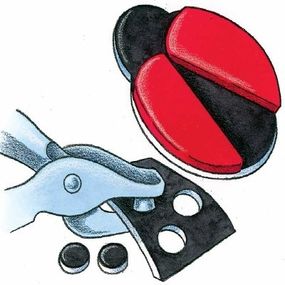
Use a hole punch to make ladybug spots.

Step 2: To make a ladybug, glue 2 ladybug wings on top of a ladybug body, keeping the wings slightly apart in the middle. Use the hole punch to make small circles out of craft foam; glue them to the tops of the ladybug wings.

For the butterfly and dragonfly, glue a body cutout to a wing cutout. Let dry.

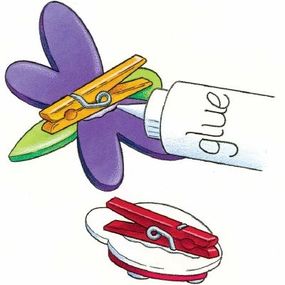
Glue a clothespin to the back of each bug.

Step 3: Turn the bugs over, and glue a clothespin to the back of each bug. Let dry. String the fishing line along a wall and secure it with a thumbtack on each end.

Clip your buggy clothespins onto the line to hang your kids' very best photos and artwork. They also make great homemade gifts for teachers, friends, and grandparents, too!

On the next page you'll learn to make a 3-D magnet in the shape of a butterfly that mimics the butterflies found in your garden.

For more fun activities and crafts for kids, see:

Advertisement
Butterfly Magnet

This butterfly magnet brings the beauty of your garden to the front of your refrigerator. Who could want more?

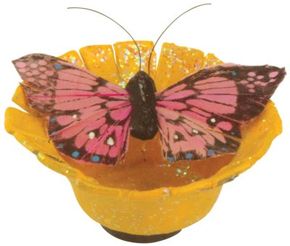
You'll love this beautiful butterfly magnet, and no doubt it will be stuck on you, too -- or at least on your refrigerator! When you've finished it, it will look as real as a butterfly alighting on a flower in your garden.

What You'll Need:
  • Paper egg carton
  • Acrylic paint
  • Small, round magnet
  • Fine glitter
  • Craft butterfly
  • Scissors
  • Paintbrush
  • Craft glue
  • Ruler
How To Make a Butterfly Magnet:

Step 1: Cut 1 egg cup from the carton. Trim the edges as smoothly as you can.

Advertisement

Step 2: Paint the egg cup the color of your choice; let dry. Apply another coat if needed.

Step 3: Glue a small magnet to the bottom of the cup. Hold it in place for a few seconds; place the cup upside down to dry.

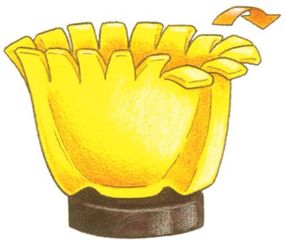
Cut the cup along the edges and bend back the petals.

Step 4: To create flower petals, make sixteen 1/4-inch cuts around the outer edge of the cup. Bend the petals back to open up the flower.

Step 5: Paint glue over the inside of the cup; sprinkle glitter over the glue. Let dry, then repeat on the outside of the cup. Tap off excess glitter.

Step 6: Glue a craft butterfly into the center of the flower.

Vary the colors of the flowers and the butterflies to create a glorious garden.

On the next page you'll learn to make a caterpillar -- the bug that blossoms into a lovely butterfly.

For more fun activities and crafts for kids, see:

Advertisement
Cutest Caterpillar

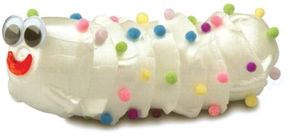
The cutest caterpillar is soft and fuzzy and jingles when he moves.

No bells, no whistles . . . well, okay, a few bells! Make the cutest caterpillar out of egg cups and jingle bells. Not only is this craft fun to look at, but it makes a lovely sound, too.

What You'll Need:
  • Foam or paper egg carton
  • 7 small jingle bells
  • 2 wiggle eyes
  • 1 crescent-shape faux gem
  • Tiny poms
  • Scissors
  • Needle and thread
  • Craft glue

Step 1: Cut 9 egg cups from the carton. Trim the edges as smoothly as you can.

Advertisement

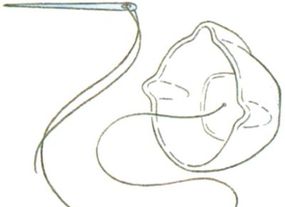
Sew thread through the center of the egg cup.

Step 2: Thread a needle, and tie a knot at the end of the thread. Poke a hole in the bottom of one of the cups from the outside in. Pull the thread all the way through.

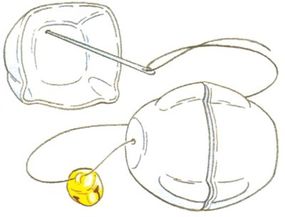
Step 3: String a second cup onto the thread, this time poking the hole from the inside out. Glue these 2 cups together.

Thread a jingle bell on the line and attach it to the cups.

Step 4: Thread a jingle bell onto the line, then begin stringing the rest of the egg cups. Place each hole off-center in the bottom of the cup, stringing from the inside out. String a jingle bell after each cup. Repeat until the final cup is in place.

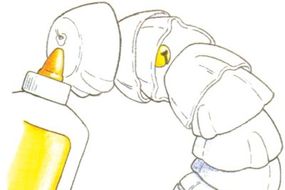
Step 5: Tie a knot in the thread, and glue it to the "nose" of the last egg cup (the face of the caterpillar).

Step 6: Glue wiggle eyes and a gem on the face to create a smile that covers the end of the thread.

Glue colorful poms along the body of the caterpillar.

Step 7: Glue tiny colorful poms all over the caterpillar's body, making sure to glue one to the very end, covering the thread at the bottom.

String more than 9 egg cups -- string 20! or 30! or more! This critter can be as long or as short as you like.

On the next page, make a butterfly spreading its wings using paper plates and chenille stems.

For more fun activities and crafts for kids, see:

Advertisement
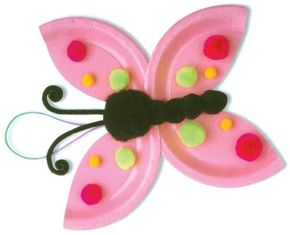
Dotty Butterfly

This dotty butterfly is made using paper plates and colorful poms.

Who would guess a dotty butterfly this beautiful could be so unbelievably quick to make? Follow our lead, or wing a pretty design on your own.

What You'll Need:
  • 2 pink paper plates, 6-3/4 inch
  • 4 black poms, 1 inch each
  • 2-inch black pom
  • Black chenille stem
  • Poms, assorted colors and sizes
  • 10-12 inches colored string
  • Scissors
  • Craft glue
How To Make a Dotty Butterfly:
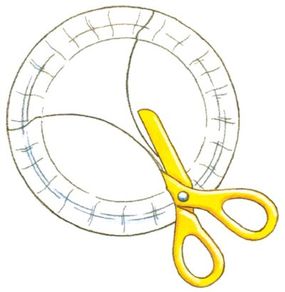
Cut the paper plates with an arcing motion.

Step 1: Cut both plates as shown to create 4 wing shapes. Set aside.

Advertisement

Step 2: Glue the four 1-inch poms to each other, end to end. Glue the 2-inch pom at the end of this row.

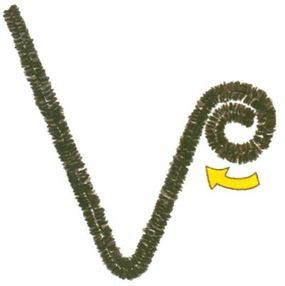
Bend a chenille stem in a V and curl the ends.

Step 3: Bend a black chenille stem in half, and curl each end of the stem around your finger. Apply a dab of glue to the bent part of the stem, and press it deep into the large pom. Hold it in place until the glue has time to take hold; set aside to dry completely.

Step 4: Glue different sizes and colors of poms to decorate the wings, and glue all 4 wings to the underside of the black pom body. Let dry.

Step 5: Glue both ends of a length of string into the back of the head to create a loop for hanging; let dry.

For more fun activities and crafts for kids, see:

ABOUT THE CRAFT DESIGNERSButterfly Autograph Book by Cindy Groom Harry and staffButterfly Magnet by Sharon Broutzas, Rice Freeman-Zachery, Connie Matricardi, Susan Milord, Lynnette Schuepbach, Kim Solga, Florence TemkoCutest Caterpillar by Sharon Broutzas, Rice Freeman-Zachery, Connie Matricardi, Susan Milord, Lynnette Schuepbach, Kim Solga, Florence TemkoDotty Butterfly by Sharon Broutzas, Rice Freeman-Zachery, Connie Matricardi, Susan Milord, Lynnette Schuepbach, Kim Solga, Florence Temko

Advertisement

Advertisement

Loading...