Evening Glamour Quilted Purse Pattern

It only takes some colorful ribbons and a few hours to make the Evening Glamour Quilted Purse. You could also choose delicate pastels and lace to make a trousseau keepsake bag for the bride-to-be.
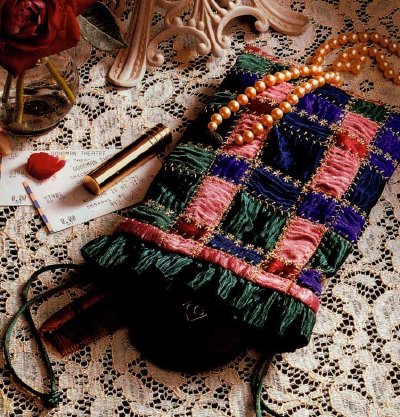
Evening Glamour Quilted Purse Pattern
©2007 Publications International, Ltd.
The Evening Glamour Quilted Purse gives you a touch of elegance
without having to work too hard.

You'll Need:

  • 2/3 yard each 4 or 5 textured ribbons in several widths, colors, and patterns, about 7 yards total
  • 1 yard ribbon, 11/2 inch wide, matching other ribbon colors
  • 7 X 18-inch piece fusible tricot interfacing
  • 7 X 18-inch piece soft woven or tricot fabric for lining
  • 11/3 yard rattail cording
  • Transparent monofilament thread
  • Gold rayon embroidery thread
  • Upholstery thread
  • Grid board
  • Press cloth
  • Safety pin or bodkin

Once you've found everything you need, learn how to put all the materials together to make the quilted purse on the next page.

Not what you're looking for? Try these:

Advertisement

How to Make Evening Glamour Quilted Purse Pattern

Add a bit of glamour to your outfit with this stylish evening bag. The finished piece measures approximately 6 X 9 inches.

Evening Glamour Quilted Purse Pattern
©2007 Publications International, Ltd.
Evening Glamour Quilted Purse Pattern

To make the Evening Glamour Quilted Purse Pattern:

  1. Place fusible tricot on grid board with glue side up. Cut textured ribbons into lengths to cover tricot completely horizontally. Then cut and weave short pieces vertically beginning at center and creating a solid, symmetrical pattern. While weaving, pin ends of ribbons to grid board to prevent shifting. Carefully place press cloth over ribbons and fuse. Remove pins. Stay-stitch around outer edges 1/4 inch from cut edges to secure loose ends of ribbons.

    Evening Glamour Quilted Purse Pattern
    ©2007 Publications International, Ltd.
    Step 1

  2. Thread machine with gold rayon embroidery thread. Center presser foot over ribbon edges and apply decorative stitches in continuous rows over all ribbon edges to create crazy quilt effect.

  3. Fold in half with right sides together and sew 1/2-inch side seams. Trim away excess fabric and ribbon from seams, leaving 1/4-inch allowance. Trim diagonally at corners. Turn.

  4. Lay slightly more than 1 yard upholstery thread over 1-yard length of ribbon, with thread close to ribbon edge and extending beyond ribbon ends. Using transparent monofilament thread, zigzag stitch over upholstery thread, taking care to avoid catching thread in stitches. Gather ribbon to fit around upper edge of bag and sew ends together. Pin in place around upper edge of bag with right sides together. Baste. Stitch all the way around bag using 1/2-inch seam allowance.

  5. To make lining, fold lining fabric in half with right sides together and sew side seams, leaving opening on one side to turn. Slip bag inside lining with right sides together and stitch around upper edge, leaving 1/2-inch seam allowance. Ruffle should be between bag and lining. Turn. Press ruffle up.

  6. To make casing, stitch around upper edge of bag through all layers 1/2 inch from top and again 1/2 inch below first row of stitching. Open seams of lining between stitching rows.

  7. To make drawstring, thread rattail cording through casing using safety pin or bodkin. Tie ends together in double knot and arrange rattail to extend equally from both ends of casing. Pull out lining and hand stitch opening. Push lining back into bag.

Want more information? Try these:

Advertisement

Advertisement

Loading...