Folk-Art Yuletide Quilted Wall Hanging Pattern

©2007 Publications International, Ltd. These Folk-Art Yuletide Quilted Wall Hangings celebrate the holiday season with a down-home, rustic air.

Welcome the holidays to your home with these folk-art wall hangings. Traditional country colors and piecing methods blend seamlessly with contemporary design and appliqué techniques. Download a photo and the patterns for the Folk-Art Yuletide Quilted Wall Hangings in this six-page PDF.

You'll Need:

Advertisement

Large Quilt

  • 1/4 yard tan print for house background
  • 1/8 yard each 4 assorted prints for houses
  • 1/8 yard each or scraps 4 assorted prints for roofs
  • Scraps 3 assorted prints for doors and chimney
  • 9-inch squares each 3 tan prints for moose backgrounds
  • 10-inch square tan print for snowman background
  • 10-inch square tan print for mittens background
  • 1/4 yard brown print for tree background
  • 1/8 yard or scraps tan print for checkerboard
  • 1/8 yard green print
  • 1/8 yard or scraps yellow print
  • 1/8 yard or scraps orange print
  • 1/8 yard or scraps dark brown print
  • 1/3 yard black and tan print
  • 1/8 yard black print
  • 3/8 yard medium blue print
  • 1/3 yard dark blue print for binding
  • 1 yard backing fabric
  • 38 X 32-inch piece low-loft batting
  • 1 yard fusible webbing
  • 9 assorted buttons
  • 5 small red buttons
  • White and black threads
  • Red fine-point permanent marker
  • 1/8 yard white for snowman
  • 1/8 yard each or scraps 3 assorted prints for windows
  • 1/8 yard each or scraps 3 brown prints for moose
  • 1/8 yard red plaid for mitten
  • 1/8 yard light blue plaid for mitten
  • Scraps: brown for stars; orange for snowman nose; assorted colors for snowman hat, patch, scarf, chimneys, mitten bands, and doors

Small Quilt

  • 81/2 X 91/2-inch rectangle tan print for snowman background
  • 81/2 X 71/2-inch rectangle tan print for mitten background
  • 1/8 yard dark red print
  • 16 scraps in various colors for scrappy border, 11/2 X 2 inches each
  • 1/8 yard dark blue print
  • 1/3 yard backing fabric
  • 12 X 32-inch piece low-loft batting
  • 1/4 yard fusible webbing
  • 17 buttons in assorted sizes and colors
  • Red fine-point permanent marker
  • White and black threads

Appliqué Fabrics

  • 1/8 yard white for snowman
  • 1/8 yard red print for mitten
  • 1/8 yard blue print for mitten
  • Scraps: orange for snowman nose; assorted colors for scarf, hat, patch, mitten bands, and mitten stars

Note: These patterns use the techniques known as bias rectangle and template-free angle piecing. See How to Quilt for directions.

Once you've gathered the materials you need, learn how to make these festive quilted projects. We'll start with the large quilted wall hanging pattern on the next page.

Not what you're looking for? Try these:

  • Find a Christmas quilt you love on our Christmas Quilt Patterns page.
  • Flip through our Quilt Patterns to find your next quilting project.
  • Learn How to Quilt or brush up on the basics with our refresher course.

Advertisement
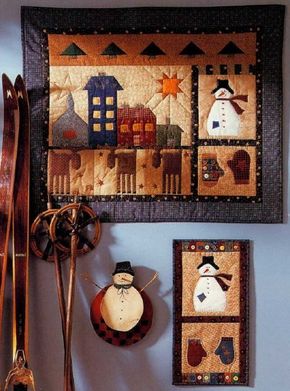
How to Make Large Quilted Wall Hanging Pattern

Find the perfect spot in your home for this adorable wall hanging. You'll be glad you did! To get a closer look at the quilted wall hanging and its patterns, download this six-page PDF of the Folk-Art Yuletide Quilted Wall Hanging.

To make the Large Quilted Wall Hanging Pattern:

Advertisement

  1. Assemble tree unit. From tree background, cut ten 41/2 X 11/2-inch rectangles, ten 2 X 1-inch rectangles, six 2 X 5-inch rectangles, and five 27/8-inch squares. From green print, cut five 27/8-inch squares. From dark brown print, cut five 11/2 X 1-inch rectangles.
  2. Place one 27/8-inch background square and one 27/8-inch green square with right sides together. Draw diagonal line from corner to corner. Stitch 1/4 inch on each side of line. Cut apart on line. Repeat for rest of 27/8-inch squares. Press half the squares toward green and the other half toward background. Pair squares so that green sides are together, forming tree tops. Pair up opposing seams. Stitch and press to one side.
  3. Stitch 2 X 1-inch tree background piece to either side of each tree trunk, along 1-inch sides. Join tree and trunk units to form five 41/2 X 3-inch blocks. Add one 41/2 X 11/2-inch background piece to top and bottom of each tree block. Stitch tree blocks together in a row, with 2 X 5-inch background pieces between tree blocks and at each end of row. Press and set aside.
  4. The houses are numbered 1 through 3 from left to right. Church: From house background, cut one 6 X 3-inch rectangle, one 33/8-inch square, and one 1 X 6-inch rectangle. From church fabric, cut one 51/2 X 31/2-inch rectangle and one 33/8-inch square. (You may prefer to use different fabrics for church base and church roof.) House 1: From house background, cut one 61/2 X 2-inch rectangle, two 2 X 21/2-inch rectangles, and two 5 X 4-inch rectangles. From house 1 fabric, cut one 41/2 X 81/2-inch rectangle. From roof 1 fabric, cut two 2 X 21/2-inch rectangles and one 31/2 X 21/2-inch rectangle. House 2: From house background, cut one 6 X 3-inch rectangle and one 2 X 11/2-inch rectangle. From house 2 fabric, cut one 6 X 3-inch rectangle and two 23/4 X 2-inch rectangles. From roof 2 fabric, cut one 5 X 2-inch rectangle and one 2 X 11/2-inch rectangle. From door 2 fabric, cut one 11/2 X 2-inch rectangle. House 3: From house background, cut one 2 X 11/2-inch rectangle, one 31/2 X 11/2-inch rectangle, one 21/2 X 11/2-inch rectangle, and one 2 X 21/2-inch rectangle. From house 3 fabric, cut one 4 X 11/2-inch rectangle, one 2 X 11/2-inch rectangle, and one 11/2-inch square. From roof 3 fabric, cut one 31/2 X 11/2-inch rectangle and one 11/2-inch square. From chimney fabric, cut one 1 X 11/2-inch rectangle. From door 3 fabric, cut one 11/2-inch square. Star: From house background, cut one 41/2 X 11/2-inch rectangle, four 11/2 X 21/2-inch rectangles, four 11/2-inch squares, one 41/2 X 3-inch rectangle, and one 11/2 X 8-inch strip. From orange print, cut eight 11/2-inch squares. From yellow print, cut one 21/2-inch square. Moose: From moose background fabrics, cut two 7-inch squares and one 71/2 X 7-inch rectangle. Inner border: From black print, cut one 201/2 X 1-inch strip.
  5. The houses will be pieced in sections. Start with section 1. Make 1 right and 1 left bias rectangle with 2 X 21/2-inch background and house 1 roof pieces. Following diagram below, stitch section 1 together (5 X 4-inch background pieces were cut with house 1). ©2007 Publications International, Ltd.Step 5
  6. Assemble section 2. Place one 33/8-inch background square and one 33/8-inch church square with right sides together. Draw diagonal line from corner to corner and stitch 1/4 inch on either side of line. Cut apart on line and press to dark. Stitch together with roof sides together to form church roof. Assemble church as shown in diagram below and add house 1 rectangle to right side. ©2007 Publications International, Ltd.Step 6
  7. Make section 3. Make 1 right bias rectangle using 11/2 X 2-inch roof 2 and background rectangles. Assemble section 3 as shown in diagram below. ©2007 Publications International, Ltd.Step 7
  8. Make section 4. Using template-free angle piecing technique, join 11/2-inch roof 3 square to 21/2 X 11/2-inch background piece. Assemble section 4 as shown in diagram below. ©2007 Publications International, Ltd.Step 8
  9. Assemble star. Using template-free angle piecing technique, stitch 11/2-inch orange print squares to 11/2 X 21/2-inch background pieces. Assemble star as shown in diagram below, adding background pieces. ©2007 Publications International, Ltd.Step 9
  10. Stitch moose background pieces together with 7 X 71/2-inch rectangle in center. Stitch 201/2 X 1-inch inner border strip to top. Stitch star block to section 4. Stitch section 2 to section 3. Stitch section 1 to the top of sections 2 and 3 and add section 4 with star. Refer to finished quilt illustration below for placement. ©2007 Publications International, Ltd.Large Folk-Art Yuletide Quilted Wall Hanging
  11. Assemble snowman and mitten blocks and borders. From snowman background fabric, cut one 81/2 X 91/2-inch rectangle. From mittens background, cut one 81/2 X 71/2-inch rectangle. From medium blue print, cut two 311/2 X 3-inch strips and two 301/2 X 3-inch strips. From black and tan print, cut one 19 X 11/2-inch strip, one 81/2 X 11/2-inch strip, two 291/2 X 11/2-inch strips, two 251/2 X 11/2-inch strips, and four 11/2 X 2-inch rectangles. From tan checkerboard fabric, cut four 11/2 X 2-inch rectangles.
  12. Stitch together 11/2 X 2-inch black and tan print and light checkerboard rectangles along 2-inch sides, alternating colors. From top to bottom, stitch together checkerboard strip, snowman background rectangle, 81/2 X 11/2-inch black and tan print strip, and mittens background rectangle. Add 11/2 X 19-inch black and tan print strip to left side of unit.
  13. Stitch snowman and mitten block to right of house and moose block. Stitch tree block to top of quilt. See finished quilt illustration above for placement.
  14. Stitch 11/2 X 291/2-inch black and tan print strips to top and bottom of quilt. Stitch 11/2 X 251/2-inch black and tan print strips to each side of quilt. Stitch 311/2 X 3-inch medium blue strips to top and bottom of quilt. Stitch 301/2 X 3-inch medium blue strips to each side of quilt.
  15. Download and cut out all patterns. Iron fusible webbing to wrong side of appliqué fabrics. Trace patterns on paper side of fusible webbing and cut out. Position on quilt as shown in finished quilt illustration above and fuse. Sew buttons on mitten and snowman. Use black thread and basting stitch to make snowman mouth. Make French knots for snowman eyes and moose eyes. Use white thread to stitch around snowman patch. With fine-point permanent marker, draw snowman cheeks.
  16. Layer front, batting, and back; baste. Using white thread, hand quilt around edges of appliqué shapes and in ditches around borders. Hand quilt lines radiating from star. To save time and create a different look, you can machine quilt instead. From binding fabric, cut four 31/4 X 45-inch strips. See How to Quilt to stitch binding to quilt.

See the next section for instructions on making the small quilted wall hanging.

Not what you're looking for? Try these:

  • Find a Christmas quilt you love on our Christmas Quilt Patterns page.
  • Flip through our Quilt Patterns to find your next quilting project.
  • Learn How to Quilt or brush up on the basics with our refresher course.

Advertisement
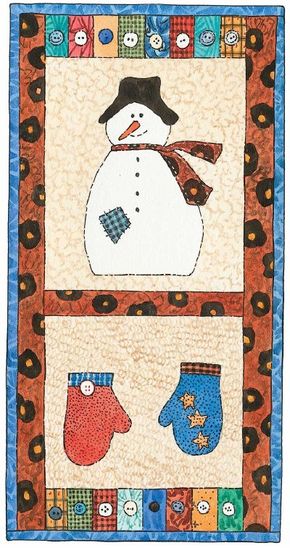
How to Make Small Quilted Wall Hanging Pattern

©2007 Publications International, Ltd. Small Folk-Art Yuletide Quilted Wall Hanging Pattern

Perfect for that little nook that needs a some holiday spirit, this small quilted wall hanging is also fun to make. To get a closer look at the quilted wall hanging and its patterns, download this six-page PDF of the Folk-Art Yuletide Quilted Wall Hanging.

To make the Small Quilted Wall Hanging Pattern:

Advertisement

  1. From snowman background, cut one 81/2 X 91/2-inch rectangle. From mitten background, cut one 81/2 X 71/2-inch rectangle. From dark red, cut two 11/2 X 201/2-inch strips and one 11/2 X 81/2-inch strip. From scrappy border fabrics, cut sixteen 11/2 X 2-inch rectangles.
  2. Stitch background pieces to 11/2 X 81/2-inch dark red strip along 81/2-inch sides. Stitch scrappy border rectangles together along 2-inch sides to make 2 units of 8 rectangles each. Stitch units to top and bottom of quilt. Stitch 11/2 X 201/2-inch dark red strips to sides.
  3. Download and cut out snowman and mitten patterns. Iron fusible webbing to wrong side of appliqué fabrics. Trace patterns on paper side of fusible webbing and cut out. Position on quilt as shown in finished quilt illustration and fuse. Use black thread and basting stitch to make snowman smile. For snowman buttons and eyes, make French knots with black thread. Use black thread to stitch around snowman patch. Layer front, batting, and back; baste. Using white thread, hand quilt around edges of scarf and hat appliqués. Using black thread, hand quilt around edges of snowman, snowman nose, mitten, and star appliqués. Hand or machine quilt in ditches around borders. Stitch buttons on scrappy border rectangles and mitten. From dark blue, cut three 31/4 X 45-inch strips. See How to Quilt to stitch binding to quilt.

Want more information? Try these:

  • Find a Christmas quilt you love on our Christmas Quilt Patterns page.
  • Flip through our Quilt Patterns to find your next quilting project.
  • Learn How to Quilt or brush up on the basics with our refresher course.

Advertisement

Advertisement

Loading...