Circus Stars Quilt Pattern

©2007 Publications International, Ltd. This bold quilt design will be treasured for years to come.

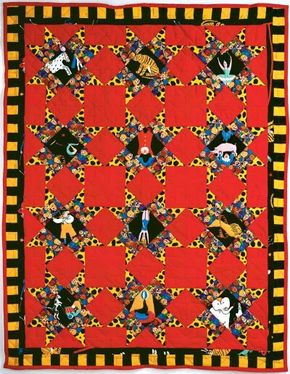
The Circus Stars Quilt will add a festival feeling to any nursery. Select a circus print and complementary fabrics for the stars and borders. The finished piece measures approximately 481/2 X 68 inches. Download the four-page Circus Stars Quilt Pattern as a PDF to print out the pattern.

You'll Need:

Advertisement

  • 1/2 yard black-and-yellow stripes
  • 1 yard yellow print with black spots
  • 1 yard multicolored print with faces
  • 1 yard bright red solid
  • 2 yards picture print on black
  • 31/2 yards backing fabric
  • 2 yards bright red binding fabric
  • 2 yards polyester or cotton quilt batting, 54 or 60 inches wide
  • Coordinating cotton or poly/cotton thread
  • Nylon thread

After you gather the materials listed above, you're ready to make the bold and beautiful Circus Stars Quilt. Find out how on the next page.

Not what you're looking for? Try these:

  • Find a baby quilt you love on our Baby Quilt Patterns page.
  • Flip through our Quilt Patterns to find your next quilting project.
  • Learn How to Quilt or brush up on the basics with our refresher course.

Advertisement

How to Make Circus Stars Quilt Pattern

With a few stitches and lots of love, you're sure to create a big top of fun for your baby with this adorable keepsake quilt. Download a photo and the patterns for the Circus Stars Quilt in this four-page PDF.

To make the Circus Stars Quilt Pattern:

Advertisement

  1. Download quilt pattern pieces A through E. Be sure you can see grain line and identifying letter. Cut paper pieces out and glue to template plastic. Cut out plastic-backed pieces. Trace pattern pieces onto fabric.
  2. From yellow print with black spots, cut 96 of piece A. From multicolored print with faces, cut 48 of piece B. From red, cut two 31/4 X 50-inch strips and two 31/4 X 70-inch strips for binding. Cut 48 of piece C and 48 of piece D. From picture print on black, cut four 11/2 X 72-inch strips for inner border and 12 of piece E. (Remember that pictures will be placed on quilt as diamonds, not squares. Be sure they read correct way before cutting them out.) From black-and-yellow stripes, cut six 21/2 X 45-inch strips for outer border; strips should run crosswise.
  3. Sew pieces together as series of units, making use of chain piecing. Sew all units before going to next step. For unit CA: Pin 2 of piece A to each piece C. Press seams toward piece C. Make 48.
  4. For unit CAB: Pin A sides of unit CA to long side of piece B. Sew. Press seams toward piece B. Make 48. For unit CABD: Pin piece D to each side of unit CAB. Sew. Press seams toward piece D. Make 24.
  5. For unit CABE: Using remaining 24 unit CABs, pin 2 CAB units to opposite sides of piece E. Sew. Press seams toward piece E. Make 12. Pin and sew 1 unit CABD to each long side of unit CABE. Press toward CABD units (away from piece E). Make 12 blocks. ©2007 Publications International, Ltd.This pattern will help you create each block.
  6. Lay out completed blocks in rows of 3. Sew blocks together in rows of 3 blocks each. Press seams to 1 side. Pin and sew each 3-block row to another 3-block row. Make two 6-block units. Pin and sew 6-block units together. Press seams.
  7. Measure quilt from center top down to bottom edge. This is the measurement for borders of 2 longest sides. Cut 2 of picture print strips (72 inches long) to measurement. Pin and sew strips to long edges. Press seams toward border.
  8. Measure from center of each long edge across to opposite edge. Cut remaining two 72-inch strips. Pin and sew to quilt. Press seams toward border.
  9. Measure from center of each long edge across to opposite edge. This is the measurement for top and bottom borders. Cut 2 black-and-yellow stripes to measurement. Pin and sew strips to top and bottom. Sew together 2 strips of black-and-yellow stripes to make long strip, about 90 inches long. Repeat. Measure quilt from center top down to bottom edge. Cut to measurement. Be sure to sew them so stripe pattern continues. Press seams toward border.
  10. Fold backing fabric in half, selvages together, and cut along fold. With right sides and selvages together, sew 2 pieces with 1/2-inch seam.
  11. Lay backing face down and center batting. Lay quilt face up. Pin and hand baste. Quilt around outline of stars. Outline prominent figures in picture fabric at center of stars. Quilt stars in red squares that occur where 2 blocks meet, including outside edges (enlarge stars to fit blocks). Trim batting and backing. Sew binding to quilt. Remove basting.

Want more information? Try these:

  • Find a baby quilt you love on our Baby Quilt Patterns page.
  • Flip through our Quilt Patterns to find your next quilting project.
  • Learn How to Quilt or brush up on the basics with our refresher course.

Advertisement

Advertisement

Loading...