How to Draw the Taj Mahal in 5 Steps

W­ith­ its intricately detailed exterior, the majestic Taj Mahal is one of the world's most wonderful works of architecture. Learn how to draw this building for a truly special addition to your repertoire.

In this section, we'll show you how to draw the Taj Mahal. You can draw it freehand while looking at your computer monitor, or you can print out this page to get a closer look at each step.

Advertisement

Here, we'll show you an illustration of each step and then give you a description of how to draw it. Follow the red lines in each illustration to learn exactly what to draw in that step. The lines drawn in previous steps are shown in gray.
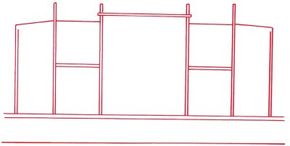
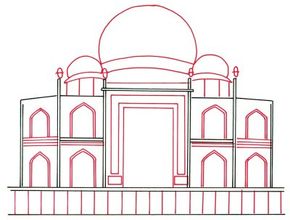
1. Outline

Draw a horizontal line on the bottom of the page. Add a double set of horizontal lines above it. Sketch six sets of double vertical lines perpendicular to the double horizontal lines. On the outer left- and right-hand sides, sketch slightly bent lines to connect the two sets of double vertical lines as shown.

Connect the middle two sets of double vertical lines with intersecting horizontal lines. Add two more horizontal lines to connect the tops of the remaining vertical lines. Draw a double set of horizontal lines on the rectangles as shown.

Advertisement

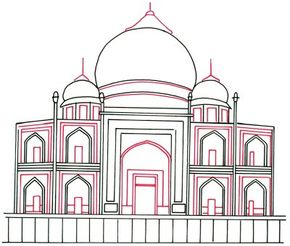
2. Domes

Add ovals to the tops of the four posts. Draw a horizontal line through the center of each oval. Sketch a slightly curved line connecting the two center ovals. Draw the center dome with a half-circle. Add a second curved line and a horizontal line underneath the center dome as shown.

Sketch a sideways V-shape on each side of the large dome. Add vertical lines underneath. Top each V-shape with a dome. Add arches with double curved lines and pointed tops. Use straight horizontal lines underneath some of the arches as shown. Detail the surface with vertical and horizontal straight lines and rectangles.

Advertisement

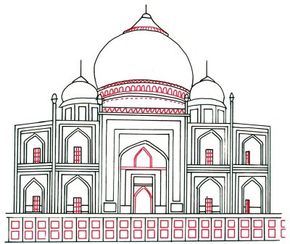
3. Arches

Cap the domes with odd-shaped V-figures. Add a half-circle to the top of the center dome. External a short vertical line from the top of each dome. Detail the surface with straight vertical and horizontal lines. Draw an arch for the doorway. Add a curved line to the top of the arch. Use straight vertical and horizontal lines for the door.

Advertisement

4. Details

Detail the center dome with curly and dashed lines. Begin the grillwork with straight vertical and horizontal lines that intersect. Draw a double arch over the doorway and two horizontal lines underneath it. Add an arched doorway with a curved line over the top of the arch. Detail the base with two squares in each rectangle.

Advertisement

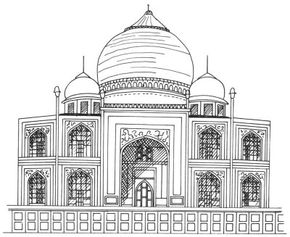
5. Shading

Shade the center dome with curved, straight and broken lines. Draw curly lines over all the arches. Shade the windows on the side domes with diagonal lines. Add a heavy black line to the bottom of each. Draw bars on all the arches that have grillwork with intersecting horizontal and vertical lines.

Shade these arches with crisscross lines. Use straight horizontal and vertical lines to finish the details on the doorway. Shade the upper left-hand half of the doorway with crisscross lines.

Advertisement

Your drawing is finished! Even if you don't get it right the first time, keep practicing until you're happy with your drawing.

Australia's Sydney Opera House is a uniquely beautiful structure. Learn how to draw the Sydney Opera House in the next section.

Advertisement

Advertisement

Loading...