How to Draw Archaeopteryx in 7 Steps

With its tail and feathers, Archaeopteryx is a dinosaur like no other. See more ­dinosaur pictures­.
Publications International, Ltd.

With its beautiful, colorful feathers, Archaeopteryx doesn't look like most dinosaurs. Show off your artistic skills and learn to draw this awesome dinosaur.

In this article, we'll show you how to draw this Archaeopteryx dinosaur. You can draw it freehand while looking at your computer monitor, or you can print out this page to get a closer look at each step.

Advertisement

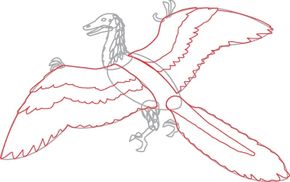
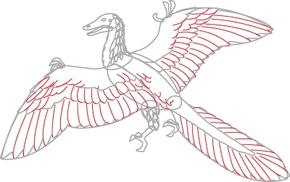
­ Here, we'll show you an illustration of each step and then give you a description of how to draw it. Follow the red lines in each illustration to learn exactly what to draw in that step. The lines drawn in previous steps are shown in gray.

Are you ready to get started? Head over to the next page for the first step.

Advertisement
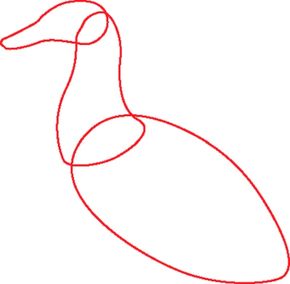
1. Draw the Head and Body

­

­Draw an egg shape leaning on its side to make the body. Make a sideways teardrop for the head. Connect the head and body with some curved lines to make the neck.

It looks more like a duck at this point than a dinosaur, but we'll fix that in the next step. Check it out on the next page.

Advertisement

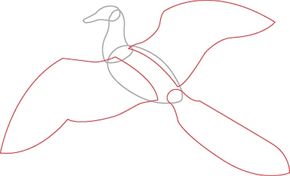
2. Draw the Wings

Draw two wing shapes spreading out from the body. Add the tail shape, which flairs out slightly from the body and ends with a soft point.

On the next page, we'll work on adding the claws and legs.

Advertisement

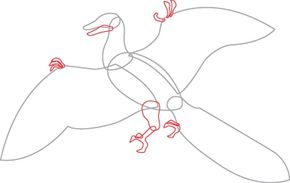
3. Add the Claws and Legs

­­

­Draw a small, narrow, rounded triangle for the lower jaw. Make three curved shapes at the front points of the wings for the talons. Make an upside-down pear for the thigh, and draw a claw shape at the end of it. Draw another claw for the back foot.

Advertisement

We'll work on adding feat­hers to the neck and legs in the next section.

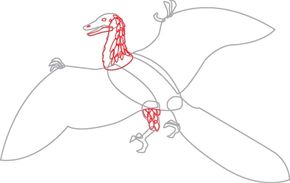
4. Add Feathers to the Head and Legs

­

­On the head, draw circles for the eye and ear. Add an oval for the nostril and a thin shape to give form to the mouth. Draw long, thin ovals for feathers along the back of the head and neck and on the thigh. Sketch over the neck front with a bumpy line to make more feather detail.

On the next page, we'll add feather outlines to the wings.

Advertisement

5. Draw Outlines of the Feathers

­

­Split the wing shapes into three long sections. Use curved lines to outline the feather details. Draw a long, pointed shape to make the tail features. Detail the outside edge of the tail with bumps to start the feathers.

We'll finish our work on the feathers in the next section.

Advertisement

6. Finish Drawing the Feathers

Finish off the feathers by drawing curved lines in the wings and around the tail.

We'll add the final touches to our drawing on the next page.

Advertisement

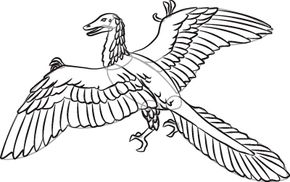
7. Add the Final Touches

Draw over the pencil lines you want to keep with a felt-tip pen, then erase the extra pencil lines.

Your dinosaur is finished! Even if you don't get it right the first time, keep practicing until you're happy with your drawing.

Advertisement

­ The Ouranosaurus dinosaur has strong muscles and a tall fin. Learn how to draw this dinosaur.


See all How to Draw articles.

Advertisement

Advertisement

Loading...