How to Draw a Rural Lane in 5 Steps

Draw a rural lane filled with trees, flowers, and a variety of plants in this heartwarming scene. Learn how to draw it in just five steps.
Publications International, Ltd.

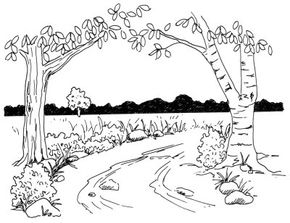
With a forest silhouette in the background and a canopy of trees in the foreground, this rural lane is a peaceful nature scene. This landscape is a wonderful drawing challenge for nature lovers.

In this article, we'll show you how to draw this rural lane landscape. You can draw it freehand while looking at your computer monitor, or you can print out the article to get a closer look at each step.

Advertisement

On each page, we'll show you an illustration of each step and then give you a description of how to draw it. Follow the red lines in each illustration to learn exactly what to draw in that step. The lines drawn in previous steps are shown in gray.

Ready to get started? It all begins with a horizontal line ...

Advertisement
1. Sketch the Horizon and Road

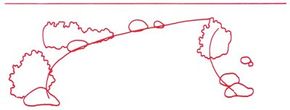
­L­ightly draw a horizon line just above the center of the page. Rough in two long, curving lines that come together somewhat for the outline of the road. Draw a few large ovals for rocks, placing them randomly along the sides of the road. Make three bushes with squiggly lines to define the roadway and distinguish it from the surrounding fields.

Advertisement

2. Fill in the Trees

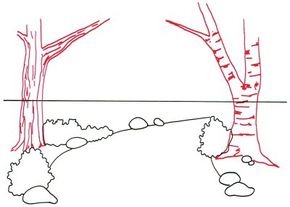
­Sketch a tree and branches on the left, with a tall main trunk. Show the bark on the side of the trunk with long up-and-down lines. Use short horizontal lines for the tree on the right, a birch, which has a smaller main trunk.

When filling in lines on the birch, notice that the lines are roughly horizontal, not vertical like the other tree's. These trees look pretty bare, so we'll give them leaves in the next step.

Advertisement

3. Add Leaves

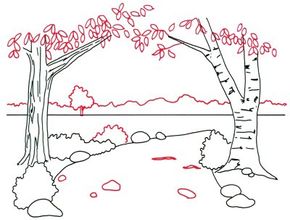
­D­raw a squiggly line across the page, just above the horizon line, to indicate the tops of distant trees. Add smaller branches to the trees with a few crooked lines.

Arrange dozens of leaves in random clumps by sketching shapes like teardrops. Place one more tree in the background and another bush by the roadway with squiggly, circular lines. Sketch several irregular oblong shapes on the road to look like rocks and stones.

Advertisement

4. Roughen the Roadway

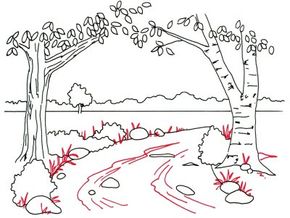
­Make a series of roughly parallel lines to look like ruts on the surface of the roadway. Sketch several clumps of tall grass at the edge of the road and around the bushes. Shape them like spikes: mostly upright, but a few are bent over.

We're almost finished! On the next page, we'll put the finishing touches on your rural lane landscape.

Advertisement

5. Add Shading

Heavily shade the area between the horizon and the top of the tree line. Add short, squiggly lines to the distant tree. Use the same method for the bushes along the roadway. Sketch a few very short lines to look like tufts of grass in the field. As the last step, lightly shade the rocks.

­Your landscape drawing is finished! Even if you don't get it right the first time, keep practicing until you're happy with your drawing.

Advertisement

A water pump has frozen over in the snow in the next scene. Learn how to draw this icy water pump in just five steps.

See all How to Draw articles.

Advertisement

Advertisement

Loading...